B2B Commerce
B2B Commerce is a B2B webshop managed within the tracezilla application. B2B Commerce is a sales channel where your customers can place orders directly into tracezilla. You can add sales agents to sell your products - without having access to other functions and data in tracezilla.
B2B Commerce is a commercial gateway for your customers to see an online product catalogue with photos and product specifications. The orders are based on price lists, service lines and SKUs created in tracezilla.
You can still create orders directly in tracezilla.
Documents between tracezilla users, such as orders and invoices, are exchanged directly through tracezilla EDI.
B2B Commerce is an Add-on. Read more in about pricing and plans.
Contact tracezilla support for specifics regarding URL and layout. Find contact info and opening hours at www.tracezilla.com
Connect B2B Commerce
- Click yuor company’s name in the upper right corner, and click Company settings in the drop-down menu.
- In the Extensions and Integrations-menu click Extensions.
- Enable the extension B2B E-Commerce.
When this is set, the tab B2B Commerce will be shown in the top menu of the application.
Products
When adding products to your B2B webshop, you can add single products, and you can add products covering multiple variants. E.g. different sizes of a shirt, or different quantities of a beverage - 1/2 L, 1 L, 1 1/2 L, etc.
Add Product
You can add a product without connecting a SKU. But the product will not appear on your B2B webshop until one or more SKUs are selected in the product setup.
All SKUs you wish to appear on your webshop must be added to the Product list. There are two ways of adding SKUs to your product list.
- Add products one by one.
- Add products as a bulk action - directly from you SKU list.
Add products one by one
- Click B2B Commerce in the top menu and select Products in the drop-down menu.
- Click Add product in the upper right corner.
-
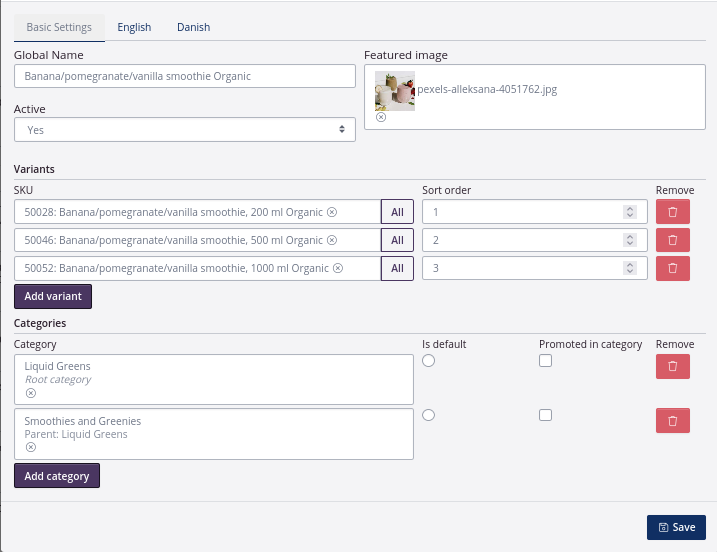
Enter the global name of the product.
-
A feature image can be added to products, if the file is attached to the SKU. The file format must be: jpeg, png, bmp, pdf, doc, docx, xlsx, xlsm, xls, csv, rtf, txt, odt, ods, html, xml.
- Add variants and Sort order. Please notice, that a variant must be an existing SKU in the application.
- Select the categories of the product. You can add a Root Category and Parent categories.
- You can enter Title, a Short description and a text of Content for each chosen language in the following tabs. This is done manually for each language.
Add products as a bulk action
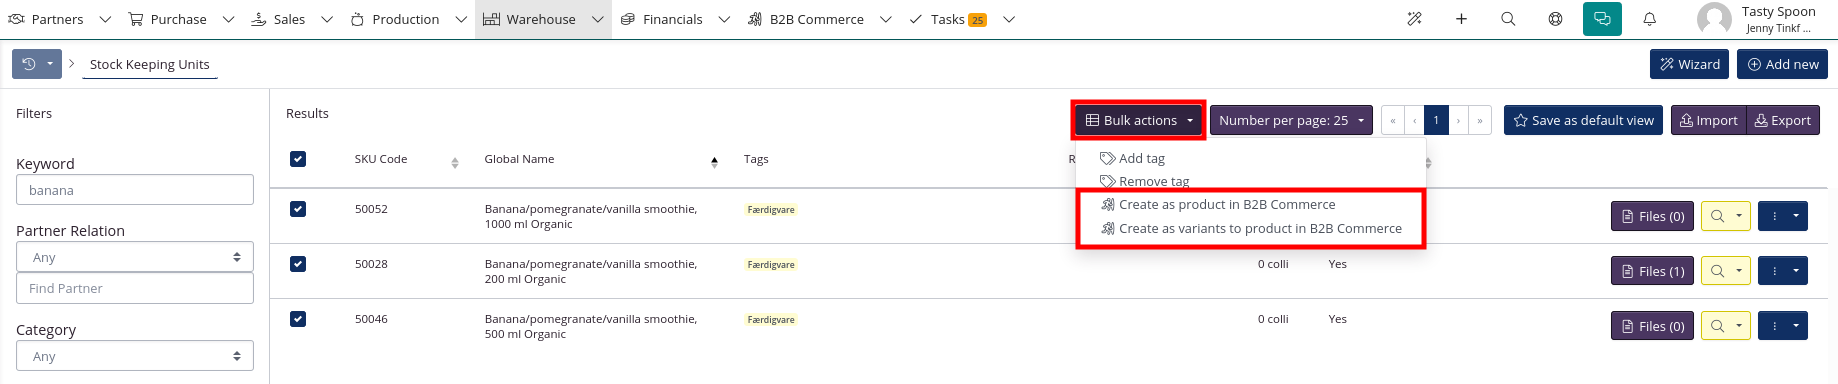
- Click Warehouse in the top menu, and Stock Keeping Units in the drop-down menu.
- Use the filters on the left, for finding the SKUs you wish to add to your B2B product list.
-
Tick the relevant SKUs.
-
Click Bulk actions and select how you want to add the SKUs. There are two options:
- Create as product in B2B Commerce
- Create as variants to product in B2B Commerce
Categories
You can select multiple categories for the same product, and it is possible to create several levels of categories.
Add category
- Click B2B Commerce in the top menu and select Categories in the drop-down menu.
- Click Create category in the upper right corner.
-
Enter the global name of the category.
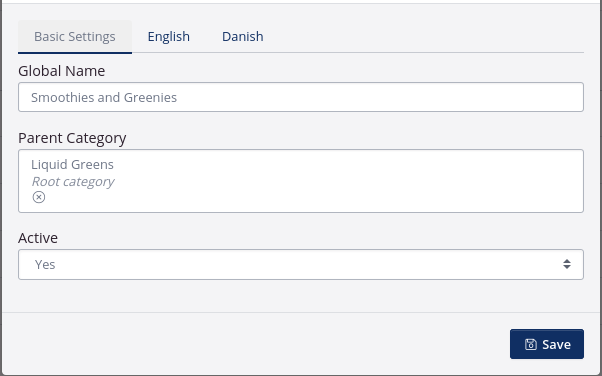
- If relevant, you can select Parent Category. You can enter a Root category or a Parent category.
- You can enter translations for each chosen language in the following tabs.
- Click Save.
Menu
The menu entries will appear as the main menu in your B2B webshop. When you add a menu entry you also select the Page you wish linked to your menu entry.
Add menu entry
- Click B2B Commerce in the top menu and click Menu in the drop-down menu.
- Click Add menu entry in the upper right corner
-
Enter the entry Title.
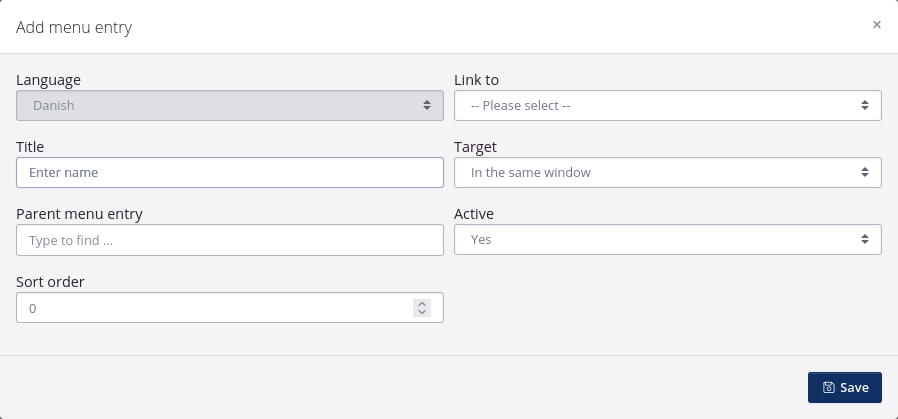
- If other menu entries have been created, it is possible to select a Parent menu entry. This can also be added later.
- Select sort order. This determins in which order the entry appears on your B2B webshop.
- In the field Link to, select what the menu entry links to in the drop-down menu. E.g. Front page, product catalogue, a page, and more.
- Select how the link is to be opened.
- Click Save.
Sales journeys
A sales journey is a tool for guiding your customers to specific product pages in your B2B webshop. By planning the customer’s path through the webshop, the customer experience is optimized.
Create Sales journey
- Click B2B Commerce in the top menu and select Sales journeys in the drop-down menu.
- Click Create Sales journey in the upper right corner.
- Enter the name of the sales journey.
- Add a Category. To select a category, the category must first be created in the category menu.
- You can enter an optional Title and Description.
- Select a Sequence number.
- Click Save
Users
A user is given customer access to your B2B webshop. With customer access it is possible for the user to create order drafts, add products to orders, and make a request for quotation and order confirmation.
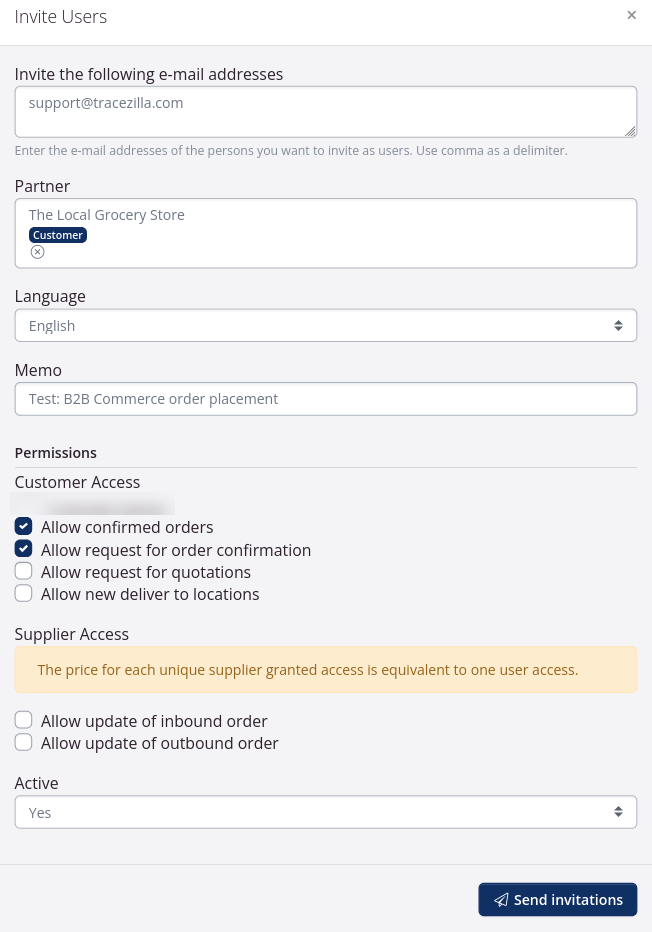
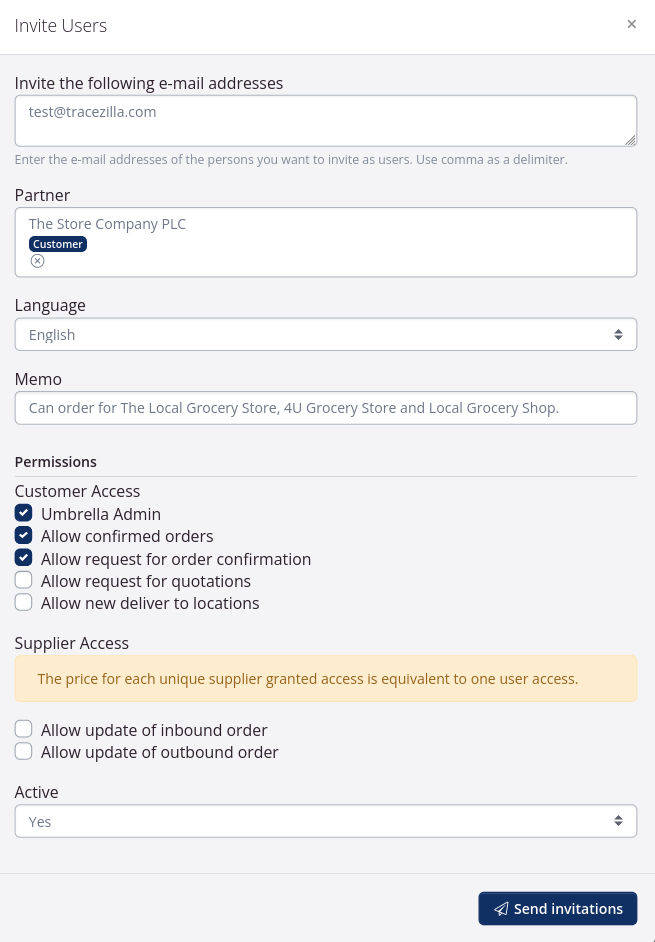
Invite Users
- Click B2B Commerce in the top menu and select Users in the drop-down menu.
- Click Invite Users in the upper right corner.
- Enter the e-mail addresses of the persons you want to invite as users. Use comma as a delimiter. The email addresses entered are linked to one company (partner).
- Select the Partner of the user. The partner must exist already in tracezilla. 5.Select Language
- Enter a Memo. The field can be used for describing a user’s role in the company.
- You can add a checkmark to several options before sending the invitation. If you are using B2B Commerce as a webshop, you can use the check boxes under the heading Customer access.
If a customer can send confirmed orders, the order will be created as an order immediately (not as a request), and you can find the order among your other open orders. You do not need to Confirm the sales order or send an order confirmation to the customer.
When a customer sends a Request for order confirmation, an order confirmation is automatically created when you confirm the order in tracezilla. A window will also automatically appear to send the order confirmation.
If a customer Requests a quote, the order will be created as a quote instead of an order. The document will be Quote instead of Order confirmation.
By allowing the customer to create new delivery locations themselves, the customer can add new delivery addresses and contact persons in addition to the locations that you have created for the partner.
- Click Send invitations
When the invitation is sent, the recipients will recieve an email containing a link to follow. When the user is set up, they will have access to your B2B webshop.
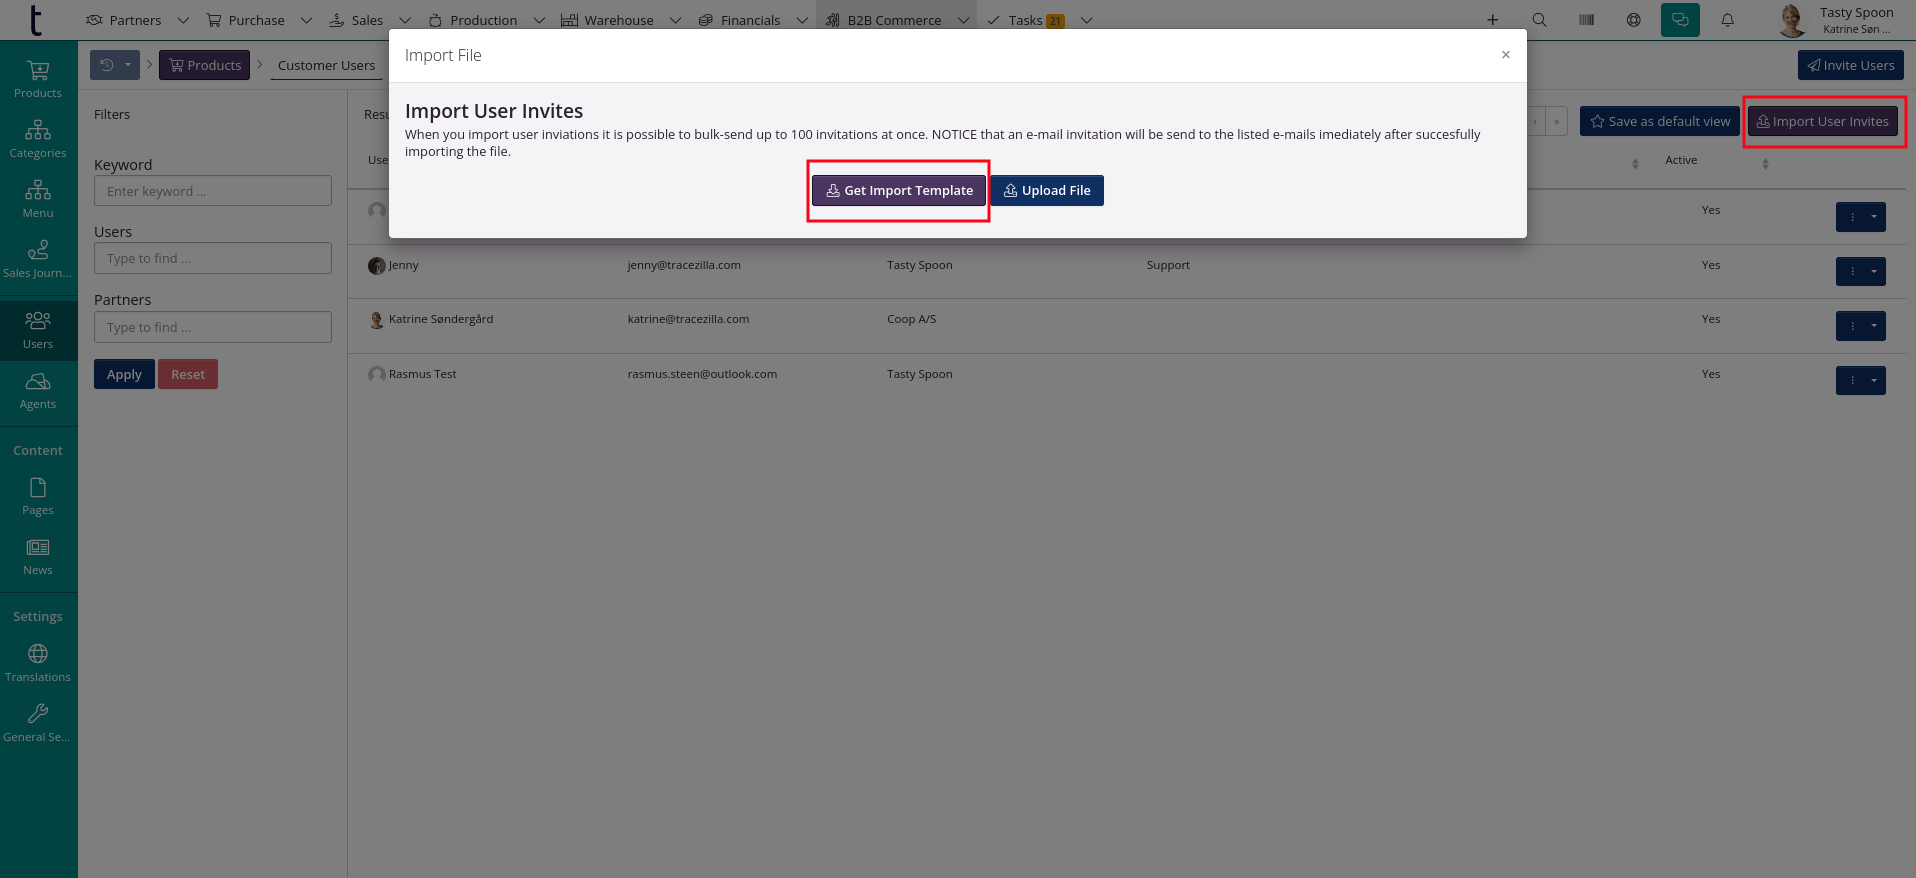
Invite users via import template
If you would like to invite many users to trade via B2B Commerce, there is an option to load the invitations via an Excel import template. You can invite up to 100 users at once with the import template.
To get the import template, click on Import User Invites and select Get Import Template.
Once you have completed the import template, you can upload it by clicking Import User Invites and selecting Upload File.
Please note, that upload of the file will not send the invitations. The invitation will automatically be send when the customer tries to log in by entering their email address on the B2B Commerce page.
Below the screenshot, you can get an overview of the columns in the import template.
| Column name | Explanation |
|---|---|
| User email address | |
| Customer | Partner name (the name of the customer as it is written in tracezilla) |
| Language | The language in which the invitation should be sent. The language must be activated under Company settings. |
| Memo | Internal memo that will appear on the user in the B2B Commerce backend |
| Allow Request for Order Confirmation | If the user must be able to order directly without first requesting a quote, type Yes. Otherwise No. The field must be filled in with either Yes or No |
| Allow Request for Quotation | If the user should be able to request a quote, type Yes. Otherwise No The field must be filled in with either Yes or No |
The umbrella administrator feature
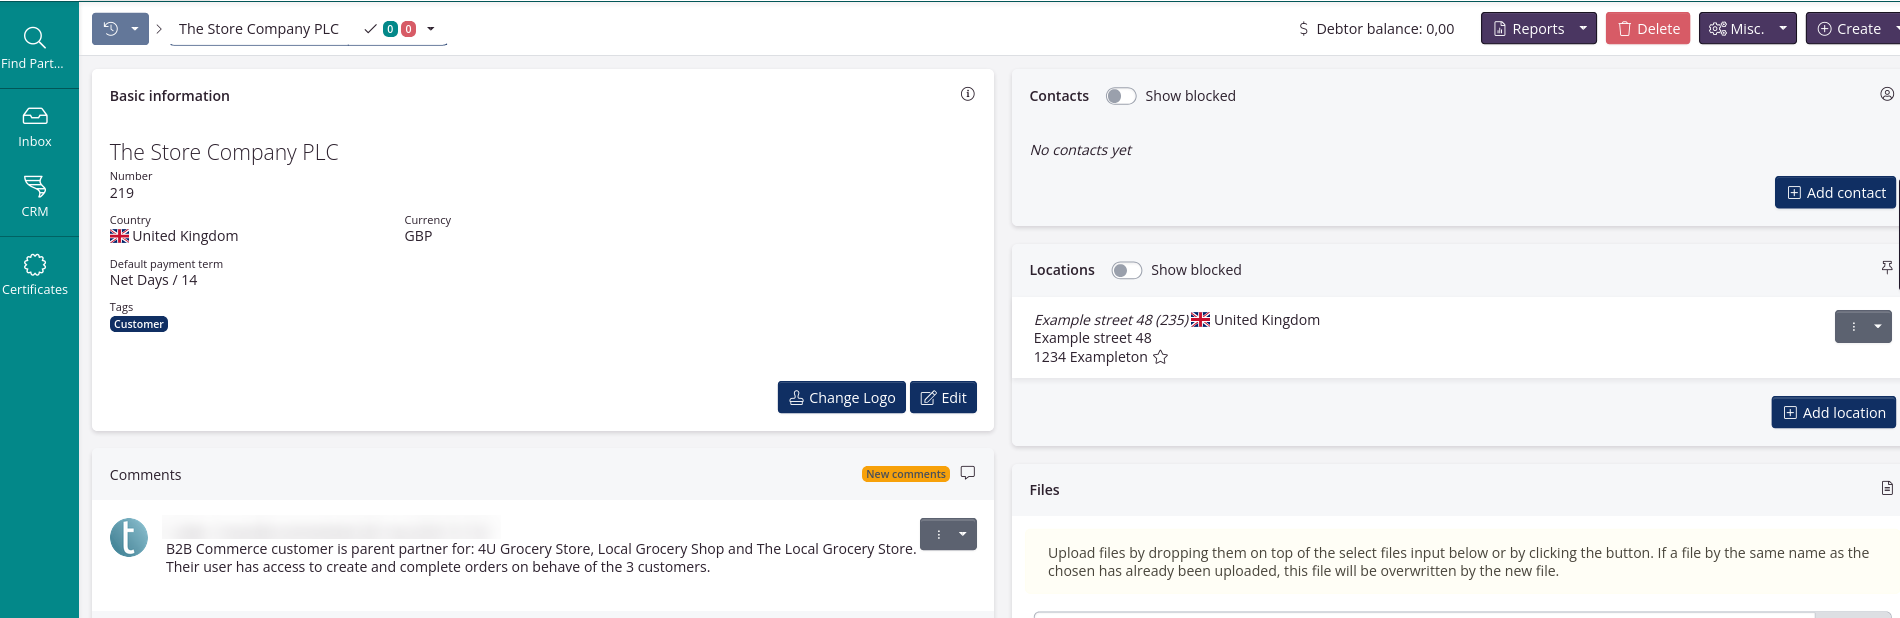
An umbrella administrator can access multiple customer pages, if the person, for example, needs to order for multiple stores in a chain. The umbrella administrator must be set as Parent partner for each store.
tracezilla support has special access to send an invitation to a user who needs access to order on behalf of multiple customer partners.
Contact us at support@tracezilla.com for help. Before doing so, please follow the steps below.
- Click Partners in the top menu.
- Click Create partner at the top right.
- Fill in Partner name with the name of the parent organization in the chain.
- Fill in the other relevant details - you can follow this tutorial.
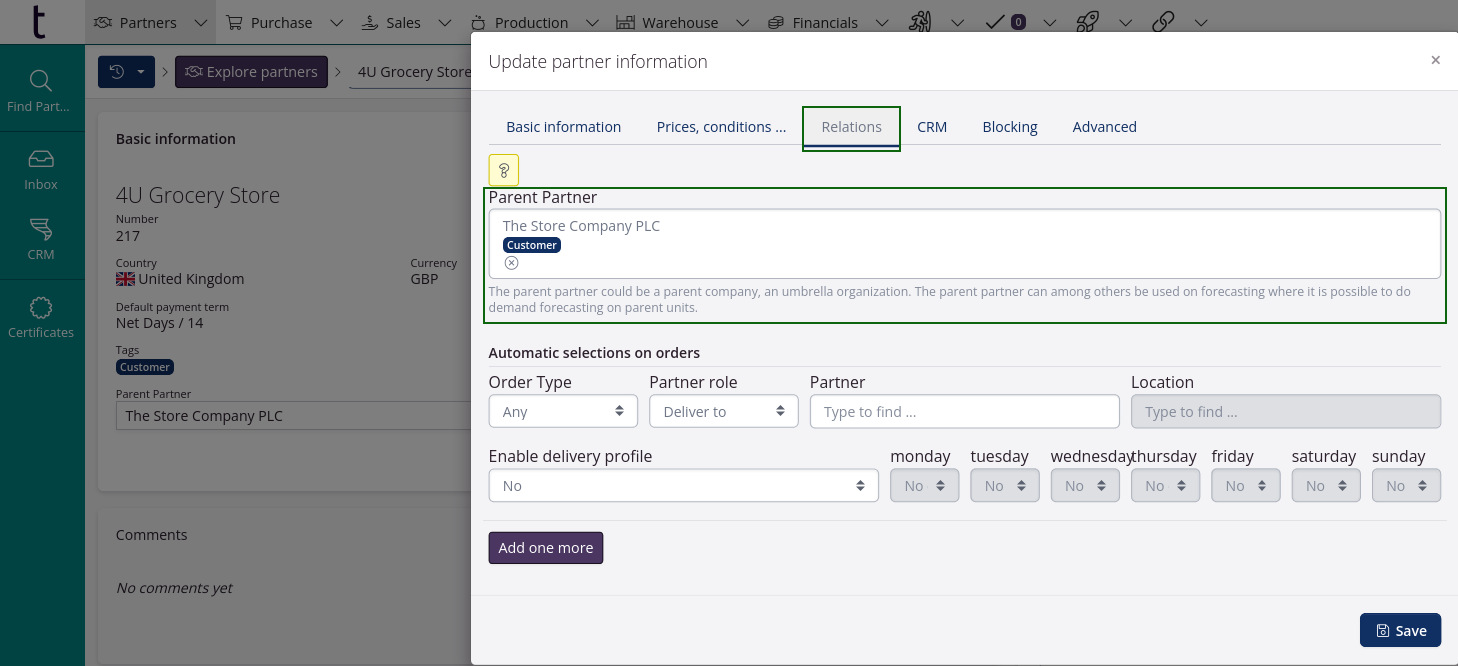
- Go to Partners in the top menu.
- Find one of the customers that the parent organization should be able to order for.
- Click the partner in the overview and then click Edit in the Basic information section.
- Go to the Relations tab. Enter the parent partner and click Save.
- Repeat for all relevant customers.
(https://www.tracezilla.com/da/vejledninger/partnere).
- Contact tracezilla support at e-mail support@tracezilla.com with information about:
- You want to send a user invitation where this user should be able to order on behalf of multiple customers using the umbrella feature.
- The email address that should receive the user invitation and that should have access to order on behalf of multiple people.
- Name of the partner that the user invitation should be linked to. This should be the partner name of the parent organization.
- Information about whether they should be able to place confirmed orders, request order confirmations, request quotes, and/or create multiple delivery locations.
tracezilla support will respond to your email and send the invitation for you.
Agents
By adding sales agents, you give the agents access to use B2B Commerce, without having access to other data in tracezilla. An agent can create sales journeys
Please note, that agents can only be added, if they are Company Members in your company account. Read more about company members here.
Add Agent / Customer Relationship
- Click B2B Commerce in the top menu,and select Agents in the drop-down menu.
- Click Add Agent / Customer Relationship In the upper right corner.
-
Select Agent in the drop-down menu.

- Select the Partner of the agent. The agent can also be added to a group of partners by tag. If an agent gets the tag Customer
- Enter a Memo. The field can be used for describing a user’s role or department in the company.
- By default the agents has permission to make requests for quotation and order confirmation. This can be limited by unticking the boxes for Permissions.
- Click Save.
Pages
In Pages you kan create the pages you want on your B2B webshop. E.g. a page with Terms and Conditions, Privacy Policy, Contact info, etc. When a page has been created it can be linked to a Menu entry.
Create Page
- Click B2B Commerce in the top menu, and select Pages in the drop-down menu.
- Click Create Page in the upper right corner.
-
Enter the Title of the page.
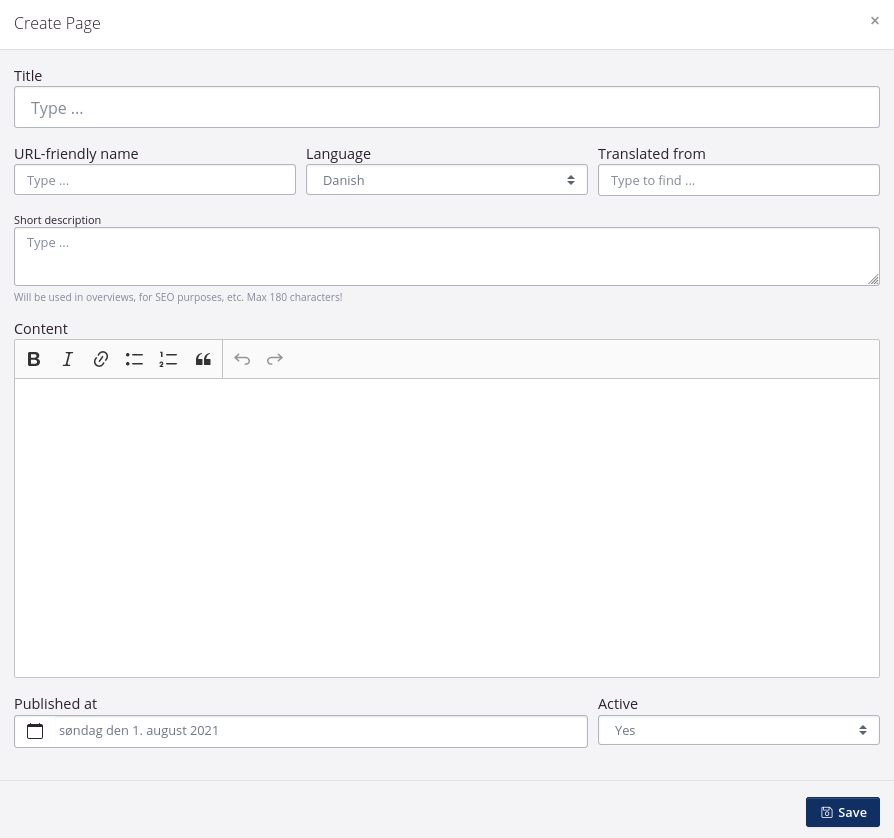
- Enter an URL-friendly name. The entered title will be set as default, if another name is not entered.
- Select Language.
- If you are creating a translation of a page, you can select the original in Translated from
- Enter a Short description. The description will be used in overviews, for SEO purposes, etc. You can enter a maximum of 180 characters.
- Enter the main Content of the page. You can use the simple editing options right above the field.
- Select a date in Published at.
- Click Save.
News
You can post news continuesly to your B2B Commerce webshop.
Add Article
- Click B2B Commerce in the top menu, and select News in the drop-down menu.
- Click Add Article in the upper right corner.
-
Enter the Title of the article.
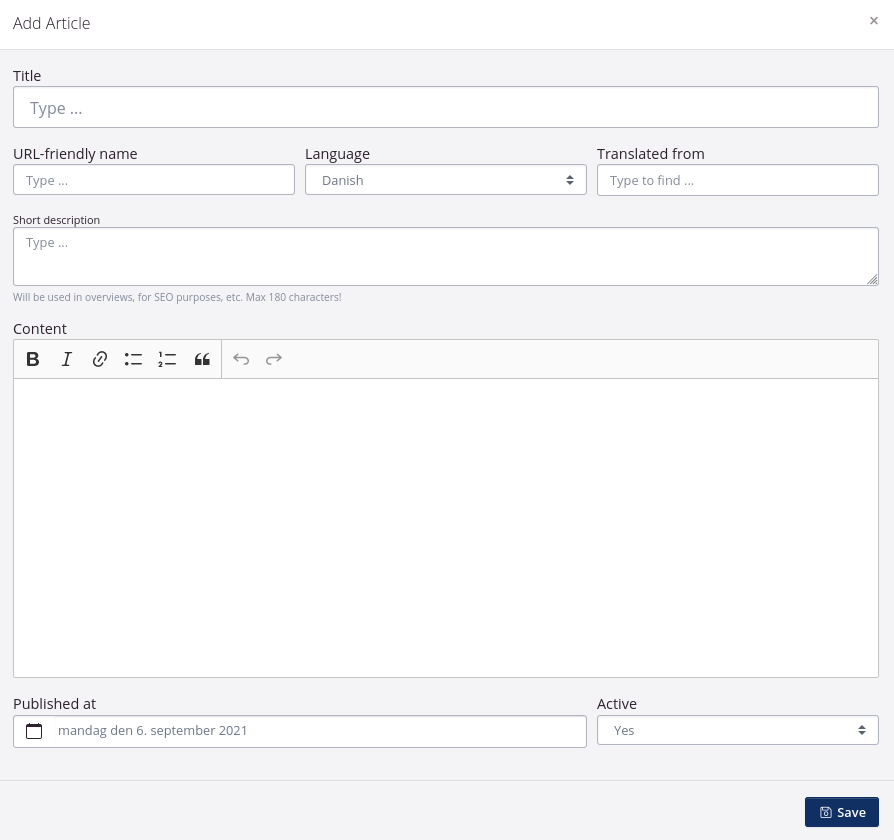
- Enter a URL-friendly name.The entered title will be set as default, if another name is not entered.
- Select Language.
- If you are translating an article, you can select the original in Translated from.
- Enter a Short description. The description will be used in overviews, for SEO purposes, etc. You can enter a maximum of 180 characters.
- Enter the main Content of the article. You can use the simple editing options right above the field.
- Select a date in Published at.
- Click Save.
Translations
In Translations you can enter and alter standard text on documents, and on your B2B webshop.
You can manually enter translations to any language selected in you Company settings.
- Click B2B Commerce in the top menu, and select translations in the drop-down menu.
- Use the filters on the left to find the text you wish to change.
- Click the pencil symbol on the right side by the the text you wish to edit.
- Enter the text of your choice.
- Click Save.
General Settings
Contact tracezilla Support to get your own customer interface.
In General Settings you can set up a color scheme for your B2B webshop. You can also manage your order settings, access settings and much more.
Languages
In Languages you can select the different languages you want for your B2B webshop. In this tab you can also link the Welcome Page for each chosen language. The Welcome Page must first be created in the Pages section.
Colors
Select your color scheme of choice for your B2B webshop. You can change the colors by clicking the individual colors in the two columns Color and ontrast color (typically for text).
Tip: If you already have a webpage with a specific color scheme, you can click the pipet symbol to copy the colors.
Order Settings
In this tab you can enter Required number of days for delivery, i.e. the minimum number of delivery days possible. Furthermore you can enter a deadline for placing orders, which determines from which day the number of delivery days counts. For example, if your company offers day-to-day delivery - if ordering before 2 p.m., the required number of days will be 1, and Time of last order of the day is 2 p.m. You can also specify which days of the week it is possible to select as delivery days.
Furthermore, when entering enter email addresses in the field CC all requests to these emails, all confirmation requests will be sent to these addresses. Remember to seperate by comma.
Access
Use a combinaton of partner- and SKU tags to restrict access to products shown on your B2B webshop.
Partners can only see products that has SKUs of the specified tags if the partner itself have the tag attached.
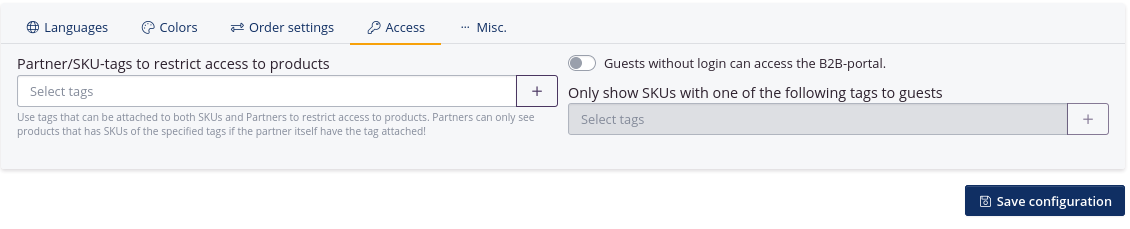
By default it is only customers with a login, who can see the contents of your B2B webshop. If you wish to give access to customers without a login, you can click the box Guest without login can access the B2B-portal.
If you want to limit the products accessible, you can enter tags of the products you want shown.
Guests without a login can only see your products. Not place orders.
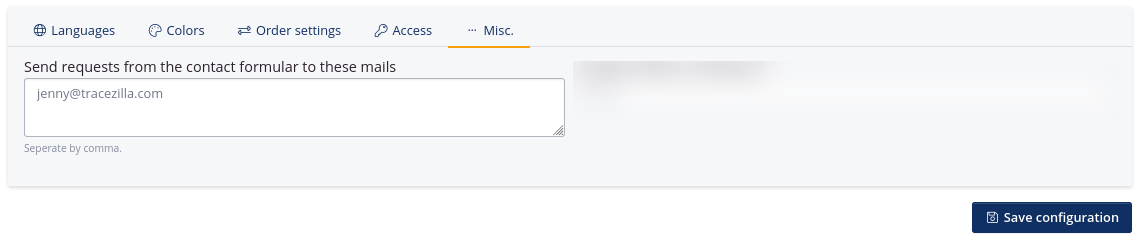
Misc.
If you want all the requests from the B2B contact formular sent to a specific email, you can enter the email address in the left field.
Good to know
- A B2B order draft is created automatically if a customer logs in to B2B Commerce and the customer only has one location registered.
- The pickup date on the sales order quotation will automatically be set based on the settings in the Order settings.