e-conomic integration
With tracezillas integration to e-conomic you can sync your customers, suppliers, SKUs and services.
In addition, you can create invoices in tracezilla, which are synchronized to e-conomic. Payment status can be fetched from e-conomic and synced to tracezilla.
The integration requires that you already have an account in e-conomic.
Step 1/8: Connect
Before connecting, we recommend that you are logged in to your e-conomic account at the same time, so tracezilla will be able connect immediately. You should have tracezilla and e-conomic open in different tabs in the same browser.
Please note that this requires superuser access to e-conomic.
- Click the Company name in the upper right corner. Select Company settings.
- Click Integrations.
- Click Visma e-conomic.
- Click the button Connect.
- Confirm by clicking Add app.
The integration is now connected and ready to configure in tracezilla.
Step 2/8: Partners
In tracezilla, the term ‘partners’ cover both suppliers and customers.
A partner can both be a supplier and a customer and you avoid having to two accounts for the same partner. Make sure the name of the supplier/customer is identical to be sure the partner is created as one in tracezilla.
You can give your partner a tag. The fields is autofilled with the tag ‘Customer’ and ‘Supplier’.
Select a default customer group and supplier group in e-conomic.
In the future, your partners will be syncronized every time you create a new partner in tracezilla and give them the Customer or Supplier (or both) tag. This means that customers will automatically be created in e-conomic and placed as default in the group you selected in this step. The same goes for the supplier. Afterwards you can place the customer or supplier in another group if relevant.
Step 3/8: SKUs and Services
When you create new Stock Keeping Units in tracezilla, they are automatically transferred to e-conomic. In the integration setup, you select the default product group in which your SKUs and services should be created in e-conomic when they are transferred from tracezilla. New products can then be moved to other product groups in e-conomic, if relevant.
When you implement tracezilla, you can choose to 1) Synchronize your SKUs from tracezilla, 2) Synchronize your products from e-conomic or 3) not synchronize already created products.
1) Synchronization of SKUs and services from tracezilla
In tracezilla, products are divided into physical products (Stock Keeping Units) and order lines that are not physical, but that you are invoiced for or invoice your customers for (services). In e-conomic, products and services are in the same overview, while they are divided in tracezilla.
If you have created SKUs in tracezilla before connecting tracezilla with e-conomic, you can transfer these SKUs by selecting Yes under Create SKUs and Services from tracezilla in e-conomic’.
2) Synchronization of products and services from e-conomic
Before you start setting up master data in your account in tracezilla, you can transfer existing data from e-conomic, which you can then update and “clean up”.
Select Yes under Load products from e-conomic and create them as SKUs and Services in tracezilla.
This will open a drop-down menu with your product groups from e-conomic. Specify which product groups should be transferred as services (such as freight and discounts) and which should be synchronized as SKUs (products).
The synchronization is done once by selecting Yes in this menu. You will then experience that the menu is automatically switched to No the next time you access the integration setup. After that, synchronization will take place from tracezilla continuously as you create and save SKUs and services.
If you create new products in e-conomic after the initial synchronization, they will not be transferred to tracezilla automatically.
3) No synchronization
You can choose not to synchronize SKUs and services. You can build up your master data in tracezilla, and then they will be transferred to e-conomic when you save them. If the SKU code is identical to an existing item number in e-conomic, a new product will not be created. The existing product will simply be updated.
Step 4/8: Accounting year
Select your accounting year from the dropdown menu. If you do not specify an accounting year in step 6/8: Expenses, tracezilla will use the year specified here.
Step 5/8: Sales
You can transfer the invoices you create in tracezilla to e-conomic in one of two ways:
- ‘Regular’ invoice in e-conomic
- Manual invoice (advanced settings for VAT)
You can also select No syncing.
Regular invoice in e-conomic:
You should create your invoices as a regular invoice unless you need to invoice advanced VAT. With this setup you can use the dashboard in e-conomic and e-conomics app integrations. The invoice number is fetched from e-conomic when creating the invoice in tracezilla. The invoice is booked automatically immediately after the creation of the invoice.
We recommend this setup.
Manual invoice:
If you need to set up advanced VAT settings, you create your invoices as manual invoices. This applies, for example, if you need to invoice differentiated VAT or if the company is VAT registered in several countries and you need to invoice VAT from these.
If you use the manual invoice, your invoices and inventory adjustment entries will be transferred using a General Ledger Journal to a journal in e-conomic, from which they will be booked.
You can create a new journal just for tracezilla entries in e-conomic. Afterwards, you can select it from the drop-down menu in the integration settings in tracezilla.
Custom invoice heading:
You can specify a header for the invoices that are synchronized to e-conomic. This can, for example, be the customer’s own order number if you specify it in the reference on the sales order.
Invoices are, of course, synchronized to e-conomic with the same invoice number that appears in tracezilla. This is just an option to enter an additional reference.
Insert the following into the field:
Invoice ref. {{ ext_ref }}
It is optional to fill in the field.
Use this journal in e-conomic for invoices and inventory regulations:
You can choose to create a new journal in e-conomic, which you call ‘tracezilla’ or you can use one of the existing journals.
Invoice layout in e-conomic:
Here you select the invoice layout you have created in e-conomic. You can select a layout specific to a currency as well.
The PDF cannot be transferred from tracezilla to e-conomic using the integration so it is essential that the variables in the layout in e-conomic matches the informations that you are able to see on the tracezilla invoice.
Guess invoice attachment when pulling payment status:
If you go to Sales > Invoices you will be able to pull a payment status from e-conomic. Then you will be able to see if an invoice is payed.
If a customer pays an invoice twice or the amount of money in a different way that doesn’t match the information indicated on the invoice, tracezilla will try to guess the connection by looking at the invoice number in the entry-text.
Step 6/8: Expenses
Accounting year
Select the current Accounting Year from the dropdown menu. tracezilla only shows the accounting years in the menu that have been created in e-conomic already.
When you have closed an accounting year in e-conomic and create a new, you need to change the accounting year in tracezilla as well in order for you to transfer the inventory value as inventory valuation adjustments to e-conomic for the new year.
Expenses workflow
It is optional to transfer expenses. This requires that you have enabled Actual Cost Pricing in the extensions. To do that, go to your Company settings and click Extensions.
You can set up your integration so that selected expenses will be transferred from e-conomic to tracezilla or vice versa. The aim is to make a good cost management by linking costs to specific lots or orders.
Select whether you want to transfer expenses from tracezilla to e-conomic or vice versa in the section In which direction should expenses be transferred?.
We reccomend that you transfer from e-conomic. Please contact tracezilla support by email support@tracezilla.com if you would like to transfer from tracezilla to e-conomic. This requires special setup and uploading of documents will incur a cost per document. Transfer from e-conomic to tracezilla is included in the regular subscription.
If you prefer, you can choose not to synchronize the expenses.
Whether you select the one or the other direction depends how you want to manage your expenses:
Transfer expenses from e-conomic to tracezilla
If you choose to pull your expenses from e-conomic to tracezilla, you create your expenses in e-conomic. This is the preferred setup for most companies because it follows the natural flow of posting of all other expenses in e-conomic.
We recommend that you put a note on the expense (or ask your supplier to refer to your purchase order number in their invoice) when you book it to make it easier to see what the expense concerns when you transfer it to tracezilla.
- Enter the date tracezilla is put into use in the field Pull expenses with posting date as of. This date should not be changed subsequently. When a new accounting year starts, you only change the Accounting Year changes, and then that will be the setting that applies for loading expenses.
- Enter the account numbers from the chart of accounts in e-conomic from which it will be relevant to match payments from in the various cost categories. Multiple account numbers in a cost category are separated by commas. The item purchase field is pre-filled.
- The synchronization from e-conomic to tracezilla takes place by clicking Fetch from e-conomic under Financial > Expenses.
Transfer expenses from tracezilla to e-conomic
If you choose to transfer expenses from tracezilla to a GL journal in e-conomic, you create your expenses in tracezilla. We recommend that you choose this setup if the person who posts GL entries in the accounting system does not have sufficient insight in the core business to know what the expenses concern. The disadvantage of this method is that it may not follow the general flow or any automization of posting expense entries in your company that you may have.
- Select the GL Journal you wish to tranfer the expenses to.
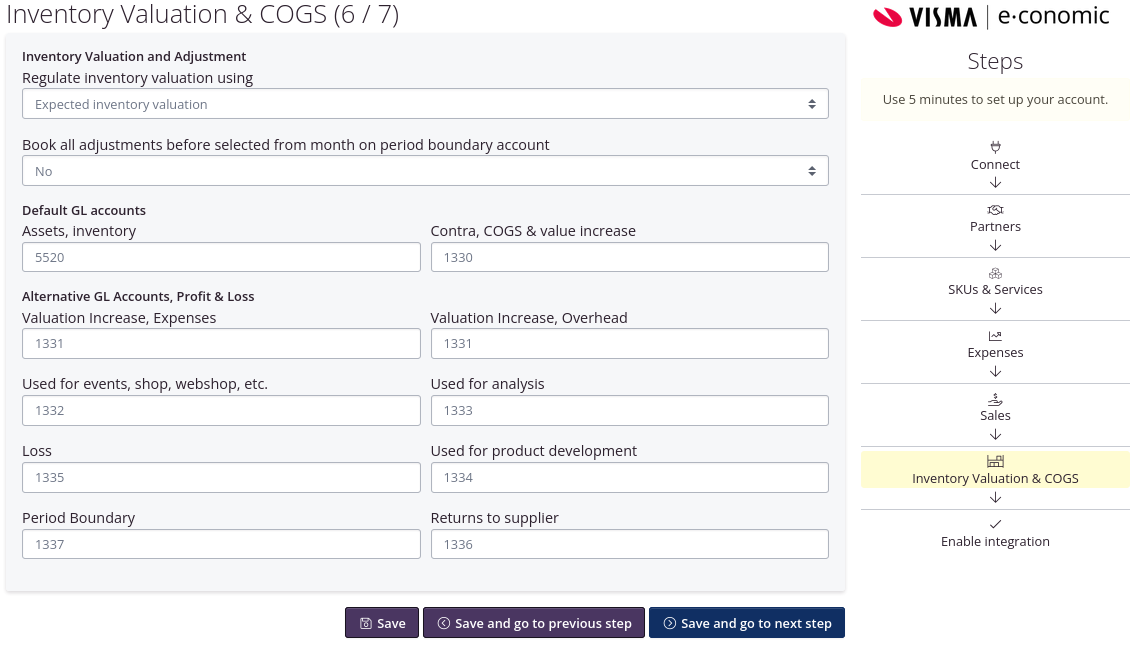
Step 7/8: Inventory Valuation and COGS
You can choose to use the expected or the actual inventory value when transfering the inventory value from tracezilla to e-conomic.
tracezilla use the expected inventory value as a default. If you want to use the actual inventory value, you need to enable Actual Cost Pricing. To do that, go to your Company settings and click Extensions.
Read more about expected and actual costs here.
Book all adjustments before selected from month on period boundary account
You can select that tracezilla does not post transactions on the accounts for Valuation Increase and COGS for periods (months) prior to the one(s) selected when the inventory value is transferred to e-conomic. Transactions that occur before the selected start month will be collected and booked on the Period Boundary account.
The inventory value in tracezilla is transferred to the selected journal in e-conomic (selected in step 5/7 Sales), so that it is ready to be booked to the relevant accounts.
If you use the e-conomic standard setup of accounts for companies, the fields for the standard financial accounts will be pre-filled: ‘Assets, inventory’: 5520 and ‘Contra, COGS & value increase’: 1330.
By filling in account numbers for alternative financial accounts, you get a more detailed inventory adjustment. If you have not created accounts for this in advance, they can be created with advantage.
PLEASE NOTE! Only the Assets, inventory account is in the balance. The other accounts should be placed under Direct costs. The VAT code is removed from these financial accounts.
| Account | Explanation |
|---|---|
| Valuation Increase (Expenses and Overhead) | The account is for activating the purchases that are booked in the operation. The account may not be used for booking supplier invoices. |
| Used for events, shop, webshop, etc. | Product consumption on the webshop, product samples for conferences etc. are accounted for here. It is important that the account is not used for anything else, and it is therefore a good idea to call the account “tracezilla …” |
| Used for analysis | The consumption of goods for analysis samples is accounted for here. |
| Loss | The value of goods that have gone out of stock in connection with stock-taking or registration of goods loss/discarded is accounted for here. |
| Used for product development | The consumption of goods for product development is accounted for here. |
| Period Boundary | If some of the inventory adjustments is registered on a date before tracezilla was implemented or outside the current accounting year, it will be account for here. |
| Returns to supplier | The value of the goods that have been sent back to the supplier is accounted for here. |
Read more about the inventory valuation here.
Step 8/8: Enable integration
Confirm that you want to enable the integration.