Recipes
Introduction to recipes in tracezilla
When manufacturing food products, a recipe is used. It can be compared to a Bill of Material (BOM), which is used in the production of products other than food.
In a recipe, you can put together the ingredients that go into the production of a given product. You can also add packaging, work flows and production costs.
In tracezilla, recipes make it easy to initiate production orders. When you add a finished good to a production order, the ingredients will automatically be added to the order in the corresponding quantities based on the recipe.
Furthermore, the recipes are used as documentation for the input-output mass balance report (certified goods). The purpose of the recipes is also to ensure correct cost price calculation - which applies if multiple end products are added to a production order.
Please note that it is not recommended to have multiple end products on one production order - this refers to a primary product and by-products. It is recommended to only have one finished product per production order for correct cost allocation and traceability.
Recipes are also used for forecasting, and the related features e.g. cost simulation.
Recipes are also a key feature in the calculation of nutritional values of finished products.
Worth knowing about automatic link to recipe
To link a recipe to a specific finished product (SKU), check the box Auto-Create and -Adjust Recipe when adding the end product to the recipe.
The box should not be checked for by-products added as end products.
When the finished product is added to a production order, the rest of the production order will be pre-filled. Always remember to make production registrations and select the specific batches of goods that are consumed for production.
NB! The recipe will only be added and quantities adjusted automatically to the production order when the order status is Draft.
How to create a new recipe
- Click Production in the top menu and select Recipes.
- Click + Add new in the upper right corner.
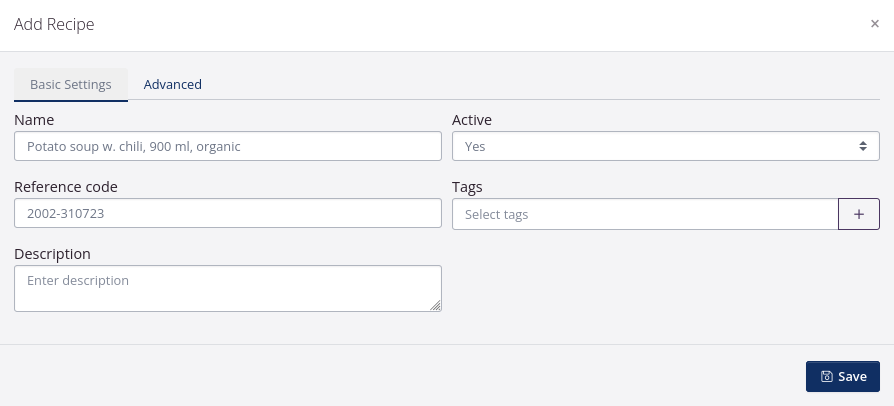
- Give your recipe a Name and a Reference code (could be the SKU code of the finished good).
- Enter a description (optional).
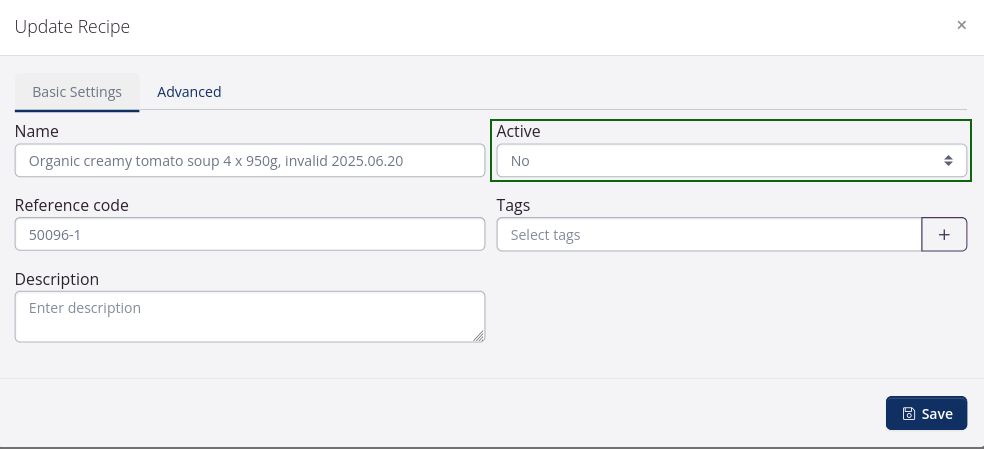
- When you create a recipe, it will be active. If you need to change or adjust the recipe at a later point, you can copy it and then you can inactive the previous recipe.
- Click Save.
Advanced settings
| Field | Explanation |
|---|---|
| Master resource | Use of this field requires the add-on Tasks and Controls. A master resource is a main resource that is used for the overall planning of productions in the weekly schedule. Examples of master resources are production lines where several different goods cannot be produced at the same time, which creates a need to plan and utilize the production capacity of the machine or production line. Specify the master resource here on which the end product of the recipe is always produced. If you enter anything in this field, you must also enter a number in either Number of units produced in an hour or Fixed number of minutes used per production. |
| Number of units produced in an hour | If you have specified a master resource, enter a number in this field or in Fixed minutes used per production. Indicate how many recipe units the master resource has the capacity to produce in an hour. This is used to estimate how long the total production of an end product will take, and can be seen in the weekly production schedule if you have purchased the add-on Tasks and Controls. |
| Fixed number of minutes used per production | If you have specified a master resource, enter a number in this field or in Number of units produced in an hour. Enter a number of minutes that it is expected to always take to produce the end product, regardless of how many units are produced. That is, it is expected to take the same amount of time to produce 10 recipe units as it does to produce 1000 recipe units. This is used to estimate how long the total production of an end product will take, and can be seen in the weekly production schedule if you have purchased the add-on Tasks and Controls. |
| Recipe replaced by | If you need to make some changes in a recipe, that has already been used for production orders, you should create a new recipe. If you create the new recipe before it is going into use, you can add the new recipe in this field at the basic informations on the former recipe. Use this field together with the field Replaced on productions with availability date from. |
| Replaced on productions with availability date from | Indicate the date for which a new recipe should replace the previous one. Use this field together with the field Recipe replaced by. |
| Preferred interval of recipe units | This feature is used with the forecasting tool. If relevant, enter how many recipe units would typically fit into a production order given e.g. the capacity of the production equipment. When production orders are created via the forecasting tool, they will be divided into sizes based on these intervals. |
| Reference ingredient | When a recipe is added to a production order, you can adjust the quantity of the individual ingredients. If you select that a specific ingredient is a reference ingredient and you change the quantity of this ingredient on the order, the quantities of the other ingredients will also be adjusted automatically when the production order has the status Draft. |
How to add end products to your recipe
- Click the button Add end product in the section One Recipe Unit Produces.
-
Select which SKU (Stock Keeping Unit) you wish to produce. If you have not yet created the end product as a SKU, you can read about SKUs here.
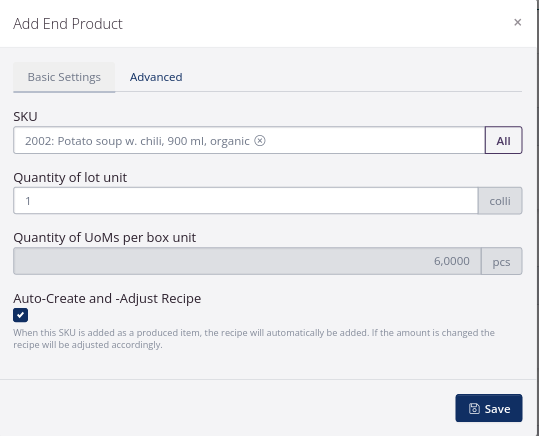
- Enter how many lot units one recipe unit should produce. This is typically e.g. 1 colli or 1 kg. You cannot break down your recipe unit to a half recipe when you produce, so we recommend that your recipe unit is a smaller unit that you can multiply when you produce.
- Enter the quantity of Units of Measure per lot unit.
- If you tick the box by Auto-Create and Adjust Recipe, the recipe will automatically be added, when the SKU is entered under Produced Lots in a production order. If the produced quantity is changed the recipe will be adjusted accordingly.
- Click Save.
You can add multiple end products to the same recipe. This could be relevant if the production results in one or more byproducts.
How to add ingredients to your recipe
- Click the button Add ingredients in the section One Recipe Unit Consumes.
-
Select the SKU (Stock Keeping Unit) you wish to add. Type part of the SKU name or the SKU code to select it. If you have not yet created the ingredient as a SKU, you can read about SKUs here.
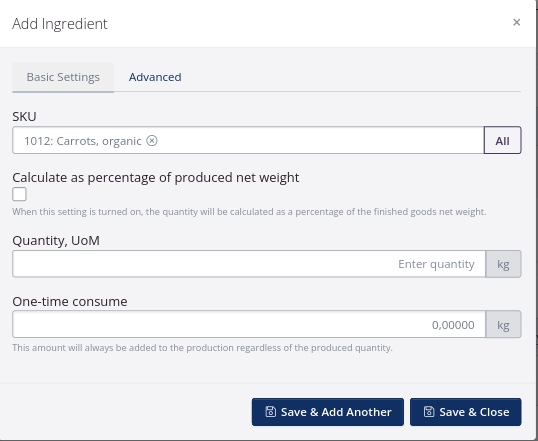
- Enter the quantity of the ingredient for one recipe unit. if you tick the box by Calculate as percentage of produced net weight you can enter the ingredient as a percentage of the end product.
- If you use a specific quantity of a SKU per production, which is not variable due to the quantity of end product, you can enter the fixed quantity in the field One-time consume.
-
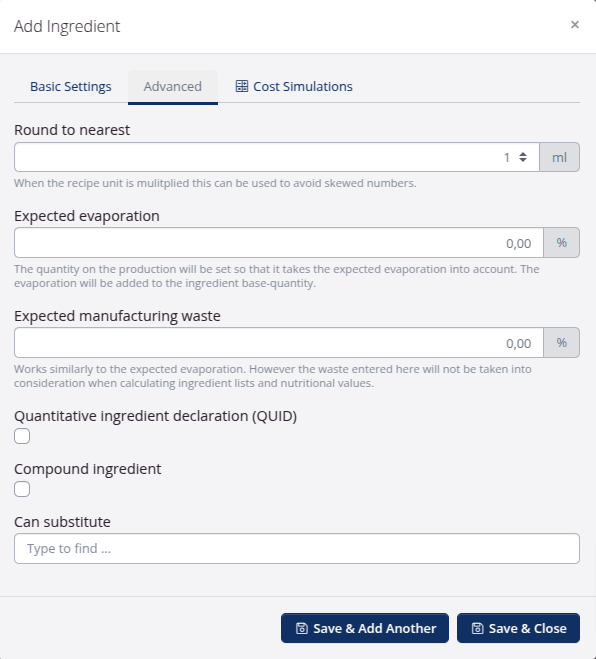
I the tab Advanced you can enter a quantity in Round to nearest. When the recipe unit is mulitplied this can be used to avoid skewed numbers.
-
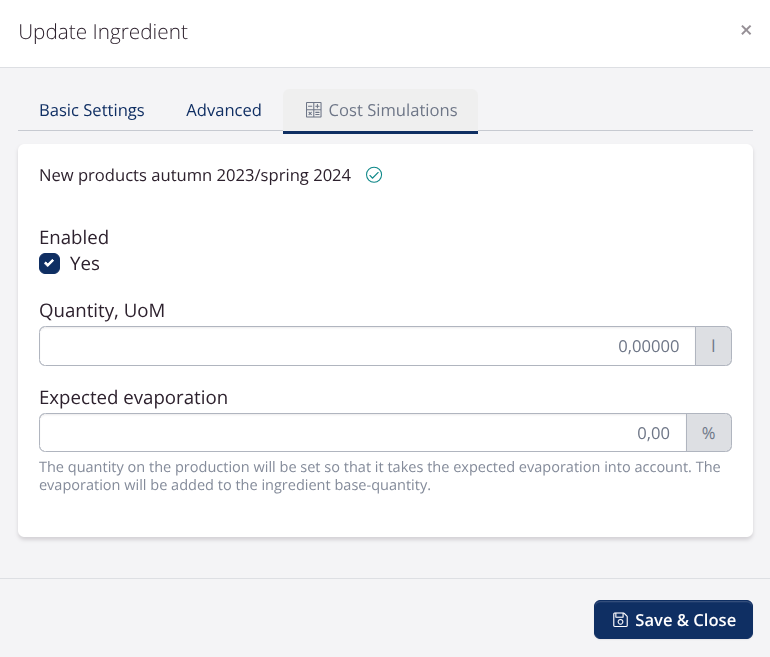
If there is an expected shrinkage during production, you can enter the percentage. The shrinkage will be added to the ingredient base-quantity. There can be different types of shrinkage; one-time consumption, expected evaporation and expected manufacturing waste. For all types of shrinkage, it applies that these are estimates based on knowledge of production, best possible estimates, etc. It will therefore typically not be the same for all the types of raw materials included in a production.
The three types of shrinkage differ from each other and each of them is defined as follows:
-
One-time consumption: Shrinkage in connection with production, for example that there are product residues in the production equipment after a production. It will typically be a (more or less) constant quantity, independent of the size of the production. The one-time consumption of a stock keeping unit is added to the registered quantity of the product type in the recipe. The one-time consumption is not included in any nutritional calculation.
-
Expected evaporation: Evaporation of water - i.e. the total mass is reduced, but the amount of nutrients is constant. This type of shrinkage is good for handling evaporation when, for example, baking, boiling and long-term storage of spirit products. Expected evaporation for a product type is given as a percentage, and the amount is added to the recorded amount of the product type in the recipe. The added quantity as a result of evaporation is included in any nutrient calculation.
-
**Expected manufacturing waste**: Shrinkage of product either on the consumed or produced side - i.e. it is the entire stock keeping unit, part of which disappears in connection with production, and the amount of loss will increase with the size of the production. It can, for example, be defective packaging on semi-finished elements for a gift basket or if during production, product is spilled on the floor in an amount that depends on the total production size. The production waste can therefore either be varied from product type to product type or be the same for all products. The function is used to register production waste during production. Expected production waste for a stock keeping unit is given as a percentage, and the quantity is added to the registered amount of the stock keeping unit in the recipe. The added quantity as a result of production waste is not included in any nutrient calculation.
- You can enter a SKU substitute. This field is only for storing information. The system will not select or suggest substitutes automatically.
- Click Save.
You can also add packaging to the recipe using the same features as for adding ingredients.
Cost Price Simulations
If you have the Power Pack, you also have the Cost Simulations tab. With cost price simulations, you can simulate the effect of changes in raw material prices or quantity changes in recipes on cost prices. Read more here.
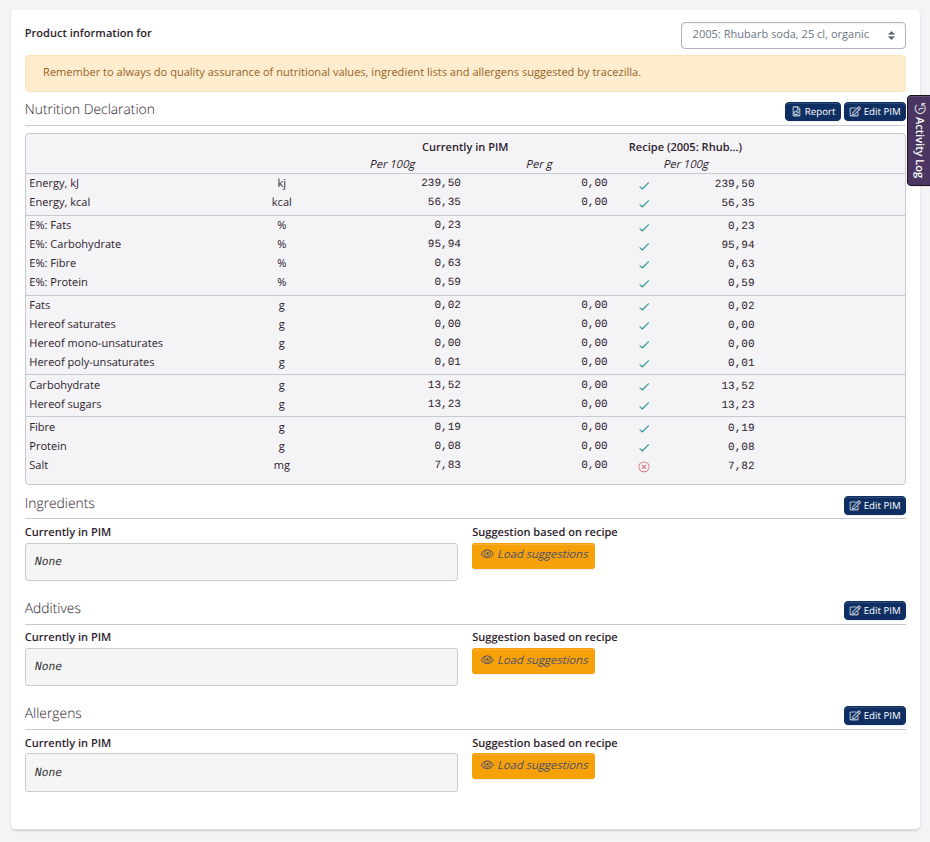
Nutritional calculations and ingredient lists
On the right side you will find a PIM section where you can enable nutritional calculations and other PIM values. Read more in this tutorial.
Add workflow to your recipe
You can add workflows to your recipe. The workflows are not automatically included in documents.
You can set up a custom document in HTML by purchasing the Power Pack. Alternatively, you can use workflows in combination with the Tasks and Controls add-on module.
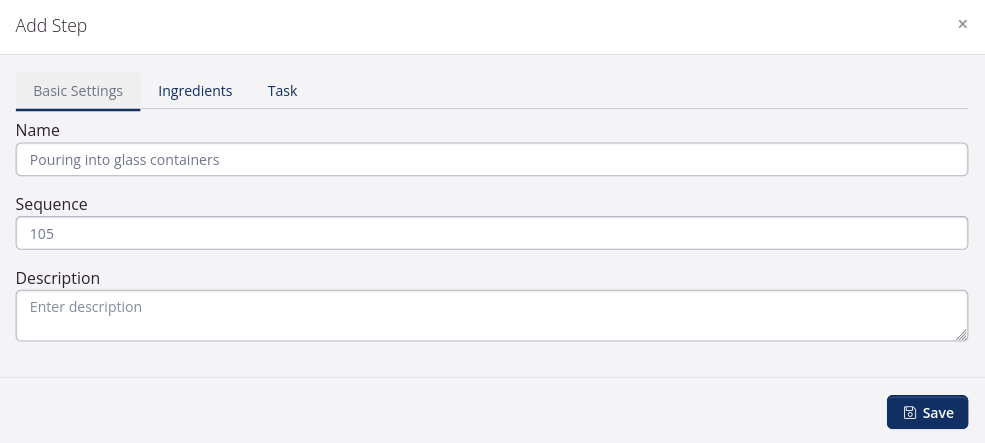
- Click Add step.
- Add a Name of the step.
- Enter a sequence no. The sequence no. determines the order of the different steps. It is sorted alphanumerically.
- Enter a Description (optional).
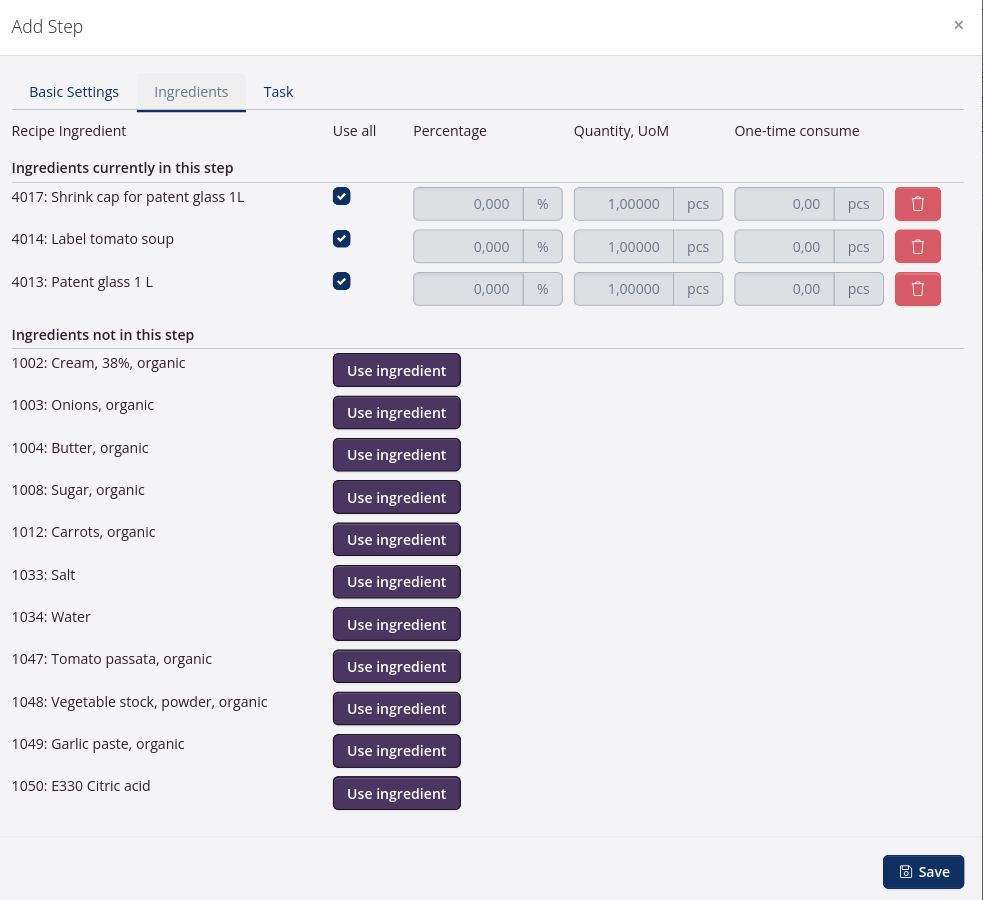
- You can add the ingredients that will be used in each process step to your workflows. When you click Use ingredient, the full quantity will automatically be used unless you remove the checkmark in Use all. You then have the option to enter a percentage consumption, an absolute quantiy per recipe unit, or a one-time consumption for the production.
- Enter the Expected duration in minutes.
- Select a Task. This requires the add-on Tasks and Controls.
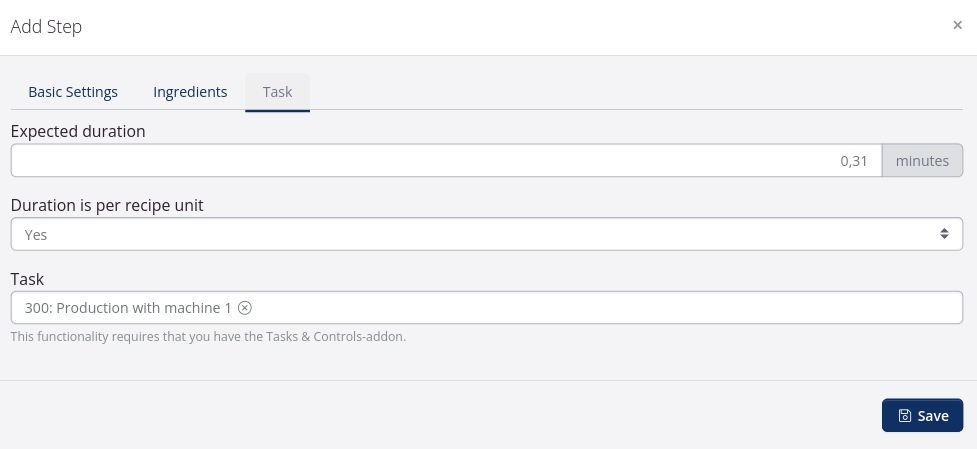
- Click Save.
How to add expected costs and overheads to your recipe
You can add expected costs to your recipe. This could be production costs for production by an external producer or freight to and from the production site.
You are not supposed to add expected costs for the SKUs that are part of the recipe (e.g. if you included the packaging in your recipe). These costs are already included in the calculation.
- Click Add budget post.
-
Enter a Memo and select a Category in the drop-down.
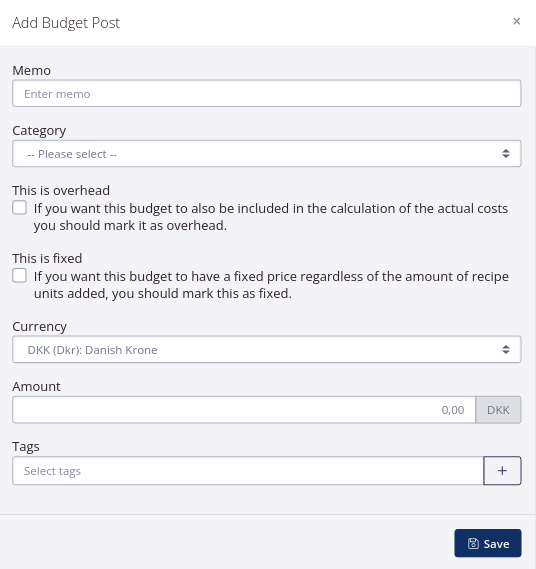
- If you want to include the amount as an overhead in the actual costs, tick the box This is overhead. This would be relevant if you produce in-house and you want to include the costs of the production in the (depreciation of material, cleaning of material before/after, startup costs, labour costs, etc.).
- If the amount is a one time amount, e.g. freight, tick the box This is fixed. If you tick the box, the amount will only be included once, no matter how many recipe units you produce.
- Enter the cost per recipe unit. The amount will be included per recipe unit.
- You can choose to add one or more tags.
- Click Save.
Recipe versioning
If you need to change a recipe, you should check: Has the recipe been used on production orders? You can see this, for example, by going to Production > Production & Yield (the report). Use the Recipe filter on the left to search for the specific recipe and see if any results appear in the report.
If yes, it has been used: Then a copy of the recipe must be made, which is a new version.
If no, it has not been used: You can edit the recipe directly without any consequences.
Purpose of recipe versioning
Changes to recipes will not change production orders retrospectively, but they do have an effect on the results in your production reports, organic accounts and other balance reports and can have a consequence for the cost price calculation.
This is because the recipe that is linked to the produced SKU is compared to the production order. If changes are made to an existing recipe, the basis for comparison is changed, and therefore deviations occur in the reports.
When you have changes to a recipe, you should instead create a copy of the recipe and link the new version to the SKU. Then tracezilla can distinguish that it is the first recipe that has been used until the recipe has been changed, and then the orders are compared with the recipe that has actually been used, so you avoid “false” deviations.
Procedure
- Go to Production in the top menu. Click Recipes.
- Search for the recipe you want to make a new version of. Use the filters on the left.
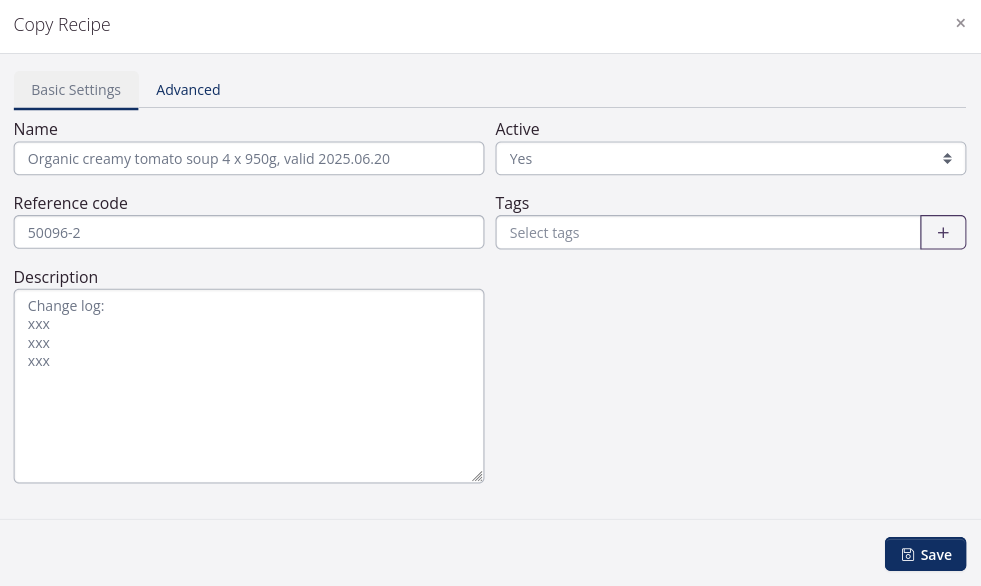
- Click the blue action button next to the recipe and select Copy.

- The recipe must have a unique name and a unique reference code. Feel free to add a date of validity to the name and a version number to the reference code. This provides a good overview over time.
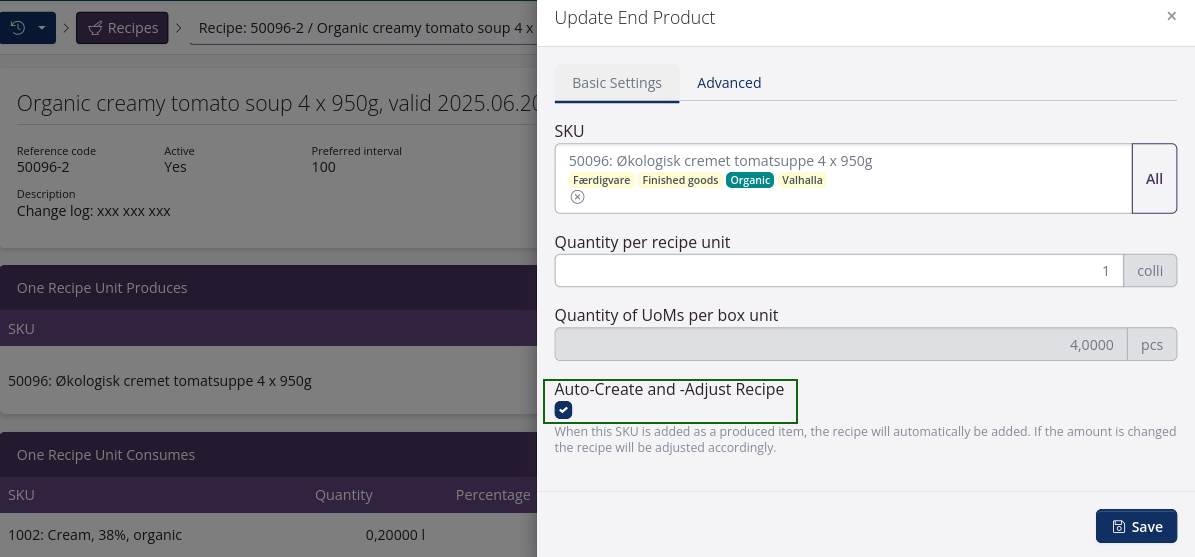
- You can then make the desired changes to the new recipe and ensure that the new recipe is linked to the end product by checking the box Auto-Create and -Adjust Recipe (click the end product in the recipe to bring up a dialog window where the check mark can be set).
- You should update the old recipe to be inactive, and you may consider noting the date of inactivation in the recipe name or in the description.
In the overview you can easily search for previous recipe versions. You can also hide all inactive recipes using the filter to the left of the overview Active: yes, which you can save as the default view.
