Sales order
To sell goods to a customer, you need to create a sales order. To view your sales orders, click Sales in the top menu and select Orders.
Create order header
- Click Sales in the top menu and select Orders from either the drop-down menu or the side menu.
- Click Create Sales Order at the top right.
- Start by filling in the order header. See an explanation of each field below.
- Click Save.
| Field name | Explanation |
|---|---|
| Order Details | |
| Customer | Select the partner to whom the goods are sold. You can create a new partner by clicking +. |
| Invoice to | By ticking Invoice should be sent to partner other than customer, you can select another partner as invoice recipient. This may be relevant if the customer is a store, but the invoice must be sent to the parent organization. It is often seen, for example, in retail. |
| Order date | The order date is automatically pre-filled with today’s date. The order date is the date on which the customer has ordered the goods, ie. the date the order is created. |
| Currency | The field is pre-filled based on the selected currency in the partner’s settings. You can also select another currency from the list. You search the list by, for example, typing EUR on your keyboard. |
| Exchange rate | Check that the exchange rate is correct. The exchange rate is obtained from the European Central Bank. |
| Requisition No. | Here you can enter the customer’s order number or another important reference, which must appear on documents. You can search for the reference number in the order overview. |
| Payment term | The field is pre-filled based on the selected condition in the partner’s settings. If you select Net 14 days, the customer has 14 days from the date the invoice is issued for payment to be due. |
| Who owns this order | The field is automatically pre-filled based on your order settings. This is the user who is the contact person from your company. |
| Contact | The field is pre-filled based on the selected contact in the partner’s settings. You can create a new contact by clicking +. If an email address is specified on the contact, the contact can receive documents. |
| Status | Select whether the order is a quote, a draft or an order. Typically, the draft status is used to indicate that the order has not yet been completed. |
| Delivery Details | |
| Deliver to partner | Select the partner and location (address) the goods are transported to. |
| Pickup from partner | Select the partner and location (address/warehouse) the goods are picked from. |
| Forwarder | Choose the company that is responsible for the shipping of the goods, if you do not ship the goods yourself or the customer picks up the goods. |
| Delivery date | Select or enter the date on which the goods are delivered/received at the delivery address. |
| Delivery term | Select a delivery condition according to Inco terms. |
| Pickup date | Select the date on which the goods are picked from the warehouse. |
| Remarks | |
| Remarks | You have the option to add remarks to the order. These will appear on order documents. |
| Internal comment | If you add a comment here, it will only be visible in the application. The customer will not be able to see the comment. |
| Tags | You can add an internal tag, which can be used to sort out orders in the same category. |
Add lots to the sales order
- On the tab Sold lots, you can add the goods to be sold.
- Click Add lot line
- In the drop-down menu, select how you want to select the stock keeping unit.
- Acitve SKUs: choose between all stock keeping units that are active (not blocked) and that are allowed for sales orders.
- Has partner relation: If you have set up a relation on a SKU to a partner, you can view a list of the SKUs that you usually sell to this customer.
- With partner prices: If you have created a price list specifically for this customer, you can view a list of the SKUs where a price has been entered.
- Select quantity of units to be on the sales order.
- Enter the sales price per unit. If you have created a price list and linked it to the customer, then the price will be filled in automatically.
- Click Save and add the next lot. Otherwise, click Close Window.
Add service lines
Service lines are lines on the order that the customer is to be invoiced for, but which are not physical objects or something that are kept in stock e.g. booklets/flyers.
Service lines can be discount or transportation costs.
- Go to the tab Service Lines.
- Click Create Service Line.
- You can select an already created service in the Predefined service field or fill in the fields manually. Read more here.
- Check that the fields are filled in correctly and click Save.
Select lots
- Go to the tab Sold lots.
- Tick the left side so that all the lot lines are selected.
- Click Suggest lots. The system will now suggest some batches/lots based on the expiration date (alternatively purchase/production date based on FIFO).
- You can then check the selected lots by clicking Select lots.
- In the new overview: Click + on the left side next to the SKU code so that the line unfolds. If there is goods available, you will now be able to fill in the field on the right with the quantity you need.
- Click Save at the top.
- Click Go to order (or you can choose to print a picking list first).
Create delivery note, order confirmation and invoice
- Once you have physically picked the lots and the lots are transported, click Dispatch order in the top right corner. Read more about Deliveries.
- You can create a delivery note by clicking on Delivery note in the yellow section Quick Access to Documents.
- You can also create an order confirmation in the Quick Access to Documents section. Alternatively, go to the Documents tab.
- To create an invoice, click Create Invoice in the upper right corner. You can follow the instructions here to fill in the fields.
Bulk actions
Once you have created one or more sales orders, they will appear in the order overview Sales > Orders.
You can tick the box next to each of the sales orders and make actions that affect all the selected orders. This feature is called Bulk actions.
- Use the filters on the left to search for the relevant sales orders.
- Tick the box next to the relevant orders.
- Click Bulk actions above the lines.
- Select the desired action e.g. Print Order Delivery Notes. This can be useful, for example, if you need to print delivery notes for the orders that need to be picked and packed on a specific date.
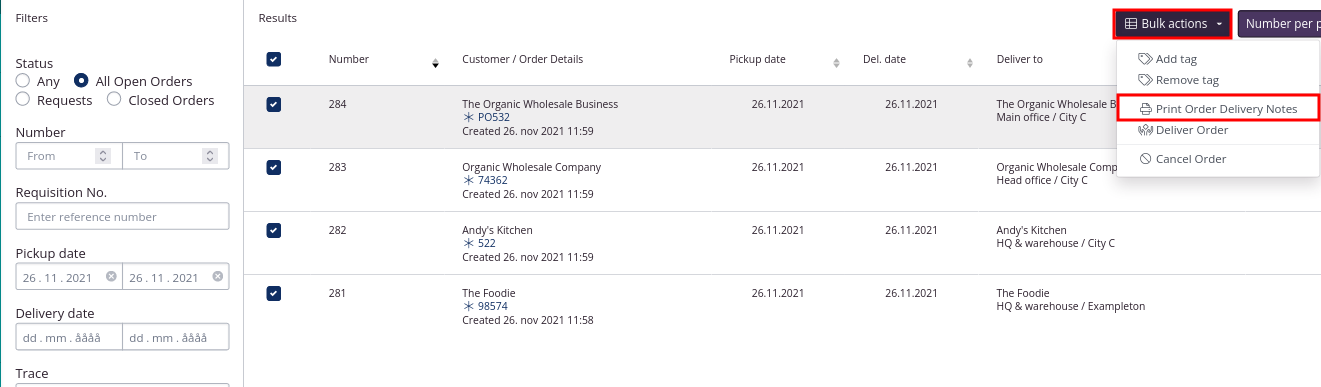
Please note that an order delivery note contains both picked lots, non-picked lot lines and service lines.
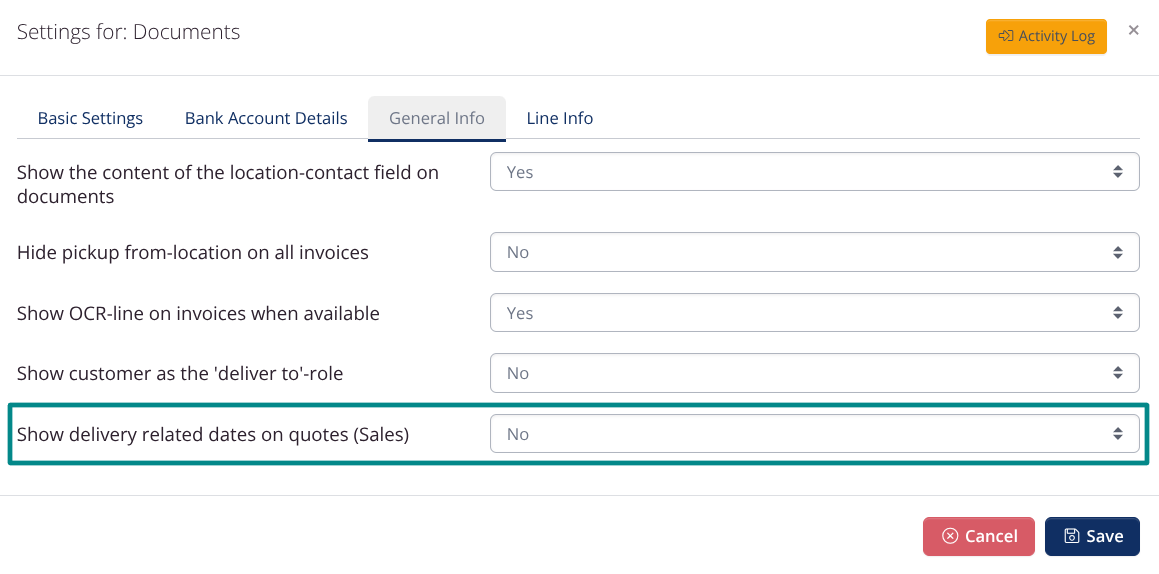
Hide delivery-related dates on quotes
You have the option to hide delivery-related dates on sales quotes. You can find the setting in Company Settings > Documents and Templates > General Info > Show Delivery-related Dates on Quotes (Sales).