Purchase order
To add goods to your inventory, you create a purchase order and add the goods to the purchase order. When you add goods, they are created as lots that are key to ensure traceability of your goods through out the supply chain.
If the goods are delivered directly from your supplier to your customer, you can learn more about direct shipping here.
In the company settings, you can set some default settings for your orders.
Create purchase order
To create a purchase order, you start by filling in informations in the order header.
- Click Purchase in the top menu, and select Orders.
- Click Create Purchase Order in the upper right corner.
- Fill in the fields on the tab Order details. Follow the instructions below in the table.
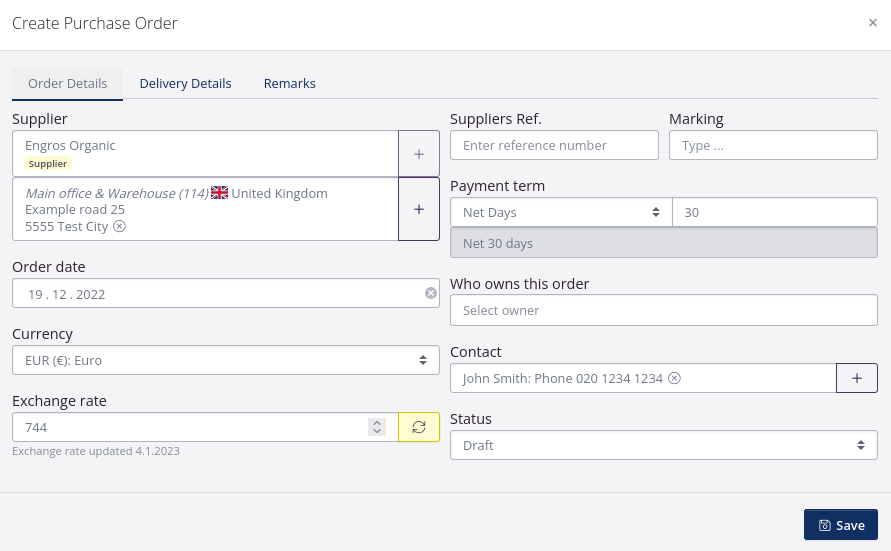
Order Details
| Field | Explanation |
|---|---|
| Supplier | Select the partner who is the supplier. A drop-down menu will appear if you click in the typing field. You can start typing the name of the partner and suggestions will appear as you type. If you have not created the partner yet, you can click the + and create the partner. Indicate the suppliers location as well e.g. the address. |
| Order date | The Order date is the date the order was placed. The date is auto filled with the date the order is created in the tracezilla application. You can overwrite the date if you ordered the goods from the supplier some other date. |
| Currency | Select the Currency from the drop-down menu. You can type a letter when the drop-down menu is open to find the currency faster. |
| Exchange rate | When you have selected the currency, you do not have to do anything further about the Exchange rate except checking the rate is correct. You can update the rate by clicking the two arrows forming a circle. The exchange rate is updated daily according to the European Central Bank. |
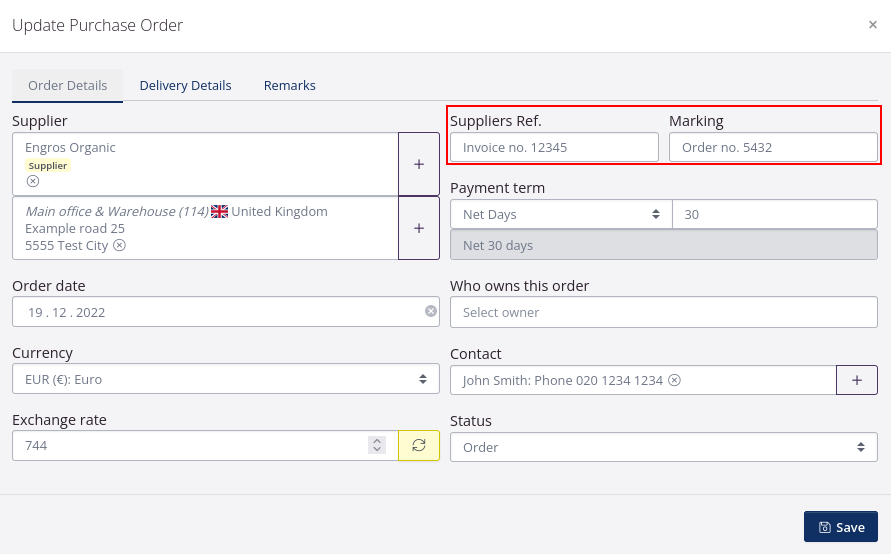
| Suppliers Reference | You can enter a reference like a order number or invoice number in the field. This is optional. |
| Marking | The field is a supplement to the Supplier’s reference. The information from the marking field is passed on to lines on production orders/sales orders. It is optional to fill out. |
| Payment term | Select the term you have to pay for the goods to the supplier in the field Payment term. The information usually appears on the invoice from the supplier. You can select a default payment term for this partner in the partner settings. The payment term will automatically appear and you will not have to select the terms manually every time you create a purchase order. |
| Who owns this order | The person who owns the order is the tracezilla user who are the contact person. This is usually the person who ordered the goods or the person responsible for the contact to the supplier company. The field is auto filled with the tracezilla user who created the order but you can simply select another user in the field. |
| Contact | Select the suppliers Contact person. This could be the person you have been in contact with regarding ordering of the goods. Contacts associated with the partner are created in the partner settings. In the partner settings, you can choose a default contact. Click in the field to see the contacts already created. If you have not created the contact yet, you can click the +. |
| Status | Set the Status of the purchase order to e.g. Order, Draft or Quote. Typically, draft status is used to indicate that the order has not yet been finalized/completed or confirmed by the supplier. |
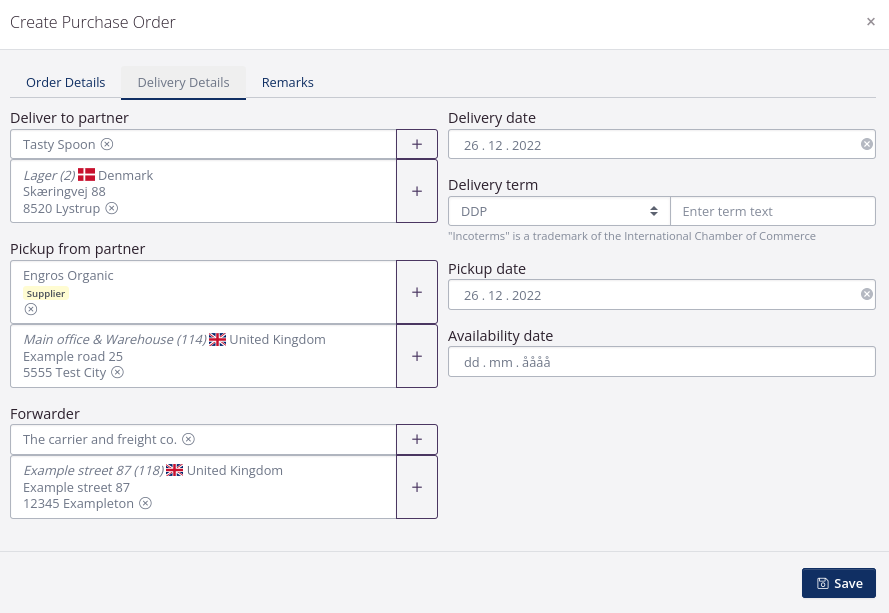
Delivery Details
On the next tab in the order header Delivery Details, fill in the fields according to the instructions below.
| Field | Explanation |
|---|---|
| Deliver to partner | Select the partner the goods are delivered to. It is often your own partner or an extern manufacturer the goods are delivered to. Select the recipient address in the field partner location as well. If you have not created the partner or the location, you can click the +. It is very important you make sure it is the correct location you have chosen in the field. The goods are stored in the selected location, and in the later process the goods can only be selected and picked from that location. |
| Pickup from partner | Select the partner who deliver the goods. Select the location as well. |
| Forwarder | You can select the partner who are responsible for the shipping of the goods. Select the shipping address as well in the location field. The Partner name and the location address will appear on documents. It is optional to fill in the information. If you have not created the partner already, you can click the +. |
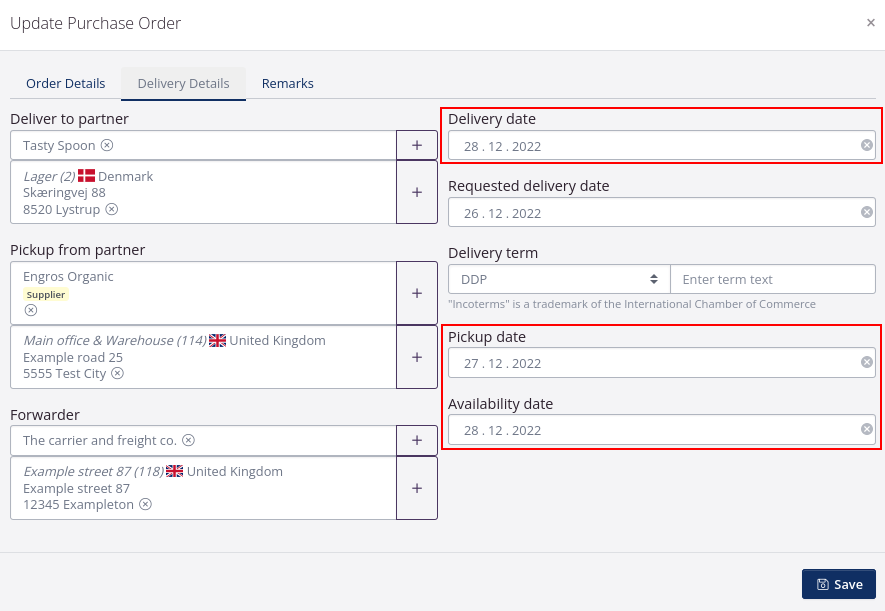
| Delivery date | Select the date on which the goods are delivered to the location selected in the field Deliver to partner. Depending on which browser you use tracezilla in, you can either enter the date or select it from the pop-up calendar. |
| Delivery term | From the drop-down menu, you can select the delivery terms that have been agreed upon with the supplier. In the drop-down menu, you will find INCOTERMS®, which is a set of predefined terms issued by the International Chamber of Commerce which defines responsibilities of buyer and seller in relation to trade. You can enter a customized text and the text will appear on documents. You can set standard delivery terms for the partner in the partner settings. |
| Pickup date | Select the date when the goods are picked up from the location selected in the field Pickup from partner. Depending on which browser you use tracezilla in, you can either enter the date or select it from the pop-up calendar. |
| Availability date | Select the date when the goods are available at the location indicated in the field deliver to. The availability date will often be the same as the date for receipt and checking of deliveries before the goods can be used for further processing. It is very important that the selected date is correct, as it effects when the goods are in stock and available to be disposed in other order types e.g. production orders or sales orders. |
Remarks
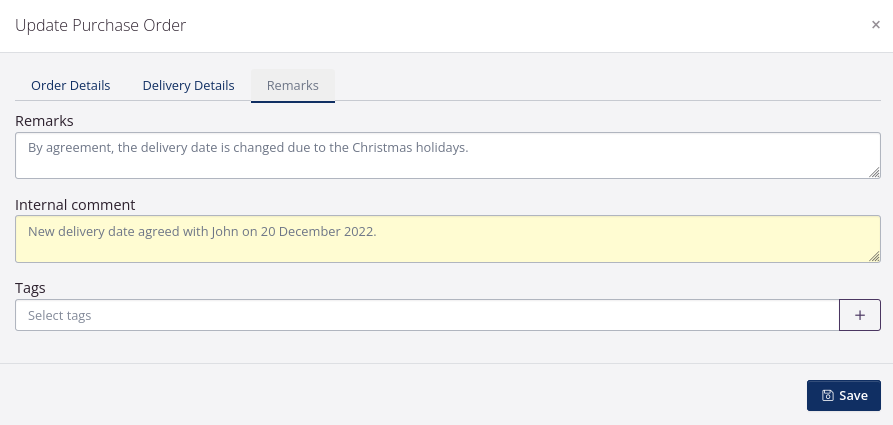
You can enter Remarks or add Tags to the order in the tab Remarks. Text entered in Remarks will appear on documents. If you wish to add a comment to the order, that will not appear on documents, you can enter this in Internal Comment.
If you have a remark for the supplier, or if the supplier has entered a comment on the order confirmation or invoice, you can enter the text here. The remark will appear on documents. This is optional.
You can add a tag to the order. You can use tags to organize and structure content. It could be used for categorization as well. This makes it easier to find a group of orders in overviews. Tags are for internal use in tracezilla. If you have not created the tag, you can click the +. This is optional as well.
Click Save.
Quick access to documents
In the Quick access to documents section, you can see the most used documents relating to the order. Click on the document to view it.
To send the document (e.g. an order confirmation to your supplier) you can click on the small arrow to the right of the document and click Send by email.
Create order lines
Order lines contain the items that you have ordered. You create an order line for every item (goods, freight, samples) that is included in the order.
Generally, tracezilla distinguishes between lot lines and service lines. The lot lines adds goods to your stock and service lines are for services like freight appearing on the invoice. Services does not effect the inventory levels.
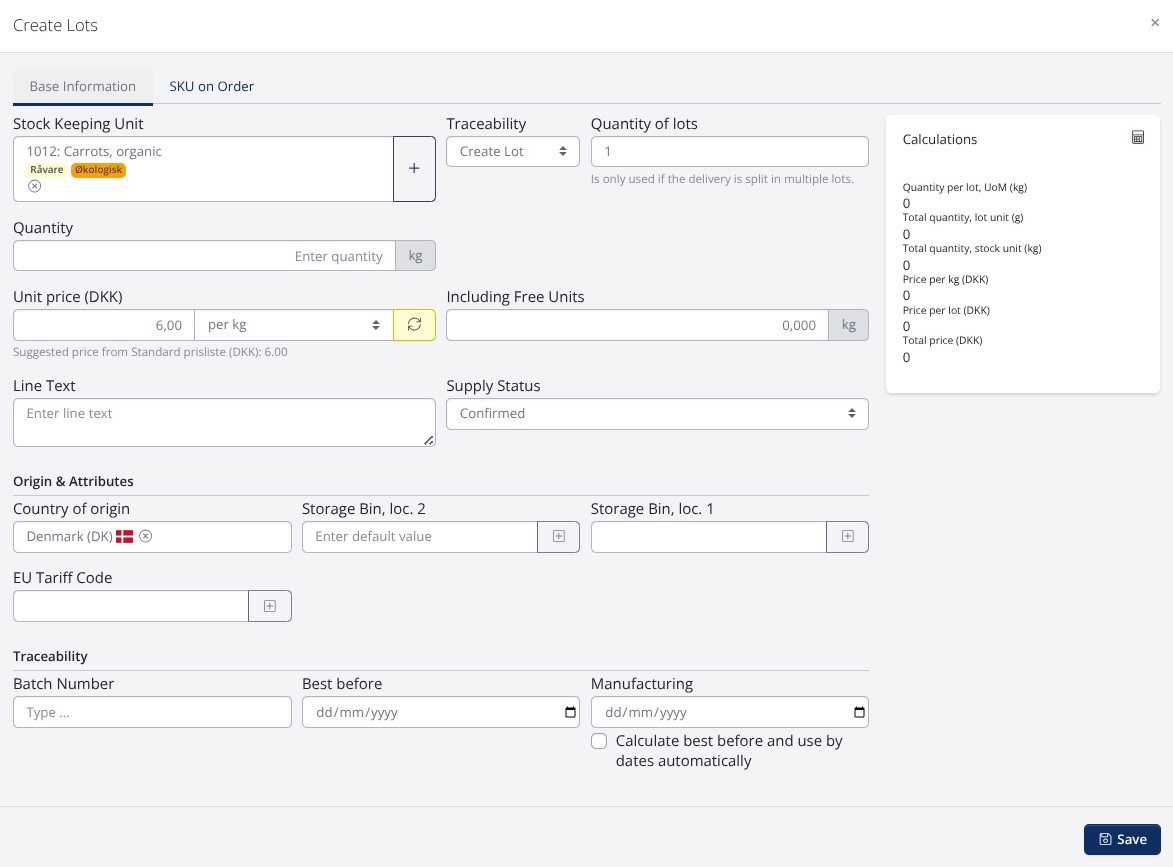
Create lot lines
- Go to the tab Purchased Lots and click the button Create lot.
- Select the Stock Keeping Unit you wish to add.
If the SKU does not yet exist, you can create it by clicking the +.
- Enter Quantity according to the unit e.g. kg.
- If you have received goods with several different lot numbers (batch no./best before dates), you can specify the number of lots received . The field Quantity indicates the number of units per lot.
- Enter the purchase price per unit in the field Unit price.
You can specify the price per box unit or per unit of measure. If you have created a price list and linked it to the supplier, then the price will be filled in automatically.
- You can set the Supply Status. Learn more about supply status below.
- In the section Origin & Attributes, you can set Country of Origin and define properties for the individual lots. You define for each SKU which attributes should be available. Learn more about attributes here.
- Traceability: In the Traceability section, add batch number, expiration date and production date (if applicable). tracezilla can calculate expiration dates automatically: When you enter a production date in the Manufacturing field, tracezilla will calculate the expiration date based on the setting (Days until Best Before or Days until Use By) that is set on the SKU.
- Click Save.
Require batch number/expiry date
It is possible to require that a batch number and expiration date has been added to a batch before the order can be confirmed.

Create service lines
If you want to add a line that does not affect stock levels, you can create a service line. The service line is used, for example, if the supplier has invoiced you for shipping the goods.
Learn more about service lines here.
The tabs on the order
You can switch between the tabs Purchased Lots, Service Lines, Deliveries, Budget, Expenses, Documents, Files and Integration logs.
Request for quotation
You can choose to create a request for quotation instead of an order.
- Click on Purchase in the top menu and select Orders.
- Click on Create purchase order in the upper right corner.
- Under Status, select Offer from the list.
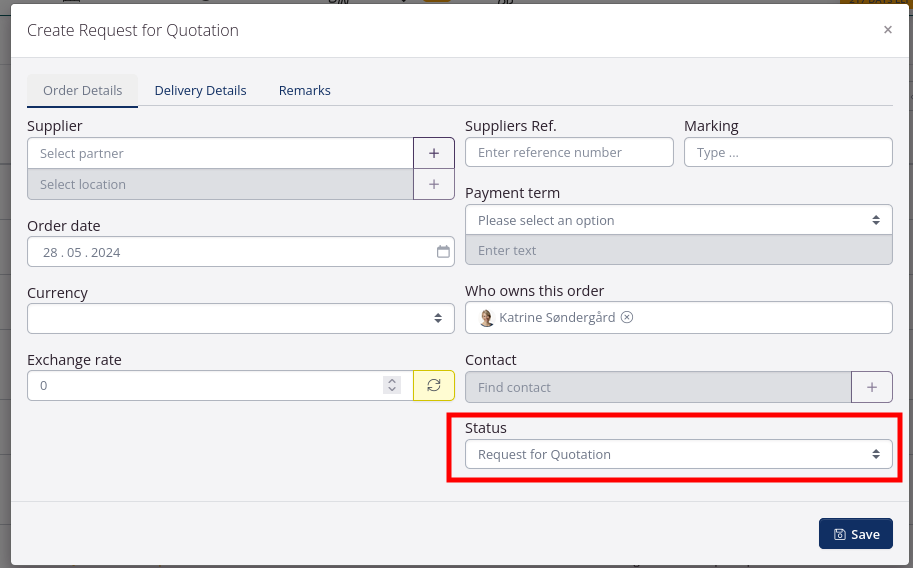
- Fill in the information for the order. Follow any the procedure in the instructions above.
- You must then create product lots for the order as described above.
Adjust the order before receiving
When the goods from an order arrive at the location, it is important to update the order according to what is actually delivered.
Changing delivery details/updating information in the order header
You can add more information in the order header after the order has been created, e.g. the supplier’s order number or invoice number. You can search in the overview using the reference number in Suppliers Ref.
Then click Edit on the Order details tab.
You can also change, for example, the delivery date in the order header after the order has been created. tracezilla also stores information about the requested delivery date (the date previously entered).
Then click Edit on the Delivery information tab.
You can also add remarks (appears on documents) or comments (internal) in the order header after creation.
Then click Edit and go to the Remarks tab.
Adjust the quantity of goods
If the quantities delivered differ from the the ordered quantity, you can adjust the quantities on the order.
If you want to keep track of discrepancies between what was ordered and what was actually delivered, you can activate the extension Expected inbound quantities in Company settings > Extensions. This will add a new field where the Expected quantity will appear. The actual quantity delivered should be updated in the filed Supplied Quantity.
- Make sure the order has the status Order by confirming the order.
- On the lot line to be adjusted, click the three dots and arrow on the right, and select Edit in the drop-down menu.
- Adjust the quantity in the field Supplied Quantity. You can still see what you expected to receive in the field Expected quantity.
- Click Save
- Repeat for other lot lines, if necessary.
- The difference between expected and delivered quantity will appear in the report Purchase in the menu point purchase in the top menu.
Split a lot line
If you receive an item that consists of several batches, e.g. with different expiry dates, you can split the lot line, and add different information for the individual lots of the same SKU.
- On the lot line to be split, click the icon on the right that shows 3 dots and an arrow and select Split Line.
- Enter the quantity of the one of the parts that the lot should be divided into. This will be the new lot.
- Click Save. The remaining quantity will be the original lot.
- Divide the line further if more than two lots of the same SKU are received.
Partial delivery/back order
If your supplier has not delivered everything on the order, a partial receipt can be made, after which the order will be listed as Partially received until the remaining part of order is delivered at a later time.
You can also create a back order for the goods not yet received.
- Go to the order that is to be updated.
- Click the Deliveries tab.
- Click the icon with three dots and an arrow to the right of the line and select Go to delivery.
- Click Mark as Arrived at the top right, then Confirm Arrived.
- Click Edit next to the lot line.
- In Quantity, adjust the quantity to what has been delivered. If the goods have not been delivered at all, enter 0.
- Remove the tick from Put remaining quantity on new batch and click Save.
- Repeat if necessary in case of other undelivered goods.
- Finally, click Mark as Delivered.
The purchase order will now have the status Partially received. If the remaining lots are not received later, click Remove Pending.
If the goods are received with a later shipment, click Create back order. An order copy will be created with the reference “Back order for xx” with the original purchase order number.
The original purchase order will get the status Received an be moved to Closed Orders.
Add traceability information
When your order arrives, you can add traceability information to the lots.
- Go to the purchase order.
- On the lot line, click Add Traces.
- Select Trace System.
- Depending on the tracing system selected, enter Key, Label, Partner/Certificate etc.
- If the selected trace should be brought forwarded, tick the box. This means that if a trace is add to a raw material that is later included in a production, the original traces will also appear on the finished good.
Print labels
With tracezilla you can print QR code lot labels for internal use.
- Go to the order.
- Tick the boxes for the relevant lot lines.
- Click Print Labels
- Select the label format, e.g. Info label (internal use).
A new window will open and you can adjust your printer settings before printing the label.
Dispatch and receive order
When you have received or dispatched an order, you can easily mark it received/dispatched by using the buttons Dispatch order and Receive Order in the upper right corner of the order. Read more about Deliveries.
If the goods are to be included in the inventory valuation before receipt of goods
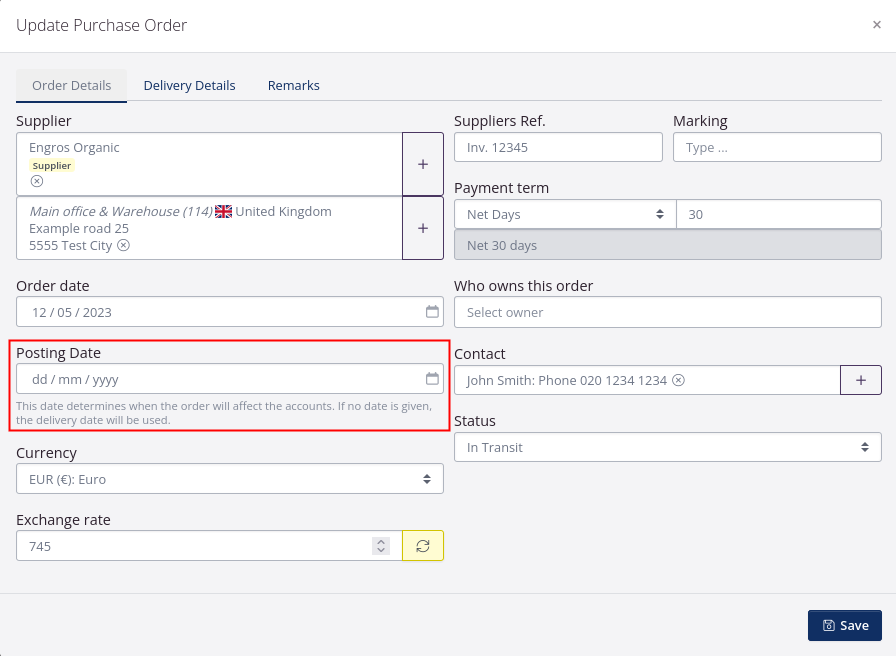
If you own some goods, in terms of value, before the goods are delivered at the warehouse, you can set a posting date.
This is relevant e.g. if you buy goods that must be shipped over a long period, where there is an agreement on advance payment and you own the goods before they are received.
Edit the order head to set the Posting date.
The supply status of the lot lines - explanation
The difference between supply status draft, expected or confirmed goods:
Lot lines with status confirmed can be added to orders (production or sales). This status is relevant when you have ordered goods and received an order confirmation from your supplier.
Lot lines with status expected cannot be added to orders (production or sales). This status is relevant when you have ordered goods and expect them to be delivered, but you have not yet received the order confirmation.
Lot lines with the status draft cannot be added to orders (production or sales). This status is relevant when you are are planning on ordering goods but have not ordered them yet. Lots with draft status will not be included in the inventory overview.
Bulk actions
You can perform an action for several lots at once. Tick the box next to the lot lines, click Bulk Actions and select the appropriate action from the drop-down menu.
You can:
- Add traces (batch number, lot number, analysis certificate, etc.)
- Set dates (best before, use by, production date)
- Refresh prices (according to price list)
You can Change supply status to:
- Draft
- Expected
- Confirmed
You can move lots to another order: If you need to move a lot line to another order, you can use the function Move to. This can be relevant if a lot line is created on the wrong purchase order and should be moved to the correct purchase order. You can move lines between purchase orders and production orders.
Please note that the order, from which a lot line is moved, must be open.
Tick the box next to the relevant lot and select Move to:
- Purchase order
- Production order
Afterwards, in the drop-down menu, you can select the order you want to move the lot line to.