Bravo integration
About the Bravo integration
Bravo is a sales platform attended for restaurants, catering services and more.
Bravo is an app, with which your customers can place orders digitally. This enables your customers to place orders on their smartphones in a short and easy ordering process.
Bravo integrates seamlessly with tracezilla, which saves both you and your customers time on the ordering process, and reduces delivery errors.
You can easily select the products from tracezilla that you wish to upload to your Bravo product catalog.
You will immediately receive your orders in tracezilla, where you can confirm the orders with a single click.
Bravo is available as a monthly subscription for you as a supplier. A free trial period is offered.
It’s free for your customers to subscribe to Bravo. It is thus a service you can offer your customers in the restaurant industry.
Read more at www.orderbravo.com
Step 1: Preparation
Before setting up the integration, it is an advantage to create and prepare the following content:
Create tags
Order and SKU tags
A tag must be created to be assigned to all orders imported from Bravo. These will be visible on the sales order overview, and in the order header on sales orders.
The same tag can be used to mark which SKUs you want included in your product catalog in the Bravo app.
- Click your company name in the upper right corner, and select Company Settings.
- Click Tags under Structures and Classifications.
- Click Add new in the upper right corner.
- Enter the tag name, e.g. “BRAVO”.
- Tick the boxes by Orders og i Stock Keeping Units.
- Click Save.

Category tags
A Category tag is also created as a SKU tag. But this category tag is also entered in the integration setup, so it simultaneously generates a product category in the Bravo app. E.g. if you want the categories Bevereages, Fruits and Veggies and Grain products in your Bravo, these must be created as individual category tags in tracezilla.
- Click your company name in the upper right corner, and select Company Settings.
- Click Tags under Structures and Classifications.
- Click Add new in the upper right corner.
- Enter the tag name, e.g. “Beverages”.
- Tick the box by Stock Keeping Units.
- Click Save.
- Repeat for every category you wish to appear in your Bravo product catalog.
Subcategory tags
A Subcategory tag is for subdivision of categories in Bravo.
- Click your company name in the upper right corner, and select Company Settings.
- Click Tags under Structures and Classifications.
- Click Add new in the upper right corner.
- Enter the tag name, e.g. “Juice”.
- Tick the box by Stock Keeping Units.
- Click Save.
- Repeat for every subcategory you wish to appear in your Bravo product.
Replacement product tags
A Replacement product tags enables you to select which product are to be shown as an alternative product or supplement for a selected product in Bravo. E.g. if a customer selects a specific product in bravo, products with the same replacement product tags will be shown below. By adding these tags, your customers will get a quick overview of similar products, enabling them to easily add more products to a purchase.
- Click your company name in the upper right corner, and select Company Settings.
- Click Tags under Structures and Classifications.
- Click Add new in the upper right corner.
- Enter the tag name, e.g. “Juice”.
- Tick the box by Stock Keeping Units.
- Click Save.
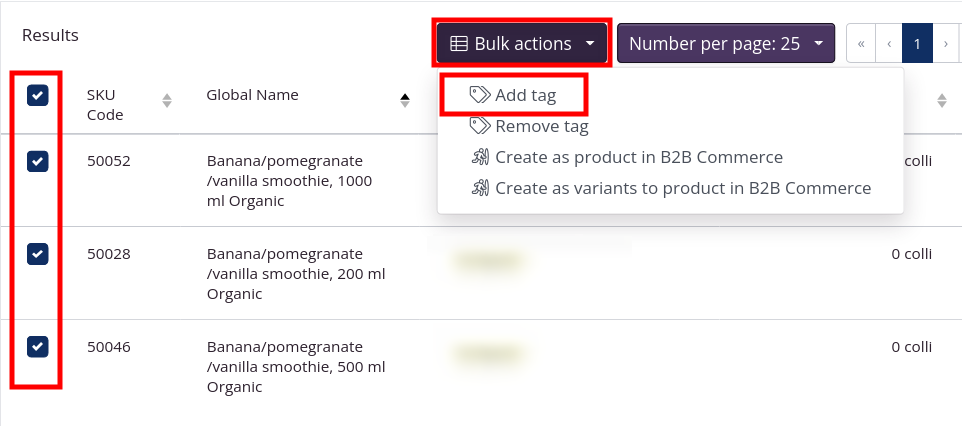
Add tags to Stock Keeping Units
Tags can be added to SKUs in two different ways. By bulk actions in the SKU overview, or by using the import template for SKUs. If you are not used to the import template, we recommend going by bulk action as described below.
- Click Warehouse in the top menu, and select Stock Keeping Units in the drop-down menu.
- Use the filters on the left to find the SKUs.
- Tick the boxes by the SKUs of which you wish to add a tag.
- Click Bulk actions, and select Add tag.
- Enter the tag, and click Yes, confirm.
- Repeat for all category and subcategory tags.
Trin 2: Integration setup
When tags are created and added, the integration is easily set up.
- Click the company name in the upper right corner, and select Company Settings.
- Click Built-in integrations in the menu for Extensions and Integrations.
- Click Connect and Configure by Bravo.
- Enter your API token. This is assigned by Bravo.
- Select Warehouse Location. This must be the partner and location from where lots for your Bravo orders are picked.
- Select Language in the drop-down menu.
- Enter your purposed Order tag.
- In the field by Upload SKUs with the following tag to the Catalog enter the SKU-tags of the SKUs you wish uploaded to your Bravo catalog. This can be a tag created for the purpose, or an already existing tag. E.g. “Finished Goods”, if you want all your finished goods to appear in your catalog.
- Enter all Category tags, created for the purpose.
- Enter all Subcategory tags.
- Enter all Replacement product tags.
- When all is set, select Yes in the drop-down menu of Enable this integration.
- Click Save configuration.
.png)
Your data will be synchronized almost immediately, and you will be able to see your product catalog in Bravo. Please notice, when transferring larger amounts of data, some extra waiting time may occur.
Contact tracezilla Support, if you need help or guidance. You can see our opening hours at www.tracezilla.com