Return of purchased goods
You can create a return order via a purchase order or by creating the return order manually in Purchase > Return.
Create the return order manually
If you do not have an order to base the return order on, you can also create a return order directly from Purchase > Return.
1) Click Purchase. Select Return. 2) Click Create return order at the top right. 3) Fill in the information in the order header.
You can see a description of each field in the order header below.
| Field, Order Details | Explanation |
|---|---|
| Supplier | Select the partner from which you purchase the goods. You can create a new partner by clicking +. |
| Order Date | The order date is automatically pre-filled with today’s date. The order date is the date on which you order the goods, i.e. the date the order is created. |
| Currency | The field is pre-filled based on the selected currency in the partner’s settings. You can also choose another currency from the list. You search the list by typing, for example, EUR on your keyboard. |
| Exchange rate | Check that the correct currency has been retrieved. The exchange rate is retrieved based on the selected currency. Data is obtained from the European Central Bank. |
| Supplier’s ref. | Here you can enter the supplier’s order number, invoice number or another important reference that should appear in documents. You can search for the reference number in the order overview. |
| Marking | The field is a supplement to the reference field, but is not as searchable. Ther marking will appear on documents. |
| Payment term | The field is pre-filled based on the selected term in the partner’s settings. |
| Who owns this order | The field is automatically pre-filled based on your order settings. This is the user who is the contact person from your company, e.g. if the supplier has to make inquiries regarding the order. |
| Contact | The field is pre-filled based on the default contact person in the partner’s settings. You can create a new contact by clicking +. If an email address is specified on the contact, the contact person can receive documents. |
| Status | Select whether the status is Draft or Order. |
| Draft status is used to indicate that the order has not yet been completed. |
| Field, Delivery Details | Explanation |
|---|---|
| Deliver to partner | Select the supplier and the address to which the goods are returned. |
| Pick up from partner | Enter your own company name and address if the goods are being returned from your own warehouse. If the goods are sent from an external warehouse, this is indicated instead. The goods must be registered in stock at this location for you to select them for the return order. |
| Forwarder | If relevant, select the company responsible for transportation of the goods, if you do not transport the goods yourself or the supplier pick up the goods by themselves. |
| Delivery Date | Select or enter the date on which the goods are delivered/received at the delivery address. |
| Delivery term | Choose a delivery term according to Inco terms or write a short text in the field next to the drop-down menu. |
| Pickup Date | Select the date when the goods are picked and sent from the warehouse. |
| Availability Date | You can enter an availability date if it is a different from the delivery date. For example, if the goods are delivered on 05.02.2023 at an agreed location, but the goods are not received/checked until 06.02.2023, the availability date is 06.02.2023. |
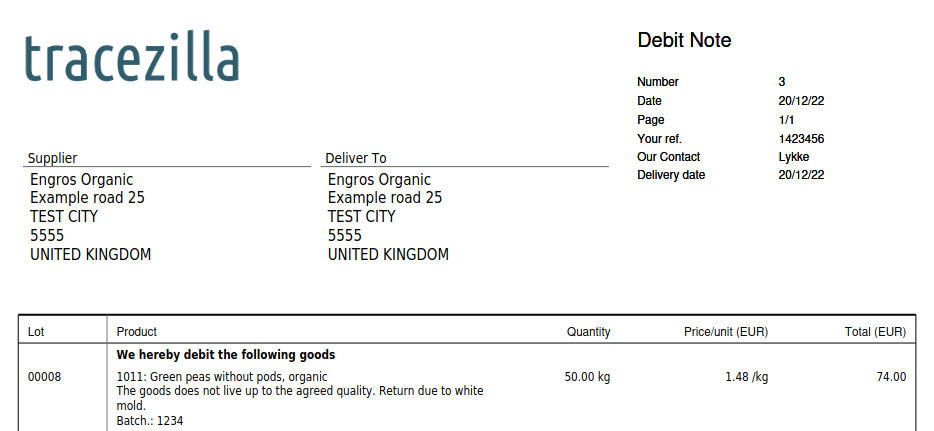
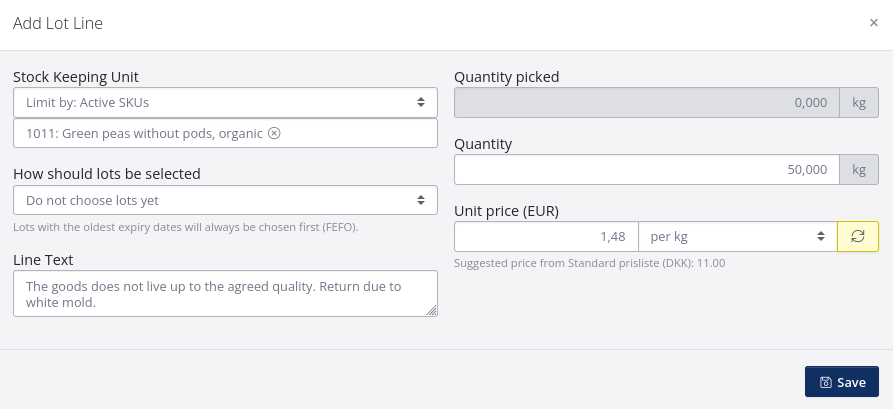
4) Click Add Lot Line. 5) Select the Stock Keeping Unit (SKU) which is being returned. 6) You can select the specific lot to be returned by selecting Specify lot in the field How should lots be selected? You can also select the lot at a later time. 7) Enter the quantity to be returned. 8) Click Save. 9) When you know which lots/batches are being returned, you can click Select lots. 10) Write the quantity of goods picked from the available lots in the fields to the right. Click Save when the lots are selected. 11) Click Go to order. 12) Create the debit note by clicking the document in the Quick access to documents section. 13) Click the arrow next to the document. Select Send with mail. Check that the Recipient is correct. Confirm sending the document. 14) The return order can be marked as in trasit by clicking Dispatch order, and the order is closed by clicking Deliver order.
Create return order via the purchase order
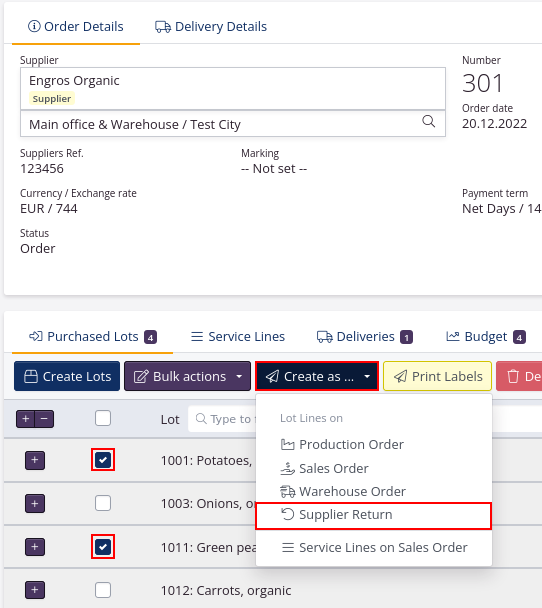
If you create the return order via the purchase order, you can tick the box next to the lot lines to be returned and create an order link.
1) Find the purchase order in Purchase > Orders. If relevant, use the filters on the left to search.
2) Tick the boxes nex to the lots to be returned.
3) Click Create as… and select Supplier return.
4) Create a new order by clicking on the + symbol - you can see a description of the fields in the order header in the table above. Confirm by clicking Send. 5) Adjust quantities and price. You can enter a line text with a comment for the individual line with a return reason.
6) Create the debit note by clicking the document in the Quick access to documents section. 7) Click the arrow next to the document. Select Send with mail. Check that the Recipient is correct. Confirm sending the document. 8) The return order can be marked as in trasit by clicking Dispatch order, and the order is closed by clicking Deliver order.
Create return order for your supplier from return on the sales order
If some goods must be sent back to the supplier after the goods have been returned from your customer, an order link can also be created from the sales order return to a return order to the supplier.
1) First, create the return order from the customer based on the sales order. You can follow this guide. 2) Once the return order has been created and lot lines have been added, you can tick the box for the lot lines. Click Create as… and select Supplier return. 3) Create a new order by clicking on the + symbol - you can see a description of the fields in the order header in the table above. Confirm by clicking Send. 4) Adjust quantities and price. You can enter a line text with a comment for the individual line with a return reason. 5) Create the debit note by clicking the document in the Quick access to documents section. 6) Click the arrow next to the document. Select Send with mail. Check that the Recipient is correct. Confirm sending the document. 7) The return order can be marked as in trasit by clicking Dispatch order, and the order is closed by clicking Deliver order.