Production order
In order to produce, process or pack goods from your inventory, you create a production order.
If you wish to make a production order directly to a sales order, you can use direct shipping.
In your company settings you can set some default settings for your orders.
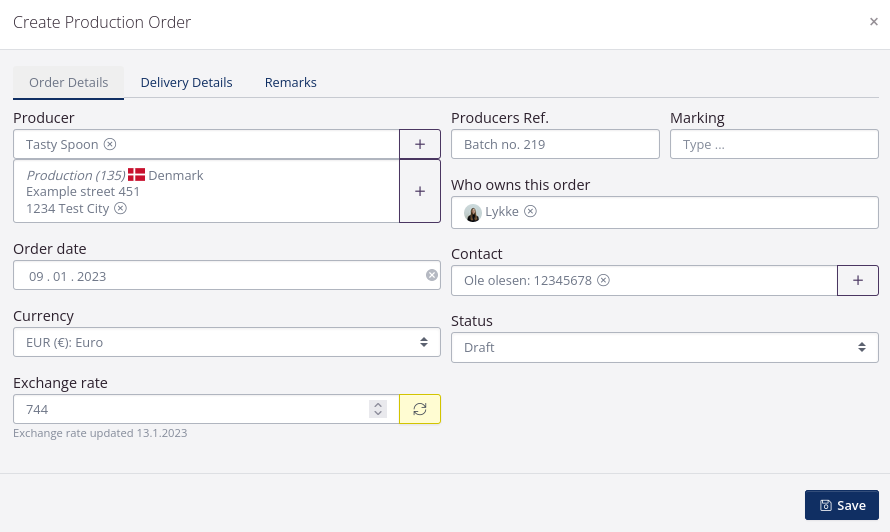
Create order header
- Click Production in the top menu and select Orders.
- Click Create production order in the upper right corner.
- Fill in the order header. You can see an explanation for each field in the table below.
- Click Save.
Order details
| Field | Explanantion |
|---|---|
| Producer | If the production is in-house, select your own company partner as Producer. If a partner is producing for you, select this partner as producer. This must be an already exisiting partner in tracezilla. You can create a new partner by clicking the +-symbol. |
| Order date | The order date is automatically set to the date you create the order. You can change the date if you please. |
| Currency | The field is automatically set to the currency entered in the partner settings. |
| Exchange rate | The exchange rate data is synchronized from the European Central Bank. |
| Producers Ref. | Here you can enter a producers reference number, e.g. batch number. |
| Who owns this order? | The field is pre-filled due to your order settings. |
| Contact | The field is pre-filled due to the selected contact in the partner settings. You can create a new contact by clicking the +-symbol. If an email address is entered for the contact, the contact can receive order documents. |
| Status | The order status will by default be set to Draft untill the order is confirmed. |
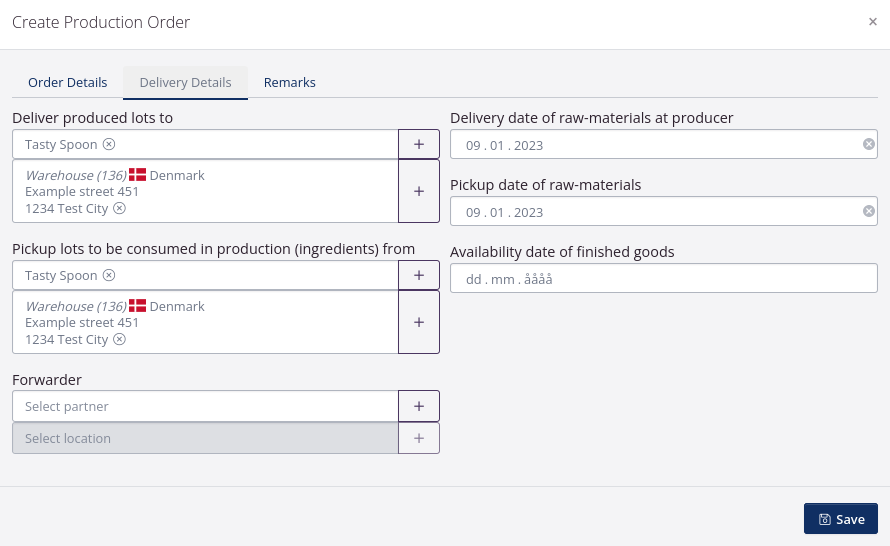
Delivery details
| Field | Explanantion |
|---|---|
| Deliver produced lots to | This is the warehouse location to where the finished product is delivered. E.g. if the production takes place at a partner, and the produced lots are immediately delivered to your warehouse, then select your own company and location in this field. |
| Pickup lots to be consumed in production (ingredients) from | This is the warehouse location from which the raw material for the production must be picked. |
| Speditør | If a Forwarder is used for delivering raw materials or the produced lots, select the partner in this field. |
| Delivery date of raw-materials at producer | If raw materials must be delivered to production on a certain date, you can enter the delivery date in this field. |
| Pickup date of raw-materials | If raw materials are to be picked up and delivered to production on a certain date, you can enter the pickup date in this field. |
| Availability date of finished goods | Enter the availability date of the finished goods. |
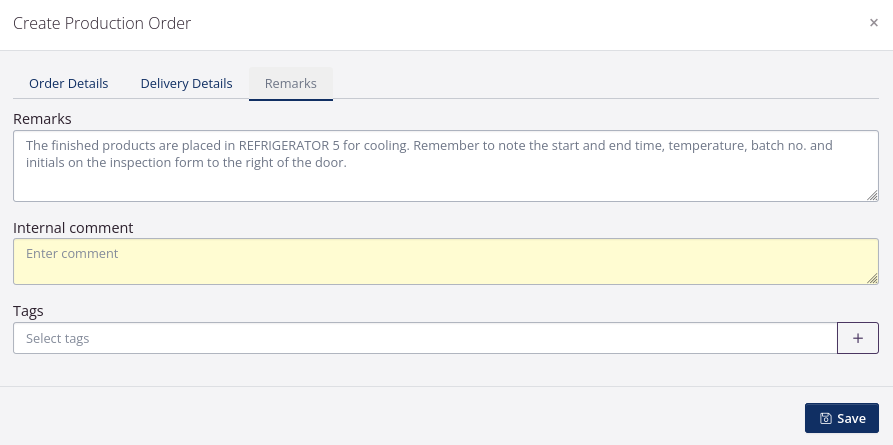
Remarks
| Field | Explanantion |
|---|---|
| Remarks | In this field you can enter remarks to appear on order documents. |
| Internal comment | In this field you can enter an internal comment which will only appear on the order in the application. |
| Tags | In this field you can enter order tags. Read more about Tags here. |
Add order lines
You can add lines to the production order based on a recipe.
You can also add all order lines manually - see the section Production order without using a recipe.
If you have linked the recipe to the end product, simply indicate how many units of the end product are expected to be produced. tracezilla will fill in the other order lines automatically.
This means that if you have created a recipe and added all the relevant information to it, you can save yourself a lot of time when creating production orders.
If your company produces organic food, you must create your production orders on the basis of a recipe, so that the produced lots appear in your input-output report for the mass balance of organic goods.
- Click Create lots on the Produced lots tab.
- Select the SKU that is produced/packaged (the end product).
- Enter how many units you plan to produce in the Quantity field.
If you have enabled parcel settings in the SKU settings, then a field will appear to indicate the number of packages expected to be produced.
- Enter the number of lots to be produced. If you enter a quantity here, the number of lots is multiplied with the quantity of units.
If you produce several runs with different lot numbers (batch no.) more lots are produced.
- If an external manufacturer produces the goods for your company, you can enter a Unit price. If your company produces the goods, the field is left blank.
If you have created a price list and linked it to the manufacturer (partner), then the price will be filled in automatically.
- If you have received some goods free of charge from an external manufacturer, enter the number in the field Of which free units.
- Under Lot attributes you can define properties for the individual attributes. Which attributes should be available as fields is defined for each SKU. You can read about attributes here.
- In the tab Country of origin, dates etc., indicate the lot’s Country of origin, Use by or Best before and production date if relevant. This is necessary to be able to manage the inventory according to FEFO - First Expiry, First Out. Alternatively, the FIFO principle applies.
- Click Save.
tracezilla will now add the line for the end product and retrieve the other information from the recipe to create lines on the tabs Consumed lots and Budget.
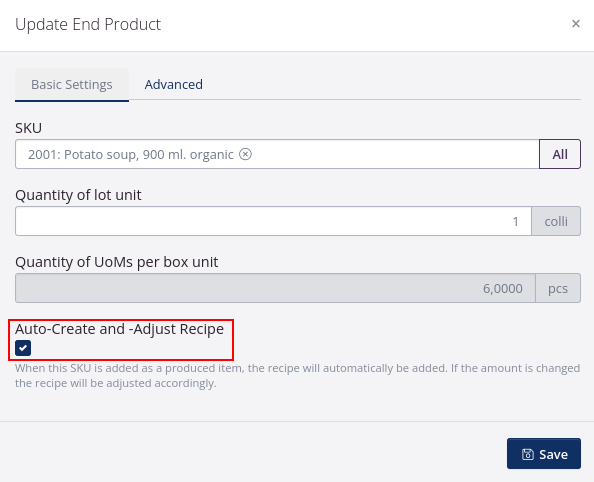
If you have created a recipe for the end product, but the information from the recipe does not appear automatically, this may be due to:
1) The production order does not have the status of Draft or
2) In the recipe, there is no check mark next to Auto-Create and -Adjust recipe, so the recipe is linked with the end product.
To solve this, you can go to the Recipes tab and add the recipe. Then you can click Force recalculation.
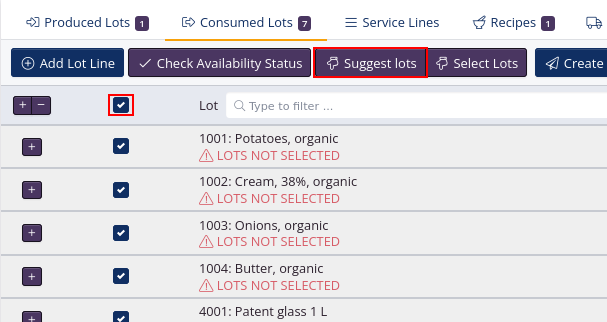
Select lots
When all order lines have been added to the production order, lots must be selected on the Consumed lots tab.
tracezilla can suggest the lots based on the FEFO or FIFO principle.
-
If a best before or use by date has been added to the lots, tracezilla will suggest the lot with the shortest remaining shelf life first.
-
If no dates have been added, tracezilla will pick according to the FIFO principle, so that the lot that arrived first in the warehouse is also the lot that is picked first from the warehouse.
- Tick the box next to the lot lines.
- Click Suggest lots.
- The selected lots can be seen by unfolding the lines by clicking +.
- You can change the suggested lots by clicking Select lots.
You can also pick the lots by scanning barcodes or QR codes on the goods with tracezilla’s mobile version or via a connected scanner (integration).
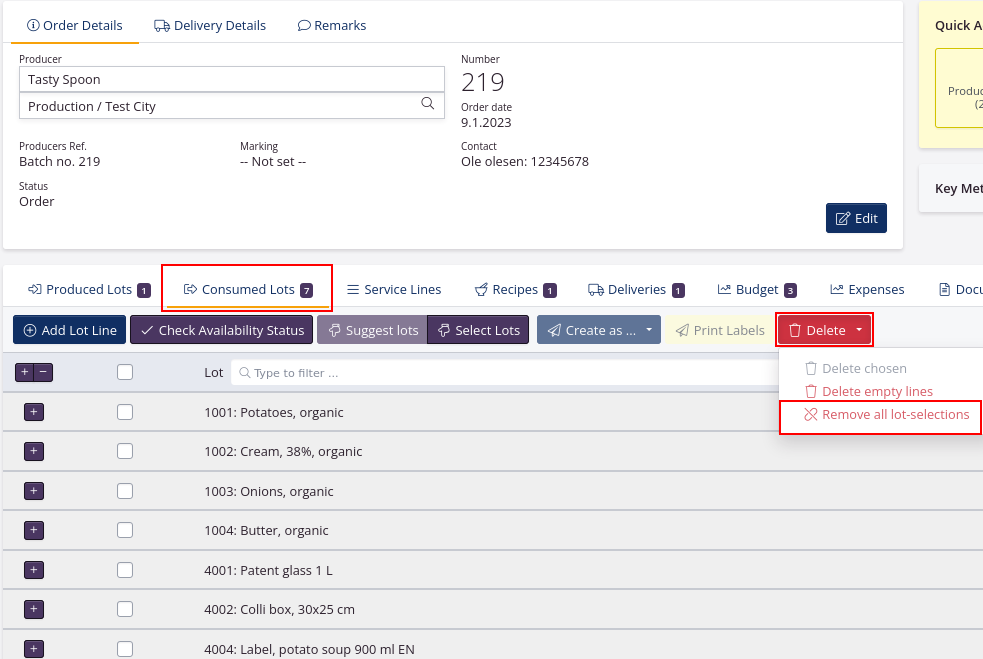
Correct the selected lots
On the Consumed lots tab you can see the selected lots.
If you want to change the selected lots or the quantities, click Select lots.
In the picking view, you can see the available lots, select lots and adjust the quantities. If you correct the quantities, tick the box Fit order to the selected.
Remember to click Save for the corrections to take effect.

If you have suggested lots but would like to undo all selections and start over, you can remove all lots by clicking Delete and then Remove all lot selections.
Adjust order lines
Adjust Order Lines: Produced lots
When the production has ended, it often happens that the quantity of finished goods deviates slightly from what was planned. This can be due to, for example, spillage during bottling/packaging, product remaining in pipes or boilers, etc.
NB! The quantity of finished goods should only be corrected when the order has been confirmed and has the status Order.
How to update the quantity of finished goods
- Go to the tab Produced lots.
- Click the line so it unfolds.
- Click the blue button with three dots and an arrow. Select Edit.
- In the Quantity field, enter the quantity of goods that have been produced.
If you have enabled parcel settings in the SKU settings, then a field will appear to indicate the number of packages. When the number of packages is updated, the total number of pcs/kg/liter will also be updated according to the package size.
- Click Save.
How to add traces
You can add more traceability information to the finished product.
tracezilla ensures traceability via an automatically generated lot number, but if you would like other traces to appear on documents, you can add these manually.
- Go to the tab Produced lots.
- Click the line so it unfolds.
- Click Add trace in the middle of the line.
- Choose a traceability system. If there are not any of the predefined systems that fit, you can create your own description of the trace by selecting Other.
- Enter the unique value that the trace has in the Key field.
- You can tick The trace should be brought forward if the finished product is repackaged or moved between warehouses and the trace must be “tranfered” to any floowing lots based on this lot.
If you add traces to raw materials or semi-finished products, you usually do not add a tick in the box. If a raw material is used in a production with 15 other consumed lots, then the finished product can potentially have 16 traces brought forward.
- Click Save.
How to add dates
- Go to the tab Produced lots.
- Click the line so it unfolds.
- Click the blue button with three dots and an arrow. Select Edit.
- Go to the tab Country of origin, dates etc.
- Fill in the relevant fields.
- Click Save.
Adjust Order Lines: Consumed lots
Usually, the quantity of lots consumed is adjusted when you select lots (read section in the above).
If you have not updated the order to what was actually consumed during production, you can also do so directly in the tab Consumed lots.
You can adjust the quantity of the entire order line (the total quantity) or the quantity of the individual lot if you have picked and consumed goods from several lots.
Production order without using a recipe
1. Produced Lots
In the tab Produced Lots, you can add the SKUs to be produced.
- Click Create Lot.
- Select the SKU you wish to produce.
- Enter the quantity you wish to produce.
- If the production takes place at a partner producer, and a unit price is agreed, you can enter the unit price.
- Click Save.
2. Produced Lots
- Under the tab Consumed Lots, you can add the SKUs to be used for production. Click Add Lot Line.
- Enter the SKU you wish to add.
- In the drop-down menu, you can select how you wish to select the lots.
- Select the Quantity of the SKU consumed in production.
- Click Save and add further lot lines, if relevant, or click Close window.
- In the tab Consumed lots you now get an overview of all lots consumed in the production, and in which quantities. If you have not yet specified these lots, this can be done as described below.
Select lots
You must specify the lots consumed in production. This can be done in 3 different ways.
- A: Go to the tab Consumed Lots. Click Suggest lots. The application will now suggest lots to be used based on expiry date (or alternatively purchase/production date), so that the oldest lot also will be used first. Please notice, that when using this method, you must afterwards check that all suggested lots are correct.
B: Click Select lots to control which lots to be selected. In the new window: Click + in the left side next to the SKU number in order to expand it. If there is a lot available, you will now be able to enter the quantity necessary. Remember to click the Save button. You can choose to print a picking list or a delivery note, and afterwards click Go to Order.
C: Alternatively, you can click the pencil symbol on the right of a lot line. In the field How should lots be selected select Specify lot in the drop-down menu, and select the lot in the field below.
Require batch number/expiry date
It is possible to require that a batch number and expiration date has been added to a batch before the order can be confirmed.

Dispatch and receive order
When you have received or dispatched an order, you can easily mark it received/dispatched by using the quick buttons Dispatch order and Receive finished goods in the upper right corner of the order.
You close an order by receiving the finished goods.
Read more about Deliveries.
Print labels
With tracezilla you can print QR code labels for internal use and GS1 parcel labels.
- Go to the tab Produced lots.
- Tick the bow next to the lot line.
- Click Print label.
- Select label format.
- You can enter remarks if relevant.
- Select the desired Tracing Systems to appear.
- Click Print labels.