B2B Commerce as a webshop
Areas of use
B2B Commerce has several areas of use. The module can be used to create a webshop, seller portal or supplier portal.
B2B Commerce as a webshop gives your customers the opportunity to place orders that are automatically synchronised into tracezilla. The seller portal gives your sellers the opportunity to place orders, which can be smart when they are out at your customers without seeing all the data in tracezilla. With the supplier portal, your suppliers or producers can fill in important information such as batch numbers and expiration dates in an easy way.
This tutorial helps you to create a webshop or seller portal. You can of course use your portal both as a webshop and a seller portal without having two different portals.
If you want to read about the supplier portal, you can go to the following page
How to access B2B Commerce?
1) B2B Commerce is an add-on module that you will need to add to your subscription.
Read how to make changes to your subscription in this tutorial.
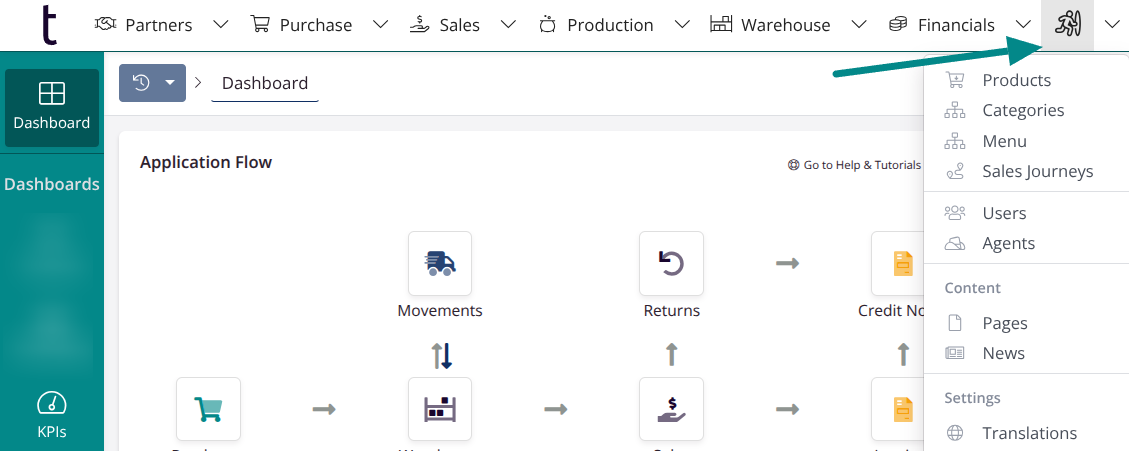
Once the subscription has been activated, you will get a new menu item in the top menu. See below:
2) Once the subscription is activated, you will need to contact tracezilla support to get a URL (web address) for your B2B Commerce portal.
You can find contact information for tracezilla support on this page.
B2B Commerce works seamlessly with tracezilla
-
Prices and partners from tracezilla are used. Your customers can get partner-specific prices based on the price lists in tracezilla.
-
You save time when the orders are synchronised automatically.
Tip: You can tag requests/orders with a specific tag. This makes it easy to see which orders come via B2B Commerce. It may also be relevant to choose an email address/email addresses, which will receive notifications about new requests/orders.
Users and Umbrella Admin
Your customers should be created as users in B2B Commerce. You invite them and they create their passwords.

If you want to invite many users quickly, you can use the import template. You can download the import template under B2B Commerce > Import user invitations > Get import template. The email invitation to the user is sent when a user tries to log in.
A user can also be given the role of Umbrella Admin. This permission allows a user to log into multiple partners’ (customers’) accounts with the same user. This may be relevant for users who will be placing orders for multiple customers who are part of a retail chain. If you want to create an umbrella admin, you should first create a parent partner and connect it to the individual stores that are part of the chain. After you have invited a B2B user, who is connected to the parent partner, you should contact tracezilla support, who can give the user permission to become an umbrella admin.
Agents
If you want to give your sales agents permission to place orders via the B2B portal, you can add them as agents. They must have a tracezilla user with access to your company account in order to be created as agents.
You simply select the user, give the agent a name and choose which permissions they should have. It is also important to choose whether the agent should be linked to a specific customer partner or multiple partners with a specific tag.
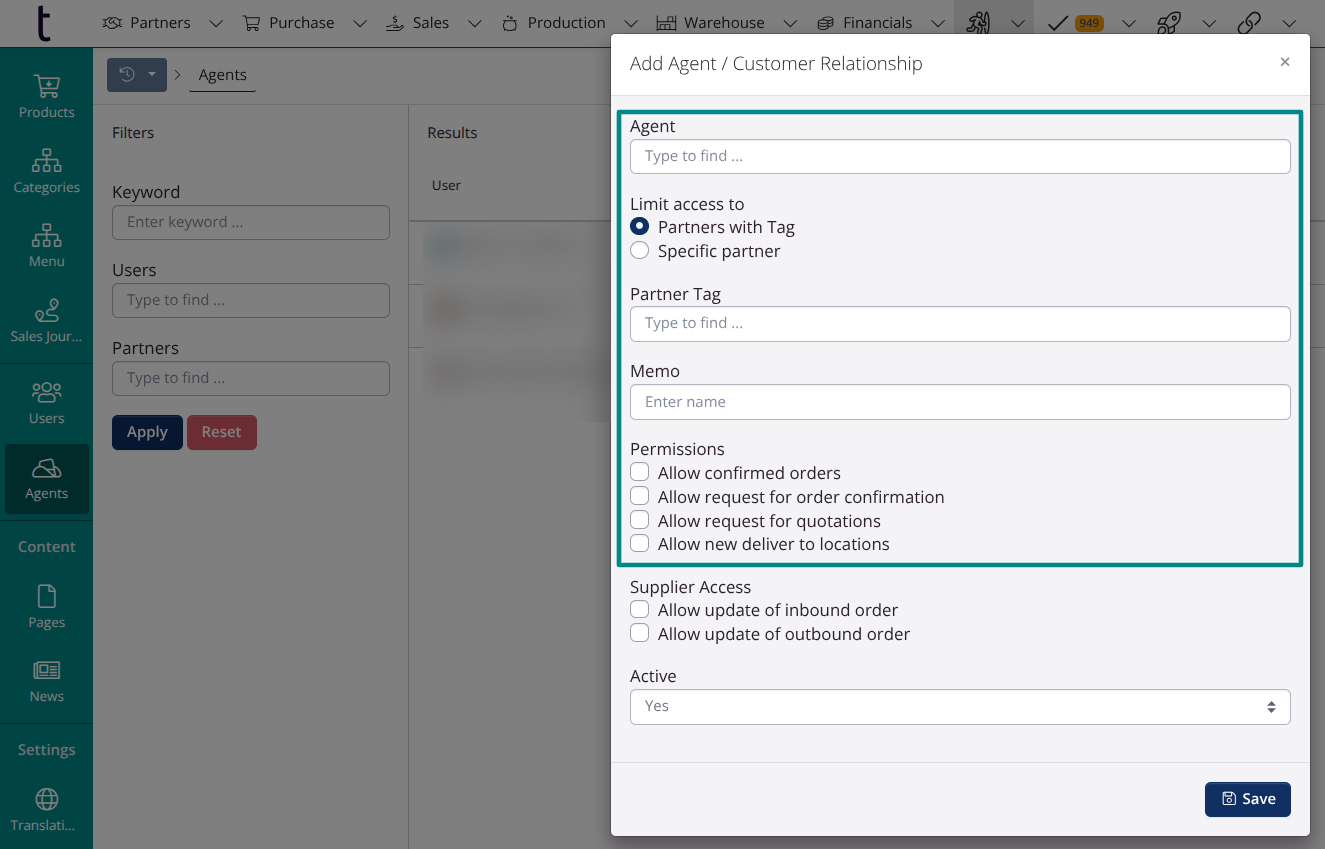
NOTE! The settings under Supplier Access are not relevant for B2B Commerce. They are used in the supplier portal
Invitations from the portal (Coming soon)
You can give your customers the ability to invite their colleagues directly via the portal.
Check Allow invitations to new users.

Basic settings
Products and variants
Creating products in B2B Commerce is an important step. You simply create product names and link items as variants in B2B Commerce. Products can contain one or more variants.
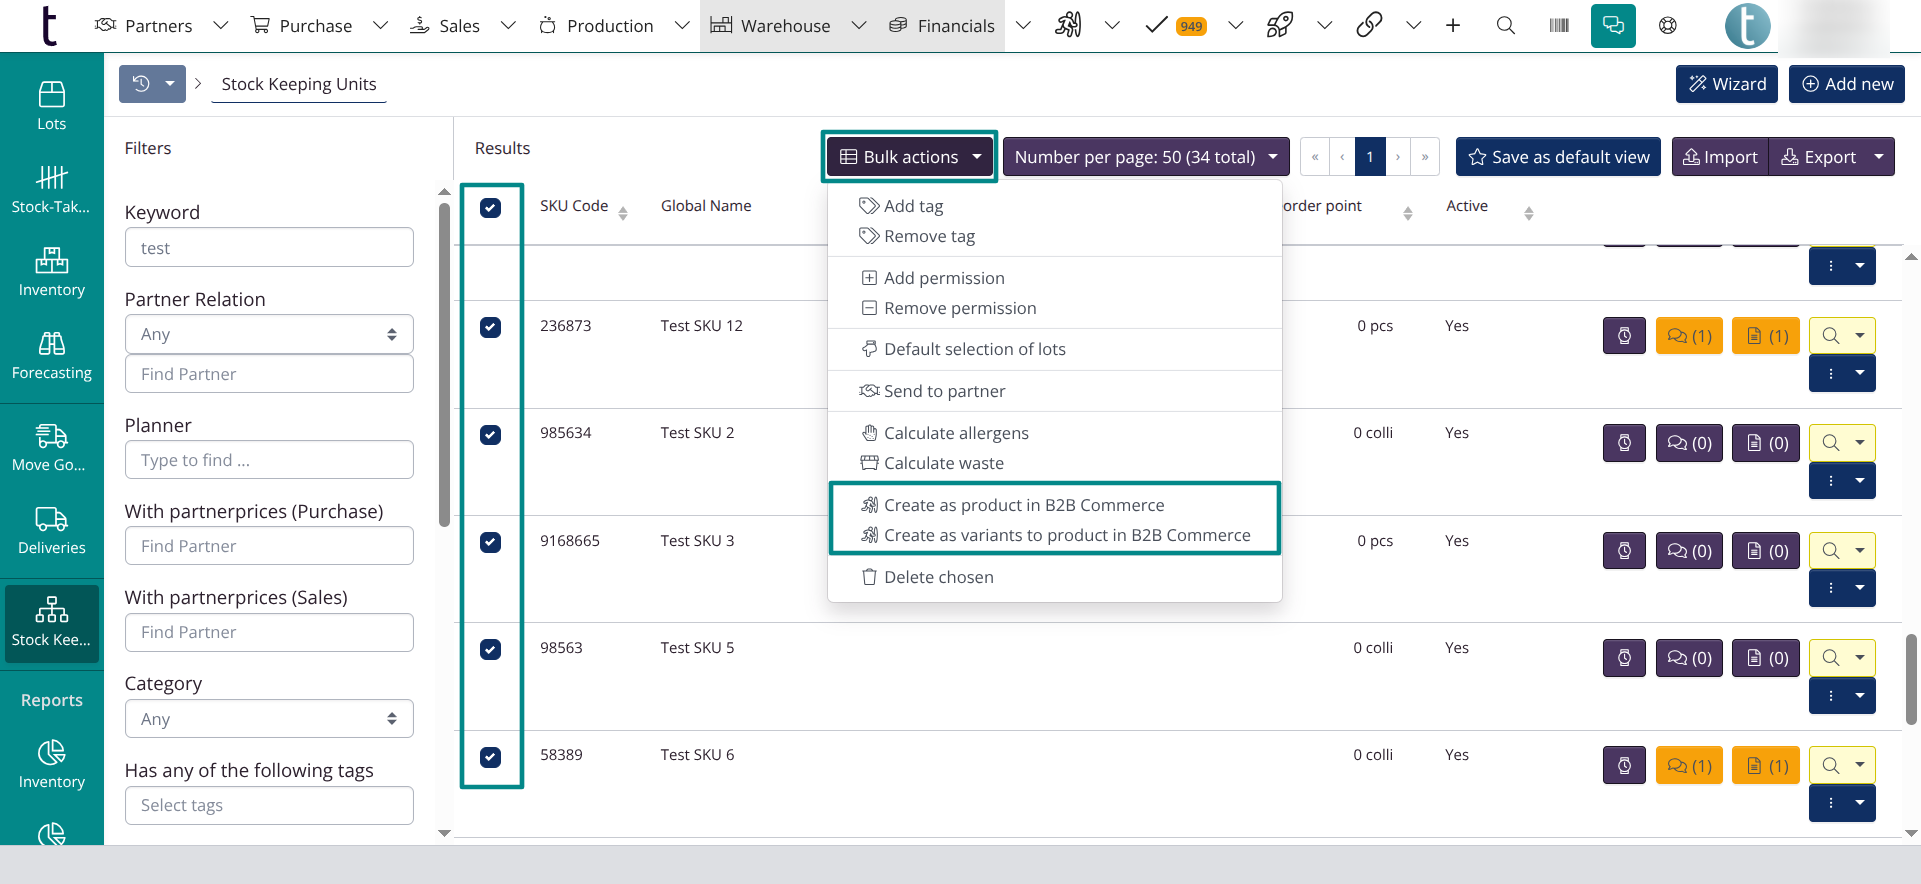
An easy way to add variants is to do it in the SKU overview. Go to the SKU overview, check the items and click Bulk actions > Create as product in B2B Commerce or Create as variants of product in B2B Commerce.
NOTE! You should select a category when adding products or variants via the SKU overview. Therefore, it is optimal to create categories before adding products.
You can also create products using the import template or create products manually, you can do this under B2B Commerce > Products > Add product. This is also where you can edit your products and select images etc.
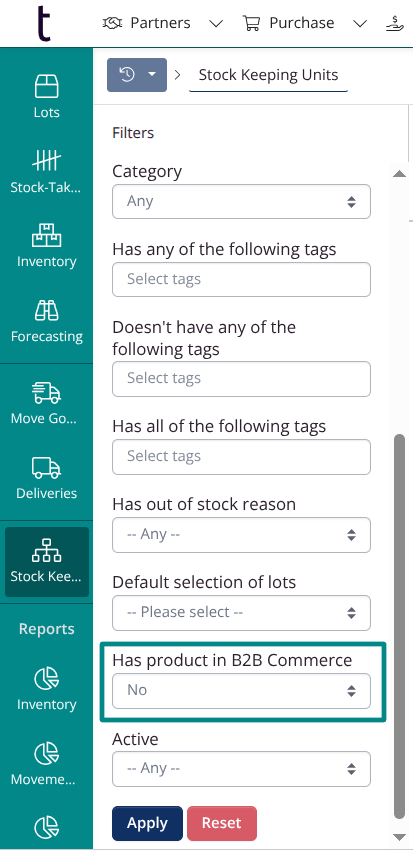
Tip: If you add products at a later time, you can select No in Has product in B2B Commerce to exclude SKUs that are already in your B2B Commerce portal, see below.
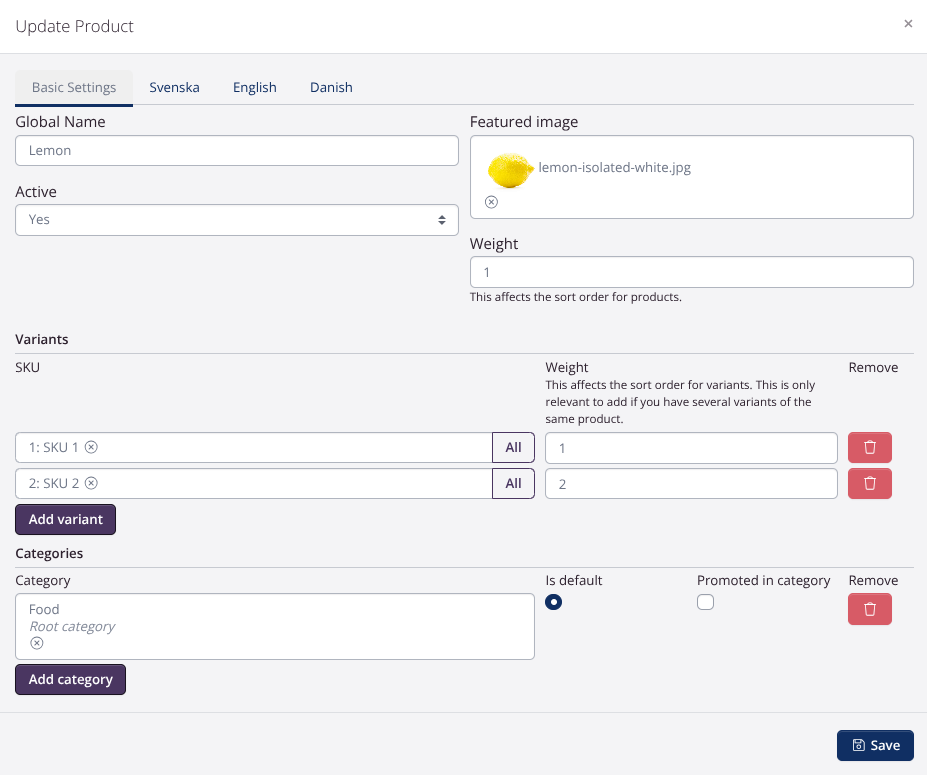
Example of product settings
Below you can see an example of a product that has two different variants. Since we have written 1 in the Weight field, the product will be displayed first in the category. The sort order for the variants SKU 1 and SKU 2 has also been specified, meaning that SKU 2 will be displayed after the first variant.
Product Images
You can add product images manually by going to a product and selecting a featured image. You must have added the images to the items before you can do this.
Add Product Images Automatically
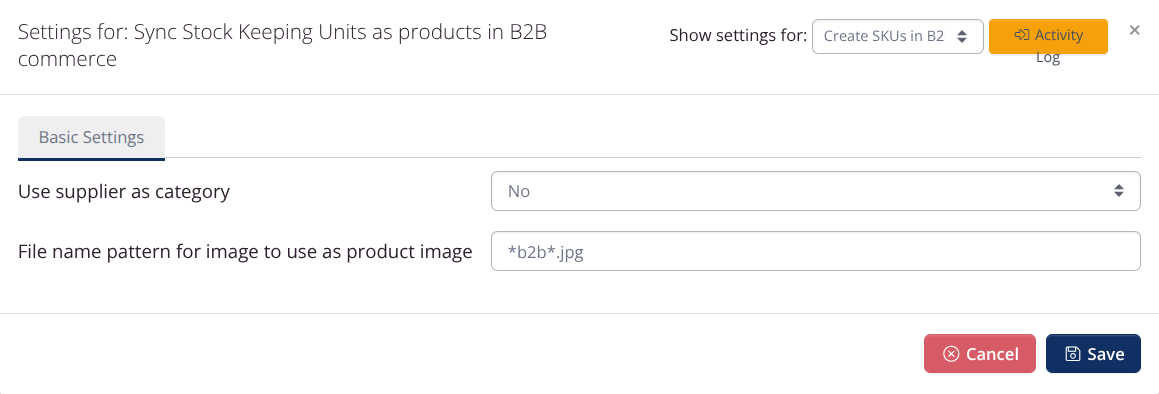
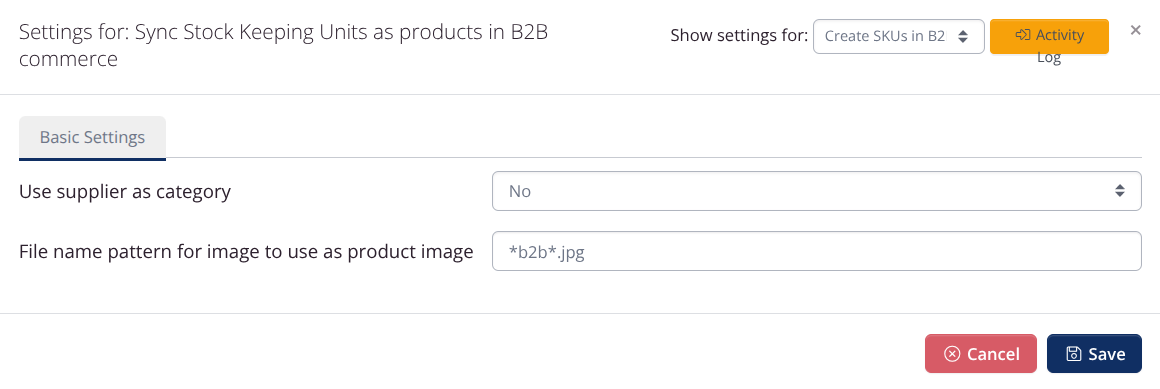
If you have the Power Pack, you can automate the creation of products and product images with a scheduler.
Below is an example of a scheduler that is set to create product images based on the item images whose names contain “b2b” and are in jpg format.
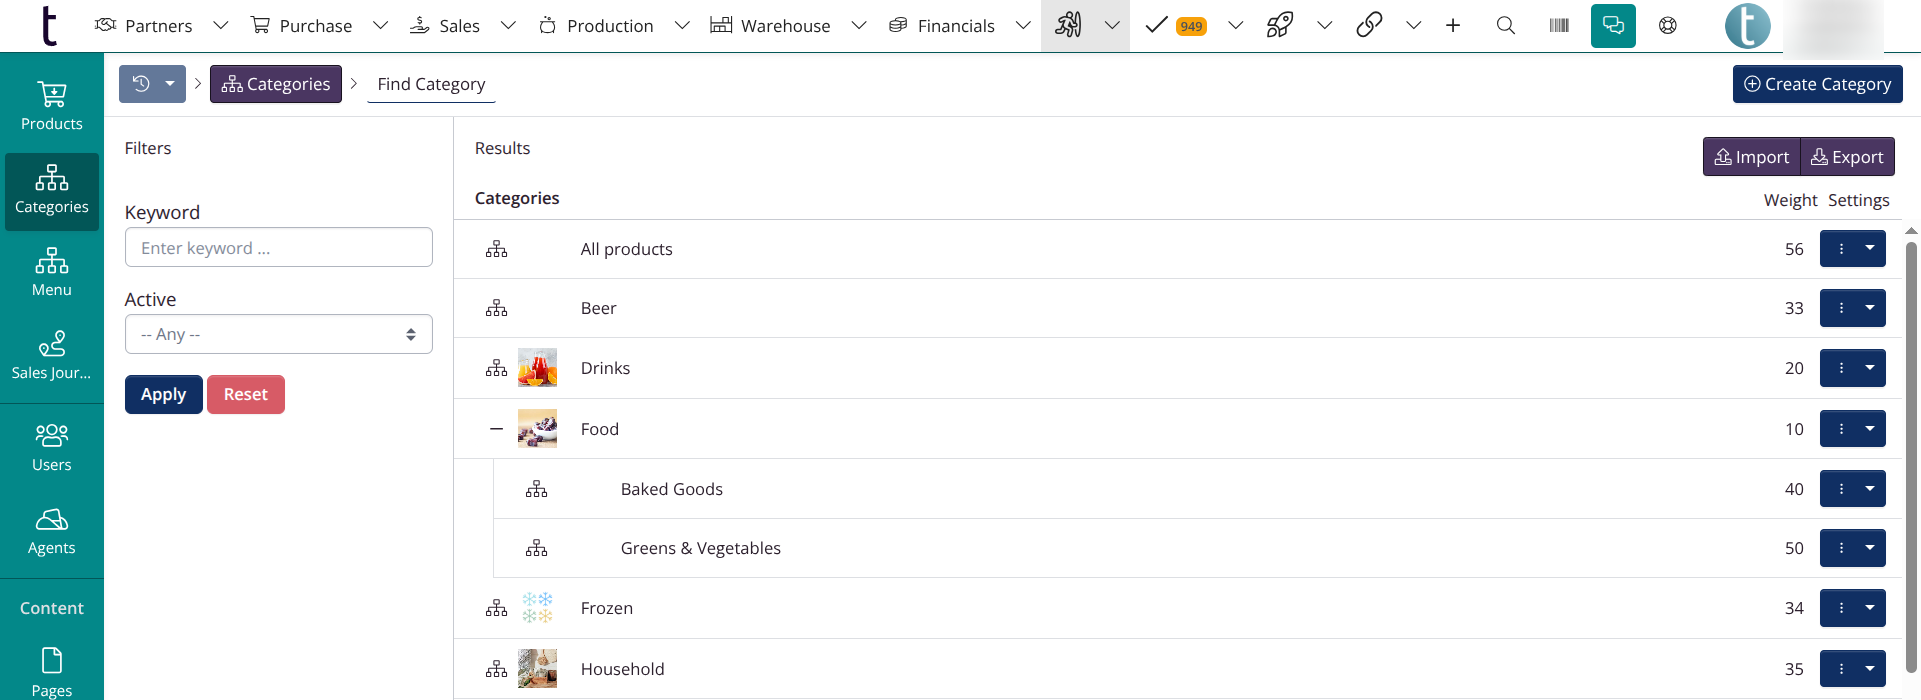
Categories
Create Categories
You can create main categories (parent categories) and subcategories.
Tip: The fastest way to create categories is to download an import template and work with it. Click Import > Get Import Template to download an import template.
Category Example
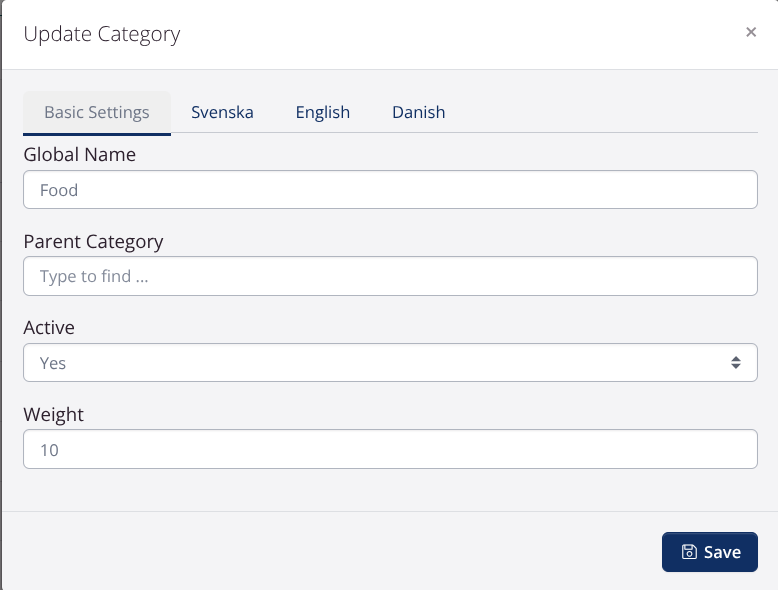
Tip: You can determine the order of your categories by adding a weight for your categories.
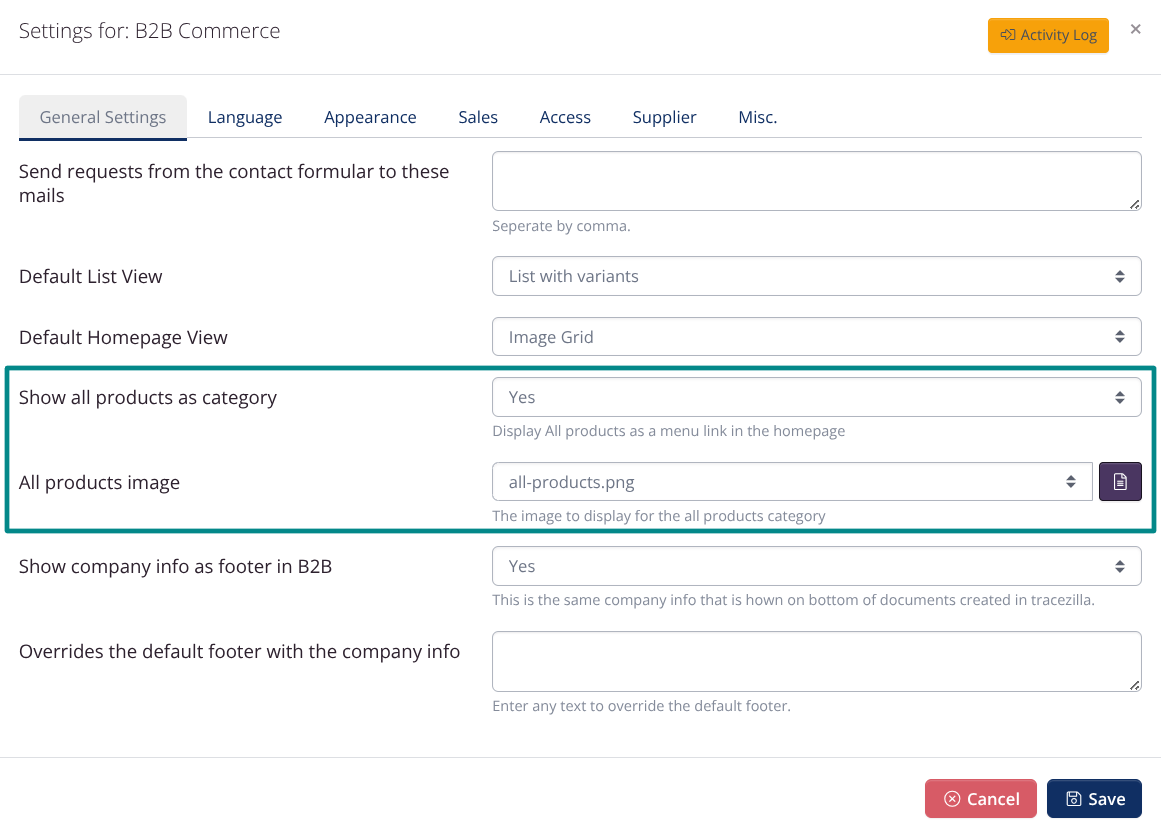
All Products Category
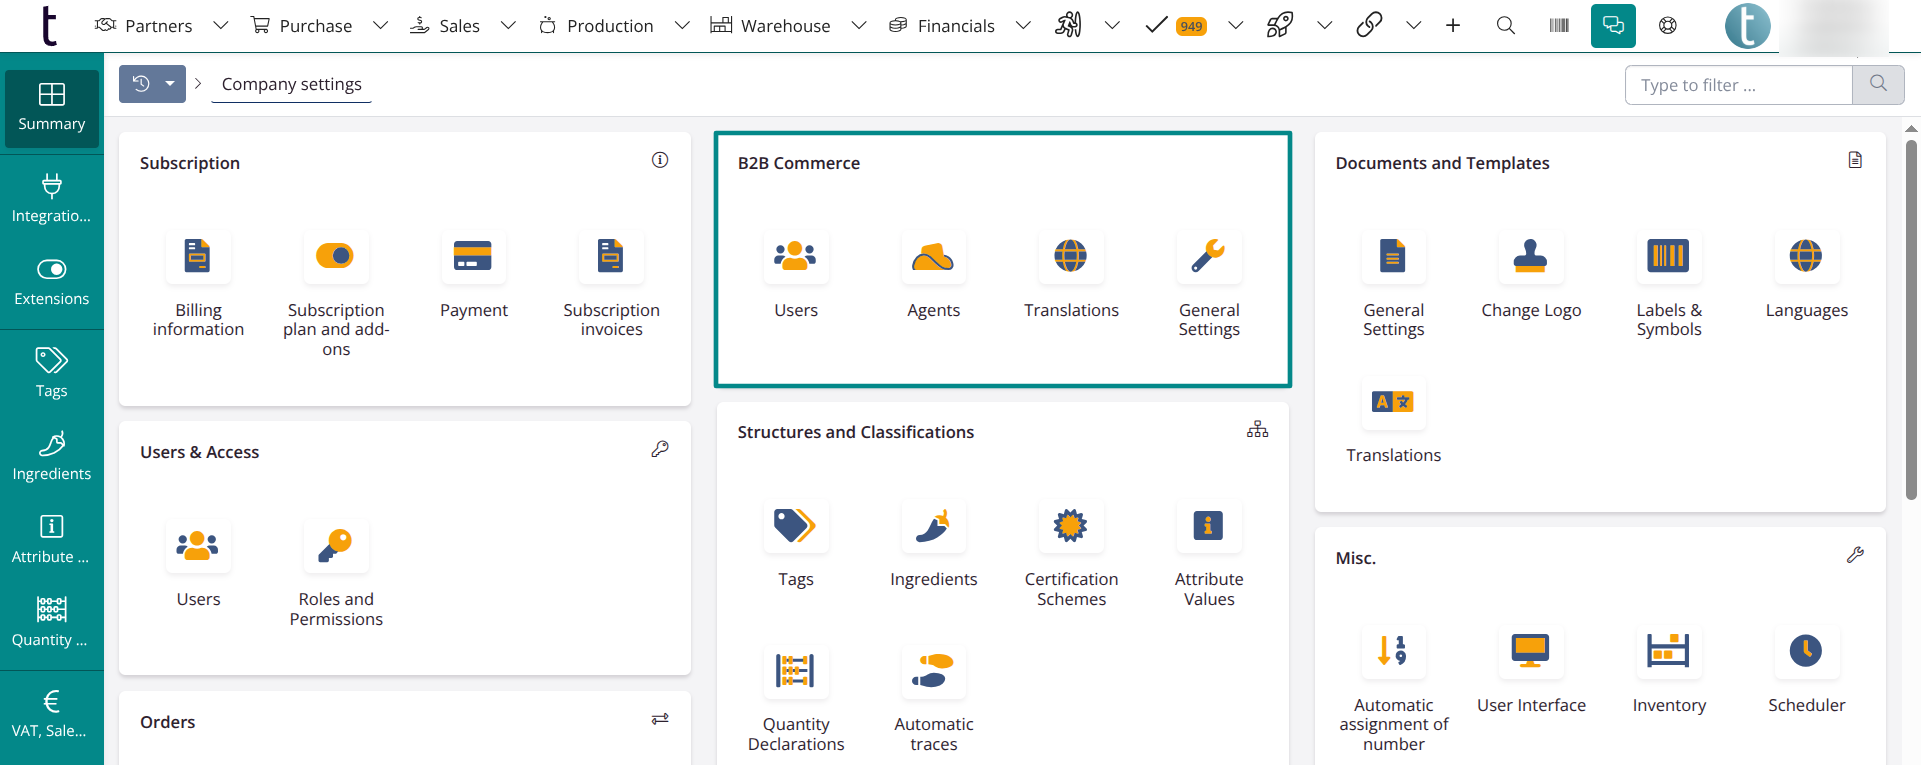
You can quickly create a category for all products in Company Settings > B2B Commerce > General Settings. Don’t forget to upload an image to display for the category.
Colors and customization
There are many B2B company settings under Company Settings > B2B Commerce that you can set to customise your online store.
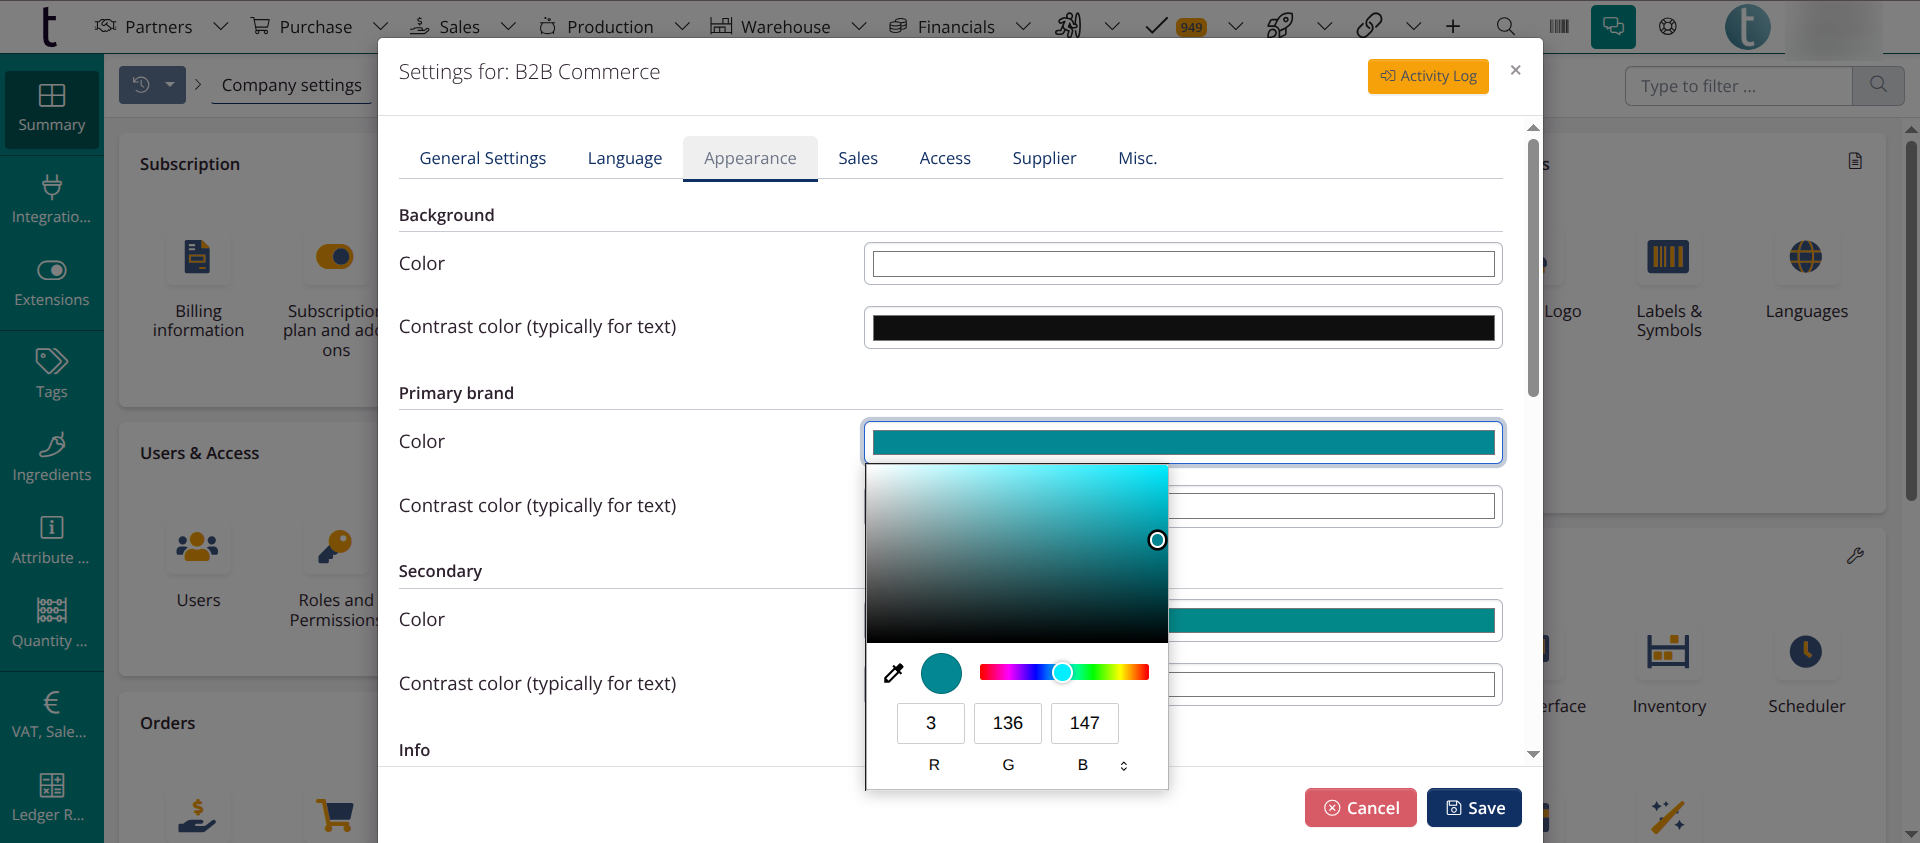
Colors
You can customise the colors for your B2B webshop under the Appearance tab.
Tip: You can use the pipette on your website to copy your existing color tones to your B2B webshop.
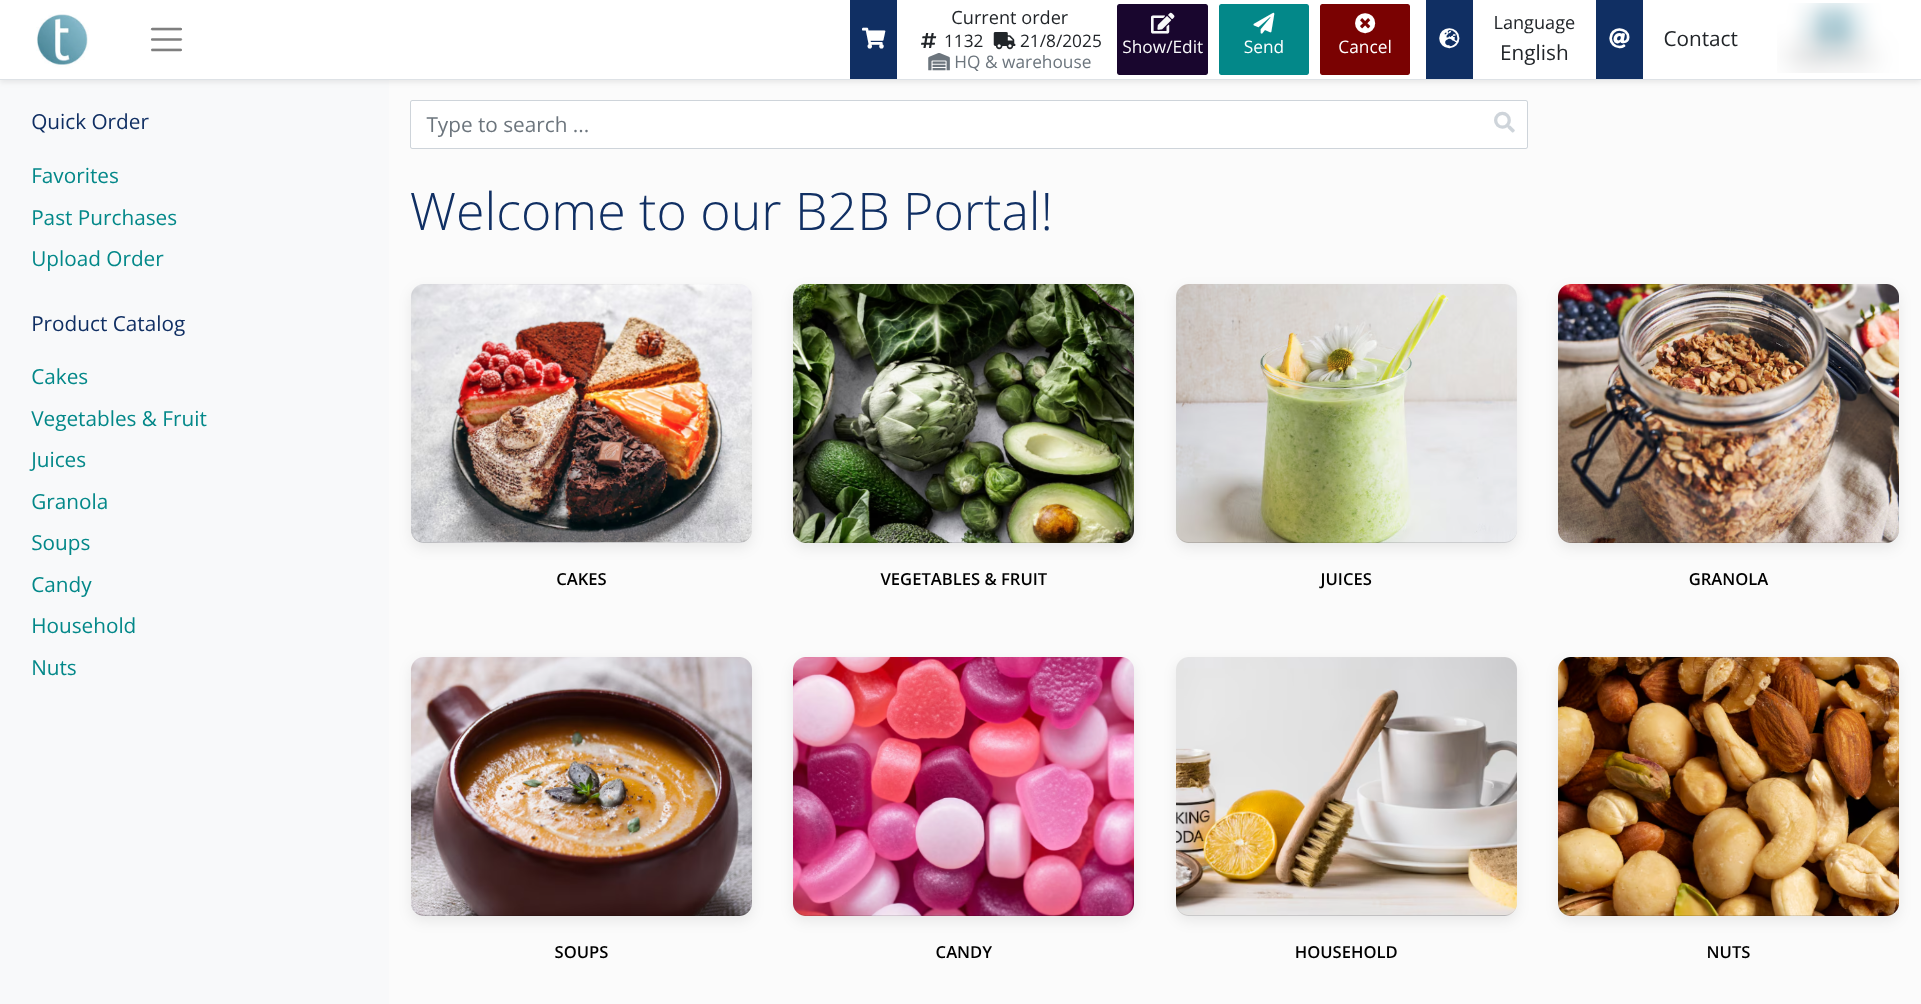
Home page
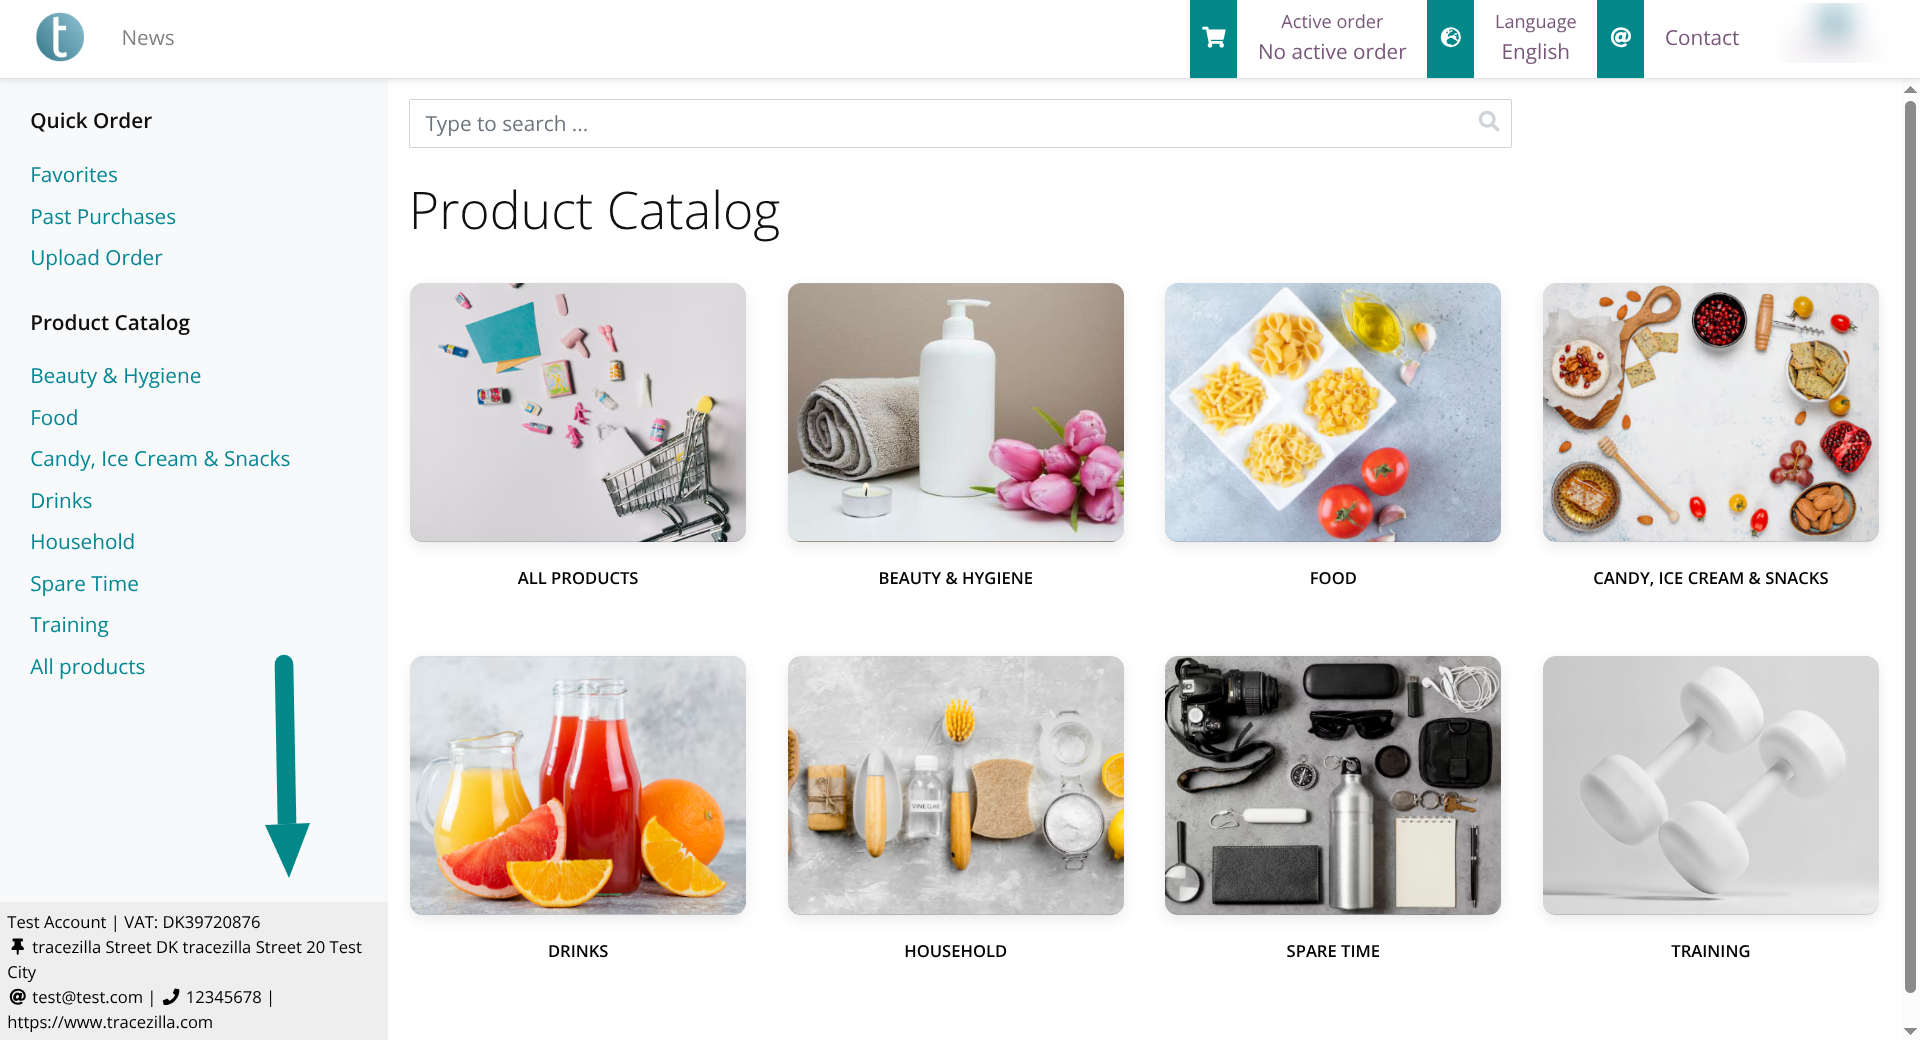
You can choose between two views: Card Grid and Image Grid. Go to Company Settings > B2B Commerce > General Settings > Default Home Page View to select your home page.
Example: Image Grid as Home Page:
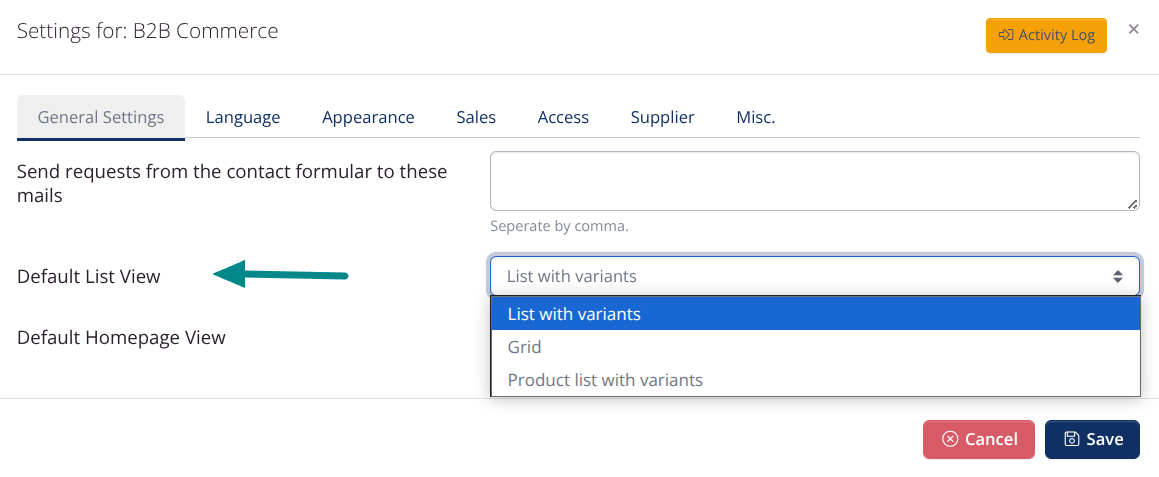
Default Product View
You can choose the default view that you want your customers to see for products. You can choose between List with Variants,Grid and Product list with variants.
Product Access
There are several access settings in Company Settings > B2B Commerce > General Settings > Access.
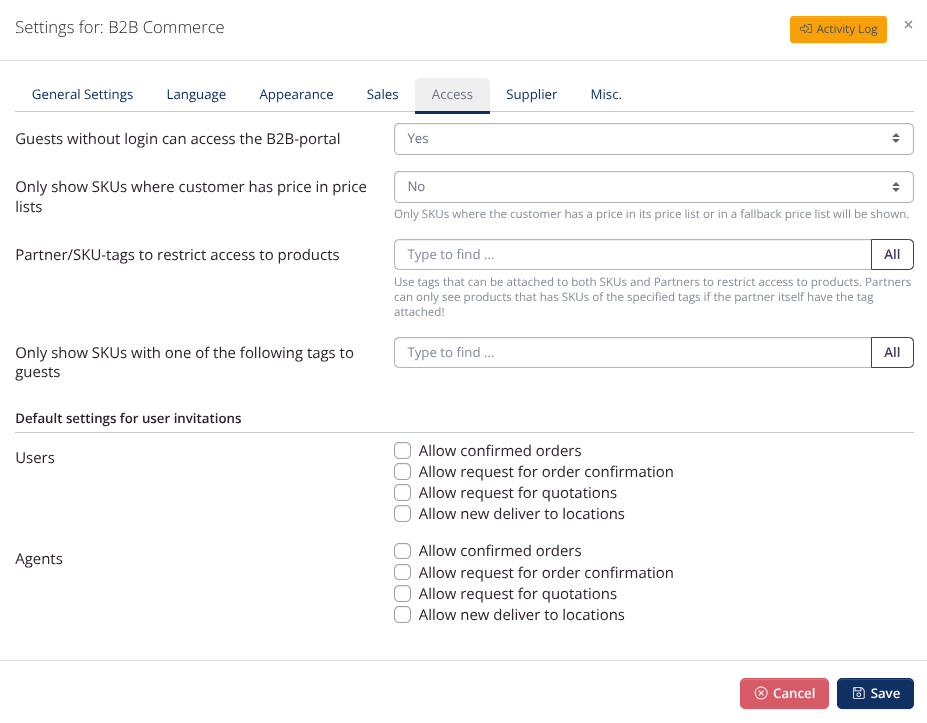
Visitors without login
You can choose to make your webshop available to both logged in users and guests, or only to logged in users.
If you choose to show your products to guests, you can restrict the access further by using a certain tag.
This is done with the setting Only show SKUs with one of the following tags to guests.
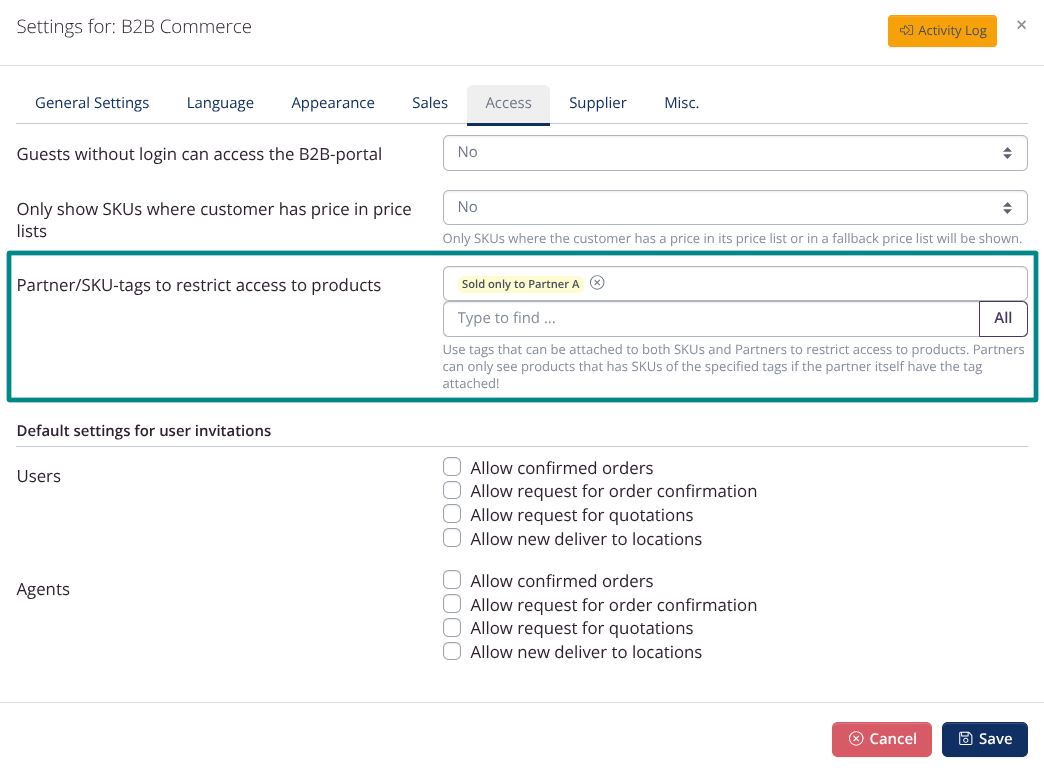
Customer-specific products
With the setting Partner/SKU tags to limit access to products, you can limit your customers’ access to certain products. This is relevant for products that you sell only to certain customers.
Example You sell a specific product group to a certain partner. You should tag both the article and the partner with the tag that you have chosen in the B2B settings. No other partner will see these products in the B2B portal.
Price list based access
If you want your customers to see only those products that have a price in the linked price list or/and reserve price list, you can select Yes in the setting Only show SKUs where the customer has a price in the price list.
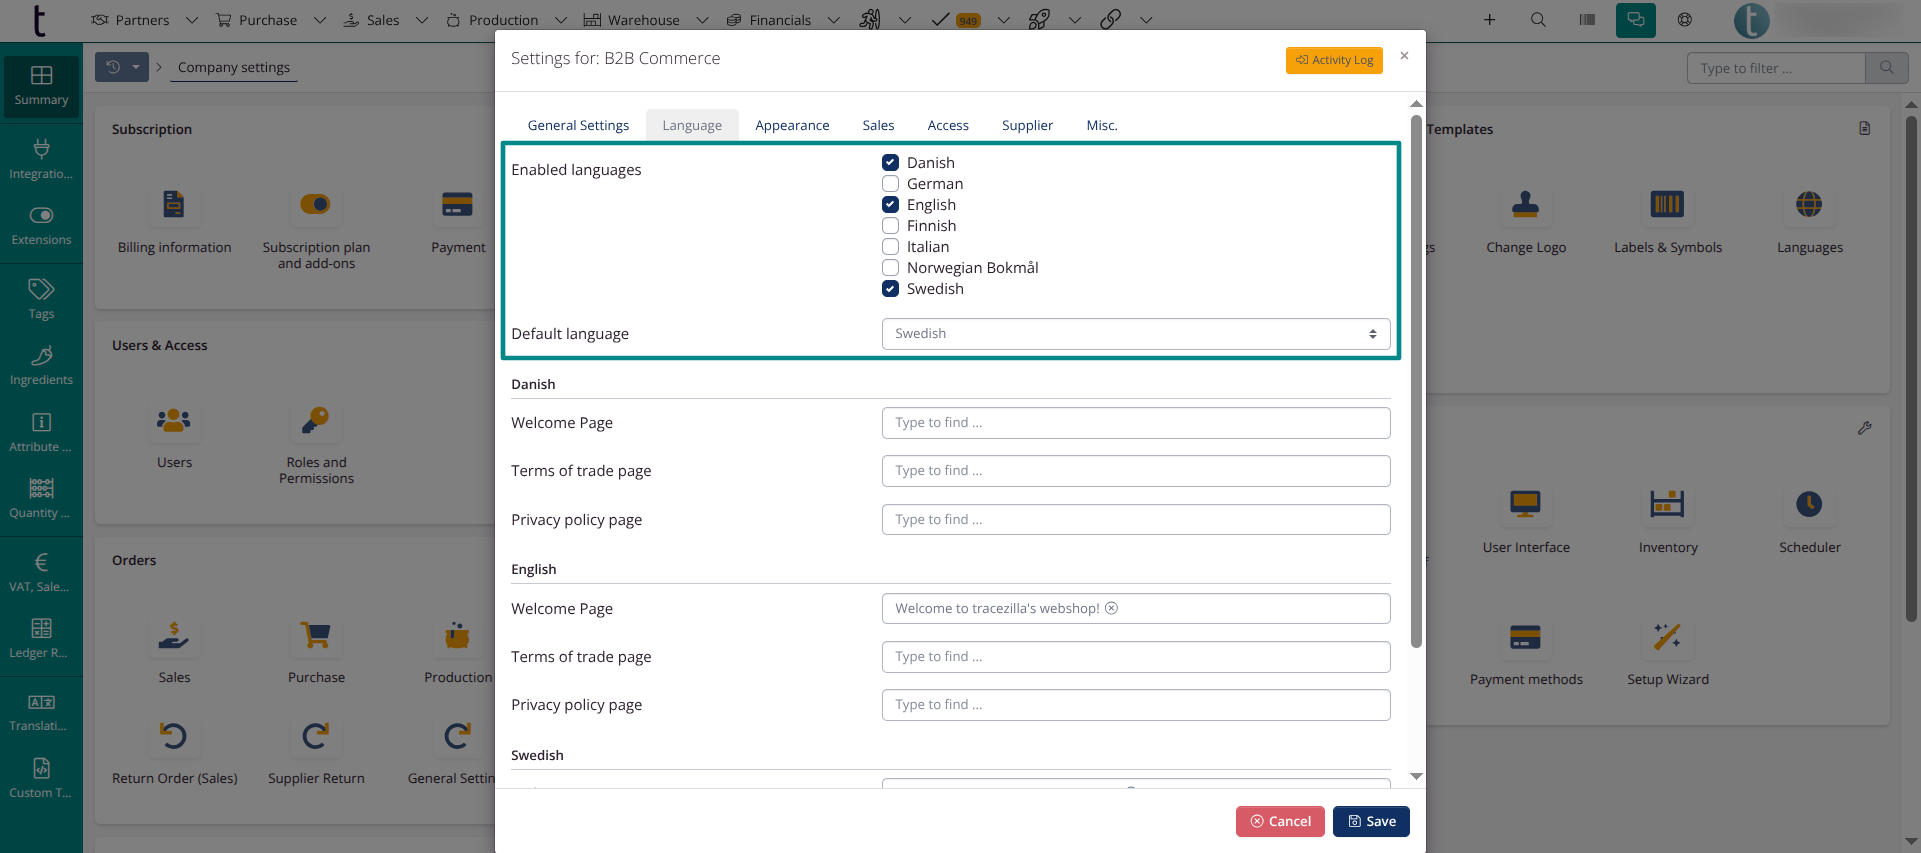
Languages
You can translate all texts, pages, products and product categories into other languages. Before you can do this, you must enable languages. Go to Company settings > B2B Commerce > Languages to enable languages.
Important: You can only enable languages that you have enabled as languages in Company settings > Documents and templates > Languages.
Pages and menu items
You have the option to create pages for your B2B Commerce portal. Examples of pages are terms of purchase, news pages or “About us”.
You can create pages under B2B Commerce > Pages.
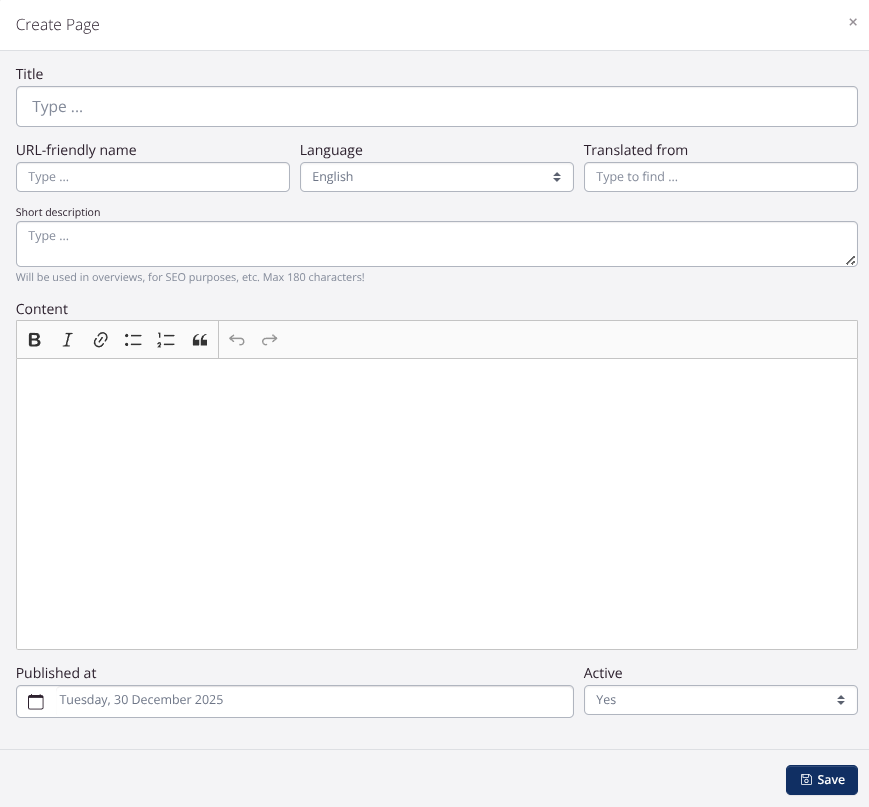
When you create a page, the page will not automatically become visible in your B2B Commerce portal. It must be linked to a menu item first.
- Standard Pages: You have the option to map your welcome page, terms and conditions page and privacy policy under Company Settings > B2B Commerce > Language.
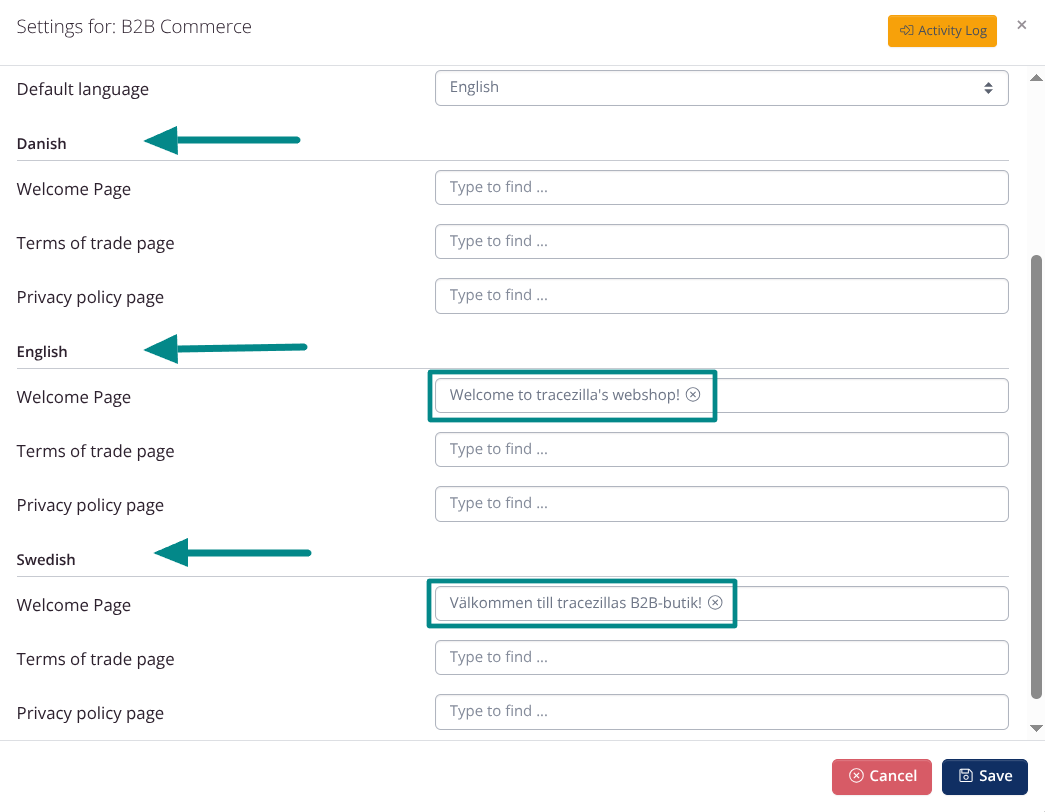
The welcome page is the landing page that your customers see when they have logged in to the portal. The text will be at the top and your product categories below the text.
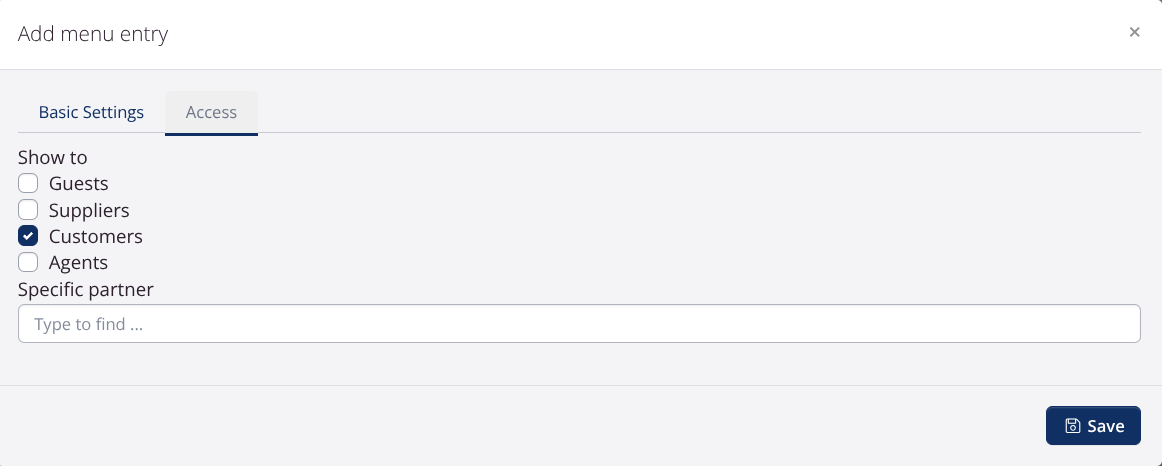
- Custom Menu Items: You also have the option to create your own menu items. You can create menu items under B2B Commerce > Menu by clicking Add Menu Item. In the Link to field, select page if you want to link a specific page to the menu item. For other types of menu items, you can choose from the other options in the list.

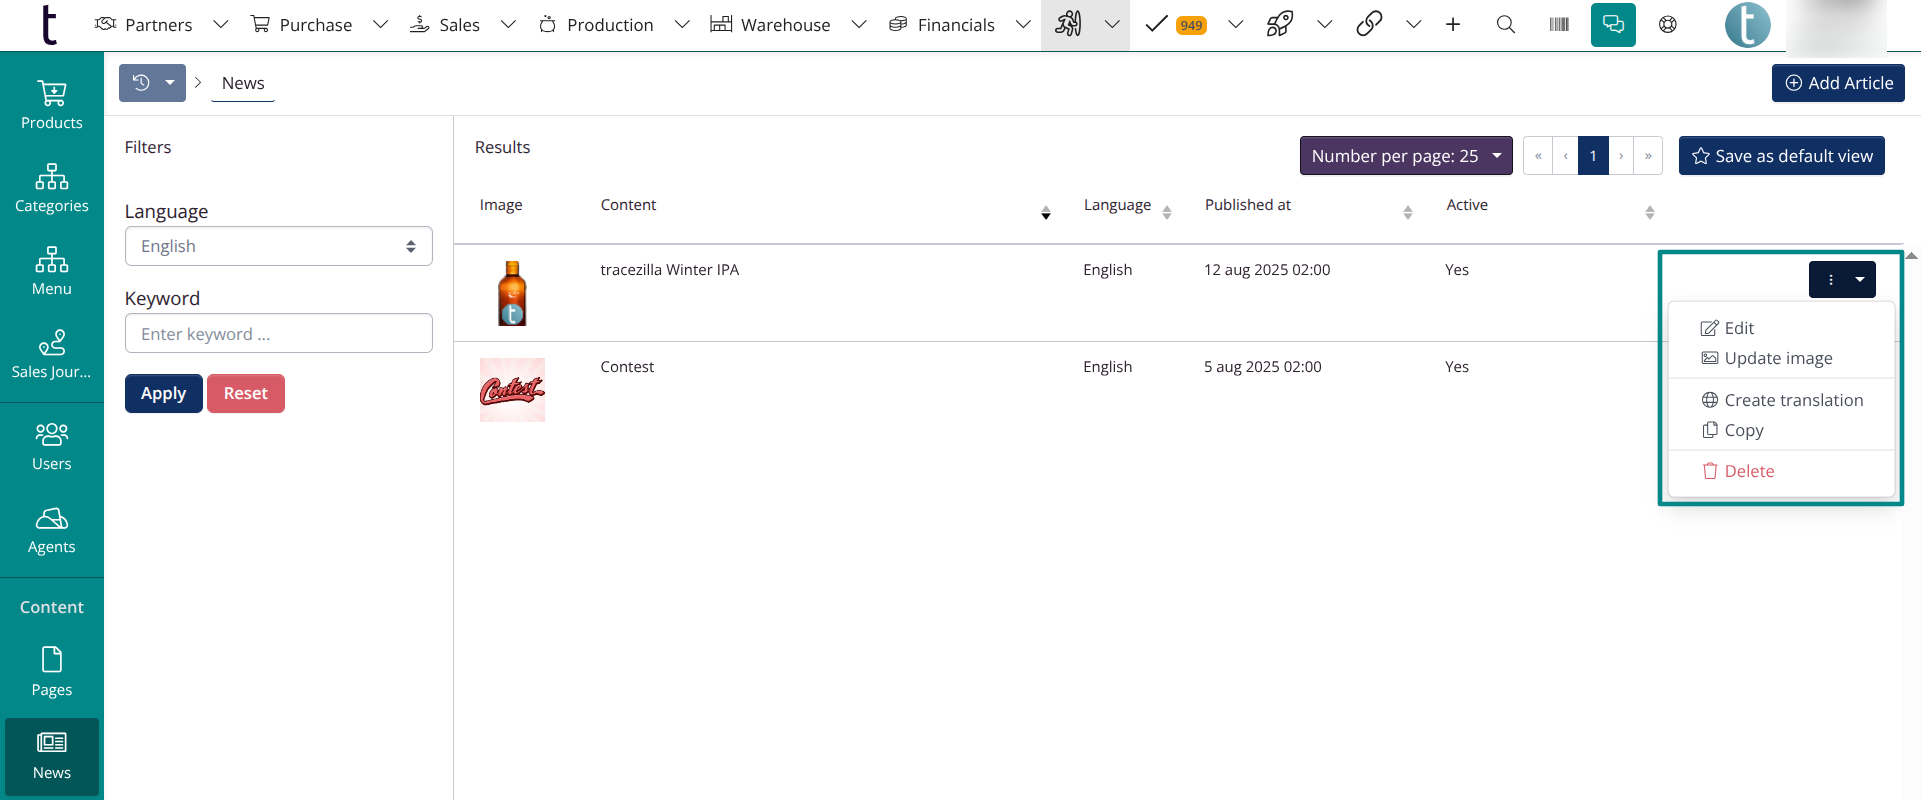
News
You can create news under B2B Commerce > News. In the same way that you connect pages to menu items, you should connect news to a menu item that is set as news index.
You can add an image to your news by clicking the blue button and then Update image.
Dashboards
You, who have Power Pack, can display Power Pack reports and dashboards as menu items. This can be relevant if you want to share quality reports or delivery statistics, for example.
Other
You can also restrict customers’ access to menu items at the partner level. This can be relevant if you want to share dashboards (see the section above) or similar with a specific partner.
Footer
Now you can display a footer in your B2B Commerce webshop.
Delivery times and profiles
Basic settings
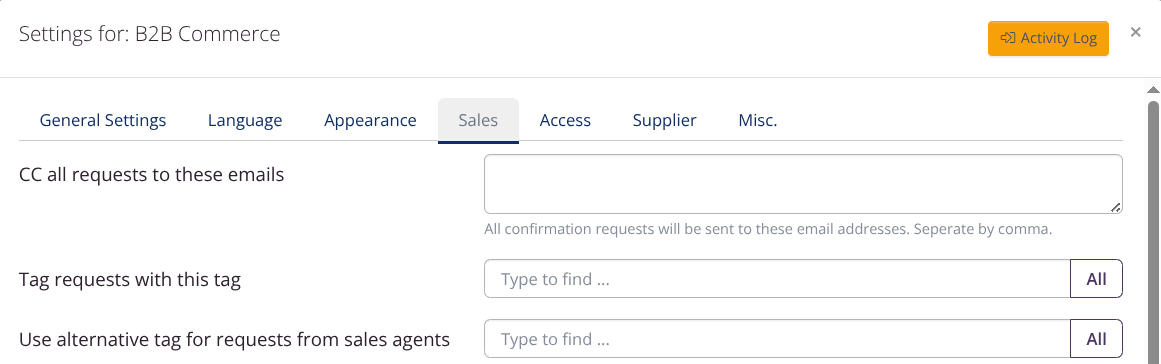
In Company settings > B2B Commerce > Sales you will find basic settings for delivery.
You can, among other things, select the time for the last delivery of the day and check delivery days.

Partners and locations
Locations from your customers’ profiles are used when creating orders in B2B Commerce.
A partner location must be marked as Warehouse (Edit Location > Access > Warehouse) to be used as Delivery Location.
This rule does not apply if the partner only has one location.
Advanced Settings
Integration with Matomo
Matomo is a web analytics tool that makes it easy to collect visitor data on websites. You should copy your Matomo portal URL and ID to the B2B settings in tracezilla. Then, analytics from visitors who have accepted the analytics cookies on your B2B site will be transferred to your company’s Matomo account.
![]()
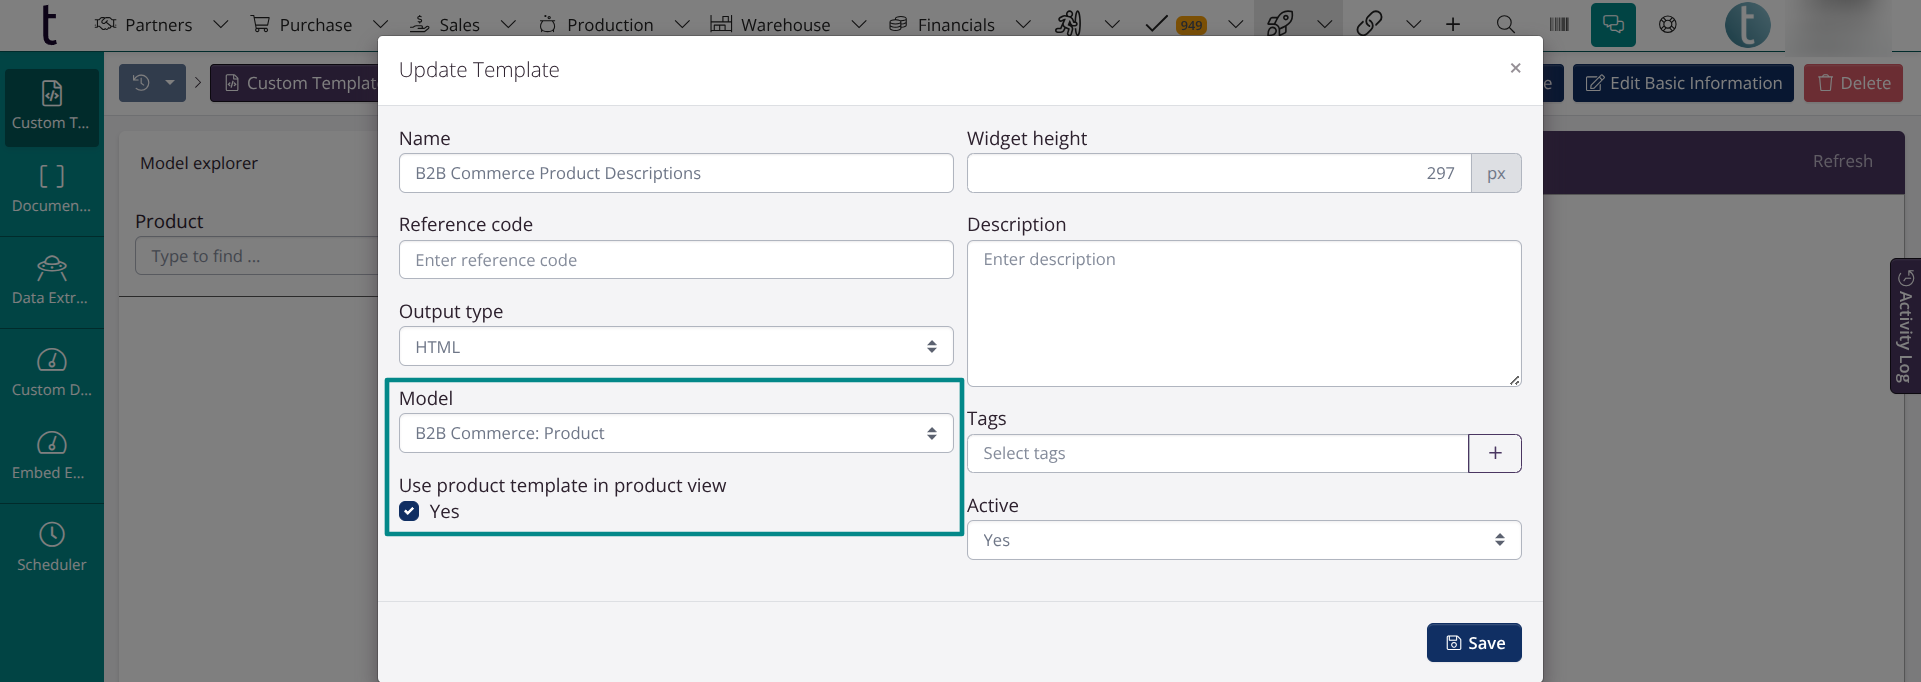
Create product descriptions quickly using Power Pack
If you have Power Pack, you have the option to automate the creation of product texts. To do this, create a document template under Power Pack > Custom Templates. Select B2B Commerce: Product as the model and check Use product template in product view to synchronize texts with your B2B portal.
In the document template, you define which data variables should be displayed on the product pages in B2B Commerce.
You should have basic coding skills to be able to create document templates. You can find technical documentation related to document templates at tracezilla tech.
Add products and product images with Power Pack
It is possible to create products and product images using a scheduler. You must have Power Pack to set up a scheduler.
Good to know
- Users and agents can favorite products in the portal
- Via search
- From product pages
- From the product list view
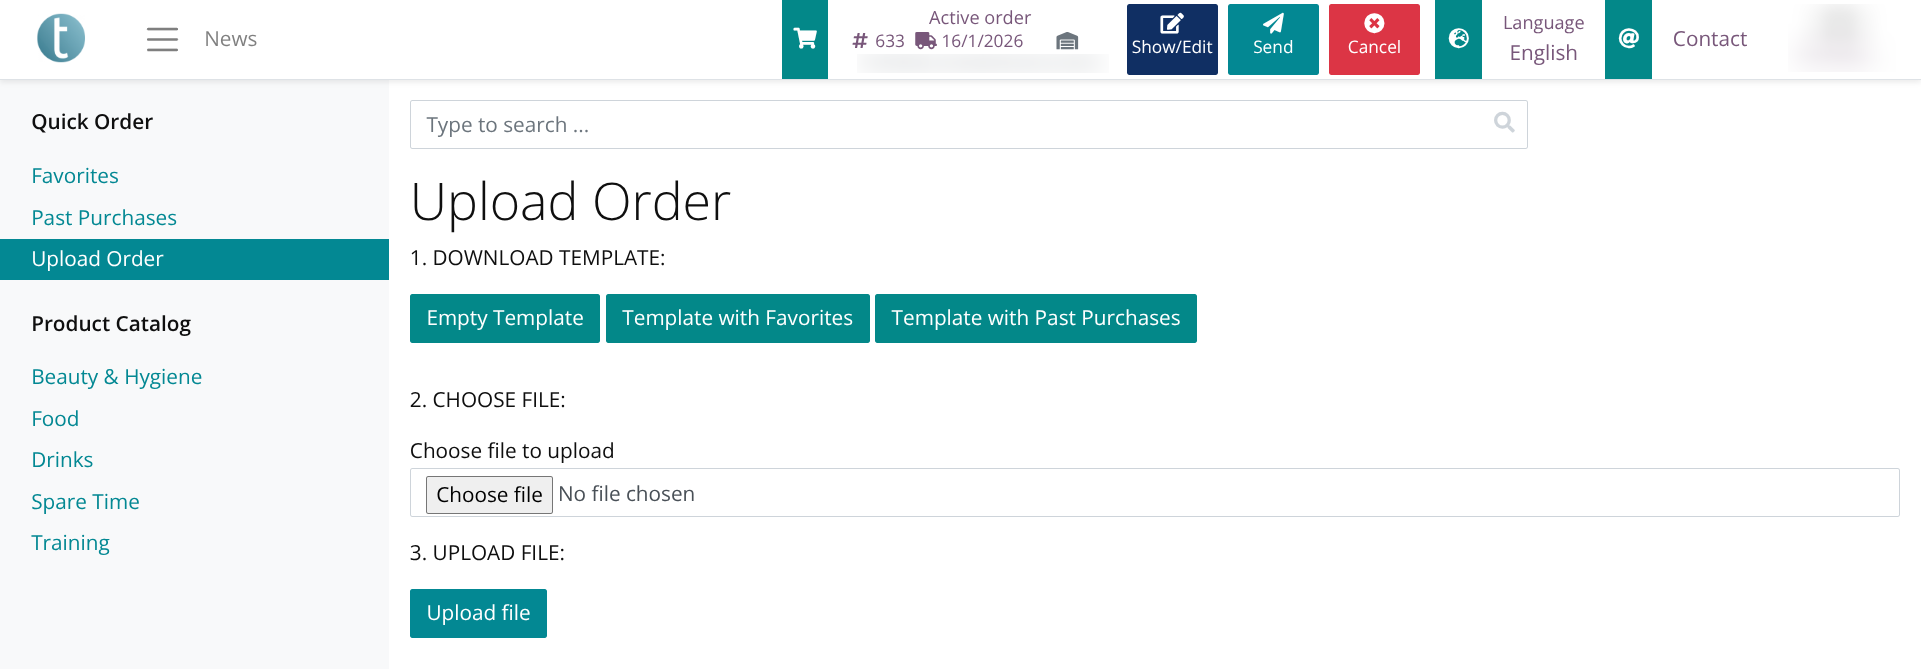
- Users and agents can update a draft order using a template
- Empty template
- Favorites
- Previous purchases